Image adjustments, Optional video output adjustment, Switching operation – Analog Way Graphic Switcher II - GSW2811 Manuel d'utilisation
Page 13
GRAPHIC SWITCHER II™ Chapter 5 : OPERATING MODE (continued)
PAGE 13
5-3. IMAGE ADJUSTMENTS
For each input source connected to the GRAPHIC SWITCHER II
™
, make the following adjustments:
c Select the source you want to adjust.
NOTE: To adjust your source on your PREVIEW monitor : you just have to press on the corresponding INPUT
SELECT key. The key is blinking and the source is displayed on the PREVIEW monitor.
NOTE: To adjust your source on your MAIN display device : press on the corresponding key (the key is blinking)
and press TAKE (the key is ON and the source is displayed on the MAIN display device).
NOTE: If the Pattern is well adjusted on both PREVIEW and MAIN , then the input adjustment can be made on
the PREVIEW or MAIN as well.
d Select the aspect ratio (4/3, letterbox...) of your source (image menu > aspect ratio >...).
e Adjust the vertical and horizontal position (with the front panel "H & V" adjust buttons). The adjustments are
visible on the selected output and their values are displayed in the LCD screen.
NOTE: The MAIN and PREVIEW LED'S indicate on which output the adjustment will be performed. To change
the output, presses on the MAIN/PREVIEW button.
NOTE: To adjust the SIZE, presses the POS/SIZE button and adjust with the "H & V" adjust buttons. The selected
mode (POS or SIZE) is displayed on the LCD screen.
f Press on the STORE button for 2 seconds until the LED flashes once to memorize the position & size adjustments.
NOTE: The GRAPHIC SWITCHER II
™
is provided with 40 NON-volatile image memories. Each of these
memories contains the input channel number, the input and output format parameters and all of the image
adjustments. When the 40 memories are used, each new memorization erases the oldest memory.
g If needed, make the others adjustments, available in the LCD image menu (color, brightness, image process…).
Validate each adjustment with ENTER.
NOTE: To erase the image adjustments, use the Preset function (image menu > preset).
5-4. OPTIONAL VIDEO OUTPUT ADJUSTMENT
c Select the video "output rate" (outputs menu > video output > output rate >...).
d Select the output standard (outputs menu > video output > video standard > NTSC or PAL).
e Select the zoom mode (outputs menu > video output > U/Over scan > underscan or overscan).
f Select a level of anti-flicker (outputs menu > video output > flicker adj. >...).
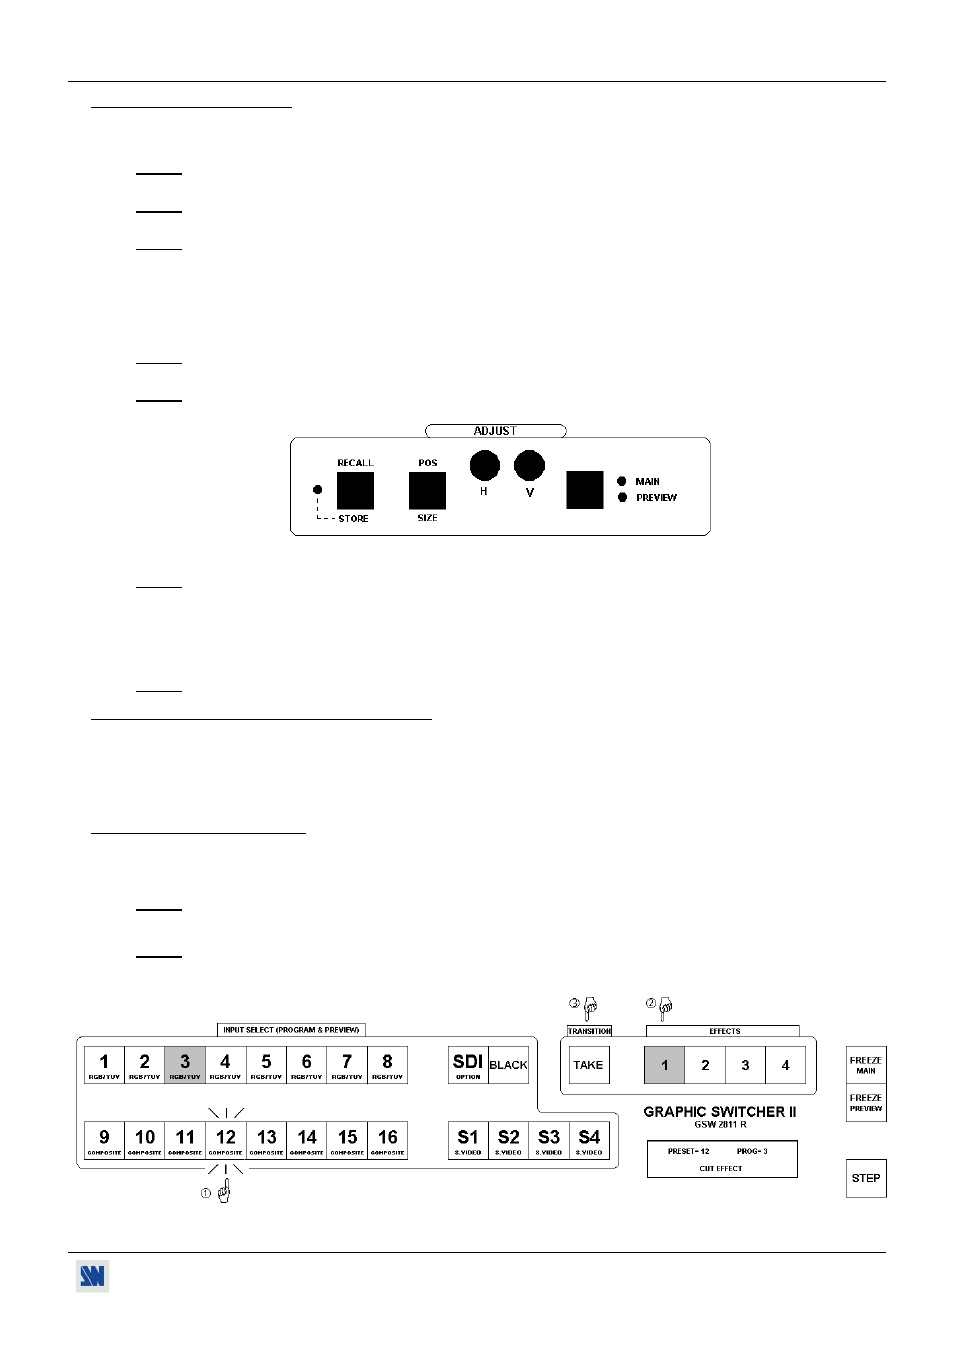
5-5. SWITCHING OPERATION
c Pre-select an input on the input select bus (KEY blinking).
d Select a TRANSITION effect on the 1 to 4 EFFECTS keys.
NOTE: The effect stored in the selected EFFECT key is displayed on the LCD screen.
e Press on TAKE. The pre-selected input is displayed on the MAIN output with the selected effect transition.
NOTE: According to the selected effect the TAKE key may turn ON or blink during the transition. When the
TAKE key is turned ON you should wait for the end of the transition before doing another selection. When
the TAKE key is blinking, then you should press the TAKE key to stop the transition.