Quick start guide - ultra vio, Connections, Settings – Analog Way Ultra VIO - VU301-IOD1 Manuel d'utilisation
Page 6
QUICK START GUIDE - ULTRA VIO
TM
ANALOG WAY
EDITION : 06/05
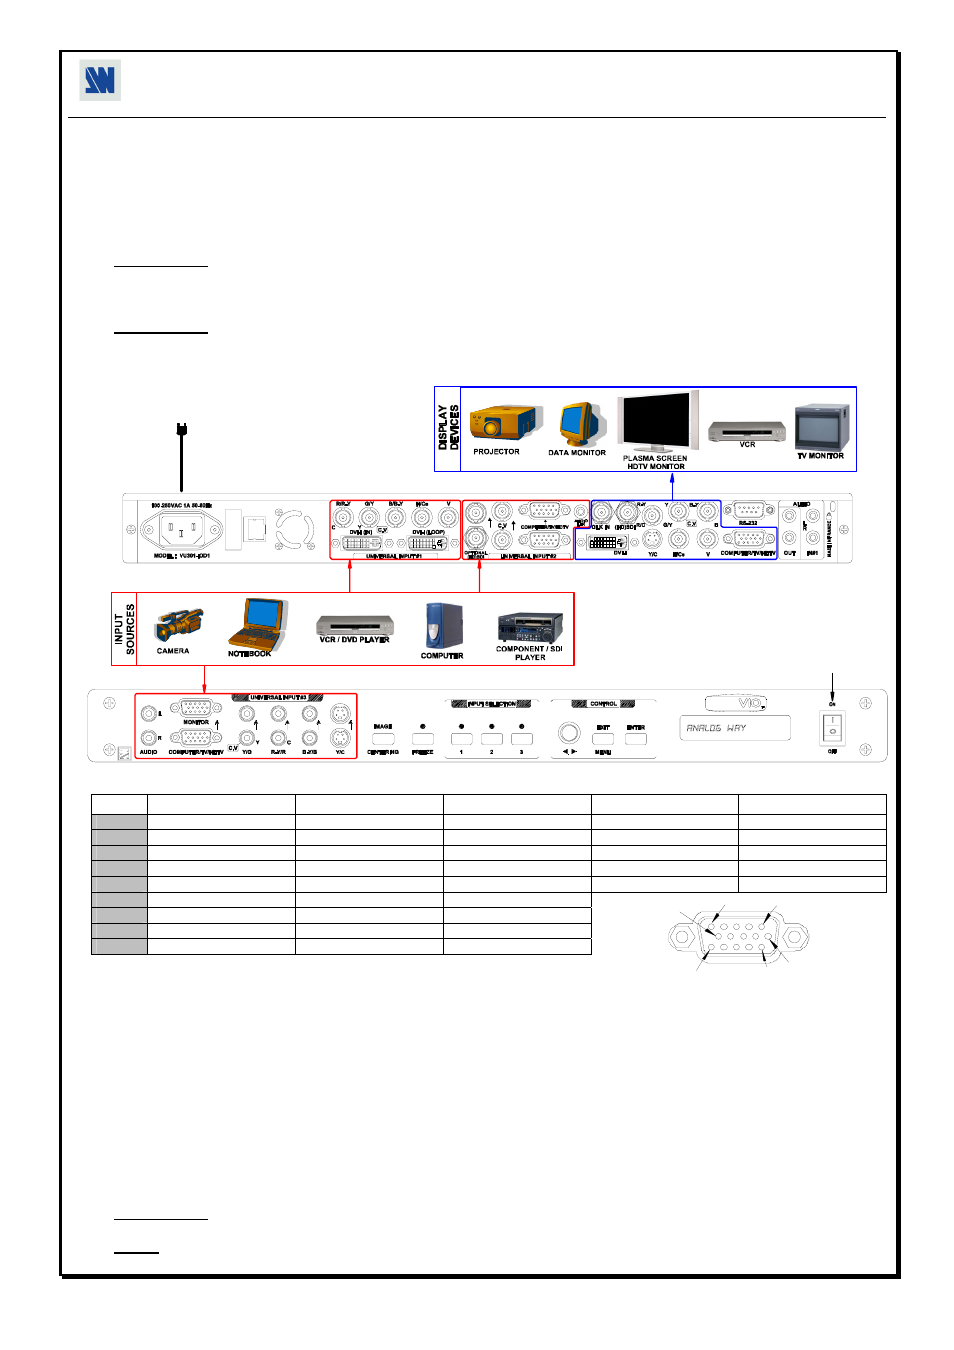
CONNECTIONS:
c Turn OFF all of your equipment before connecting.
d Connect the AC power supply cord to the ULTRA VIO and to an AC power outlet.
e Connect your computer & video sources to the 3 universal inputs of the ULTRA VIO.
- If you need to connect a digital computer source, use the input #1 (DVI-I IN connector).
- If you need to connect a SDI or HDSDI video source, use the input #2.
- Connect your others sources to the unused inputs.
IMPORTANT: Connect only one source by input.
f Connect your Hi-Resolution display device (projector, plasma screen...) to the HD15 or BNC connectors, or connect your video
display device (TV, VCR...) to the C.V, Y/C or RGB connectors, or connect your DVI display device to the DVI-I connector, or
connect your digital display device to the (HD)SDI BNC connector.
IMPORTANT: Connect only one display device to the output.
g Turn ON the ULTRA VIO (front panel switch). Then turn ON all your input sources, and then your display device.
• ULTRA VIO connection diagram:
OUTPUTS
ANALOG W
AY
Versatile Converter
S
/N
IP/L
A
N
4
3
3
3
2
5
ULTRA
• HD15 connector pin assignment (inputs #2 & #3 - input #1 with the DVI/HD15 adaptor)
:
SIGNAL COMPUTER (analog)
RGB/S VIDEO
YUV & HDTV (analog)
S.VIDEO (Y/C)
COMPOSITE VIDEO
PIN 1
RED.
RED.
Cr / Pr.
C (chrominance).
PIN 2
GREEN.
GREEN.
Y.
Y (luminance).
VIDEO (NTSC, PAL...)
PIN 3
BLUE.
BLUE.
Cb / Pb.
PIN 6
RED return.
RED return.
Cr / Pr return.
C return.
PIN 7
GREEN return.
GREEN return.
Y return.
Y return.
return.
PIN 8
BLUE return.
BLUE return.
Cb / Pb return.
PIN 10
GND.
GND.
PIN 13
H sync or C sync (S).
C sync (S).
PIN 14
V sync.
SETTINGS:
c We recommend resetting the ULTRA VIO device to all of its default values, with the front panel display menu (CONTROL >
default value > yes) before proceeding.
d Select the input type connected to the INPUTS with the front panel display menu (INPUT > input type).
e Select the output type & format which corresponds to your display with the front panel display menu (OUTPUT > output type).
f Select one of the output rate available with the front panel display menu (OUTPUT > output rate).
g For computer source, select the output sync type with the front panel display menu (OUTPUT > output sync).
h Display the grid pattern with the front panel display menu (OUTPUT > test pattern > grid), and display a black output.
i Adjust directly the display device itself, using its position and size controls, to fill the grid pattern in full screen.
j Display the centering pattern (OUTPUT > test pattern > centering).
k For each input source connected to the ULTRA VIO, make the following adjustments:
- Select the source you want to adjust (with the front panel "INPUT SELECTION" buttons).
- Select the aspect ratio of your input source with the front panel display menu (IMAGE > aspect ratio in).
- Press the Image Centering front panel button to automatically position the image in the Centering pattern.
IMPORTANT: For best results, display a full size bright image (no black border) to perform a centering. If necessary, correct the
adjustment with the position & size functions (IMAGE > pos settings).
NOTE: The centering function is only available for computer sources.
- If needed, make the others adjustments, available in the IMAGE menu (color, brightness…).
5
6
1
15
10
11