Assembly preparation, Assembly instructions, English – Louisiana Grills Black Label Series 57 Inch Freestanding Smart Wood Pellet Grill Assembly Guide Manuel d'utilisation
Page 3
www.louisiana-grills.com
3
ENGLISH
ENGLISH
ASSEMBLY PREPARATION
MAJOR CAUSES OF APPLIANCE FIRES ARE A RESULT OF POOR MAINTENANCE AND A FAILURE TO MAINTAIN
REQUIRED CLEARANCE TO COMBUSTIBLE MATERIALS. IT IS OF UTMOST IMPORTANCE THAT THIS PRODUCT BE
USED ONLY IN ACCORDANCE WITH THE FOLLOWING INSTRUCTIONS.
Parts are located throughout the shipping carton, including below the grill. Inspect the grill, parts, and hardware blister pack after removing from the
protective shipping carton. Discard all packaging materials from inside and outside of the grill before assembly, then review and inspect all parts by
referencing the parts list. If any part is missing or damaged, do not attempt to assemble. Shipping damage is not covered under warranty. Contact
Customer Care for parts.
WWW.LOUISIANA-GRILLS.COM | USA: (480) 923-9632 | CANADA (TOLL FREE): 1-877-942-2246
IMPORTANT: TO EASE INSTALLATION, USING TWO PEOPLE IS HELPFUL (BUT NOT NECESSARY) WHEN ASSEMBLING THIS UNIT.
Tools required for assembly: screwdriver. Tool not included.
ASSEMBLING THE CART
PARTS REQUIRED:
1
x
Bottom Shelf (#17)
2
x
Support Leg A (#18)
2
x
Support Leg B (#19)
8
x
Screw (#A)
8
x
Washer (#C)
8
x
Locking Washer (#D)
INSTALLATION:
•
Place a piece of cardboard on the floor to prevent scratching the unit and
parts. To ease installation, turn the bottom shelf upside-down (flat side down).
•
Prepare the four Support Legs for installation, arranging the labelled legs as
shown in illustration. Mount one Support Leg to the Bottom Shelf using two
Washers, Locking Washers, and Screws.
•
Repeat the same installation for the remaining three Support Legs into the
Bottom Shelf.
ASSEMBLY INSTRUCTIONS
IMPORTANT: IT IS ADVISED TO READ EACH STEP ENTIRELY BEFORE STARTING ASSEMBLY ON INSTRUCTIONS. DO
NOT TIGHTEN SCREWS COMPLETELY UNTIL ALL SCREWS FOR THAT STEP HAVE BEEN INSTALLED. HARDWARE
COMBINATION INVOLVING A LOCKING WASHER AND WASHER SHOULD BE INSTALLED WITH THE LOCKING
WASHER CLOSEST TO THE HEAD OF THE SCREW.
A
8x
C D
8x 8x
A
C D
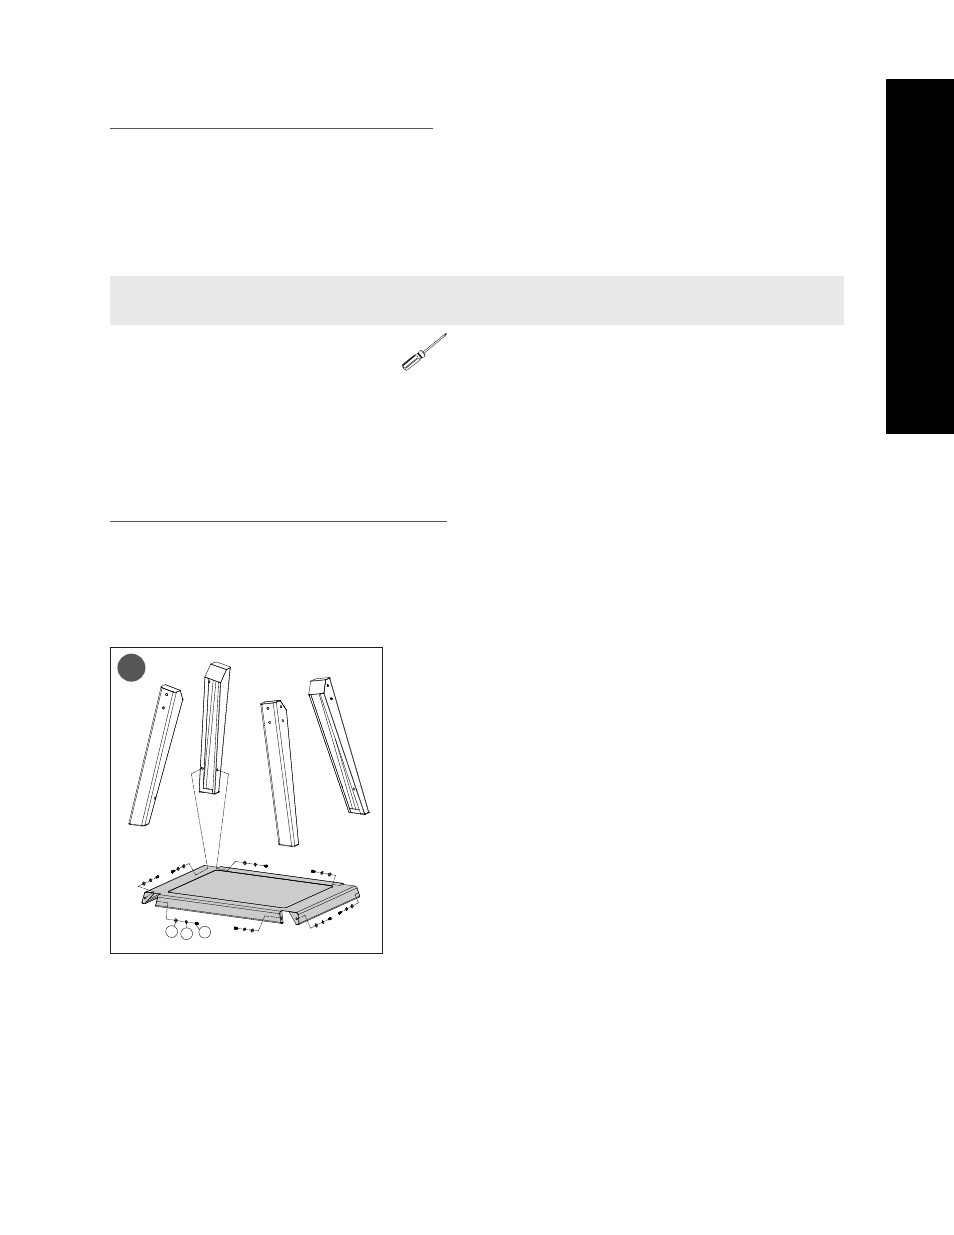
1.ASSEMBLING THE CART
1 x Bottom Shelf (#2)
2 x Support Leg (#3)
2 x Support Leg (#4)
8 x 1/4-20x5/8" Screw (#A)
8 x 1/4
washer
(#C)
8 x 1/4
spring washer
(#D)
Place a piece of cardboard on the floor to prevent scratching the unit and parts. To ease
installation, turn the bottom shelf upside-down (flat side down). Prepare the four support legs
for installation, arranging the labelled legs as shown in illustration.
Mount one support leg to the Bottom Shelf using two screws,two washer,two
spring washer. Repeat installation for the other three support legs.
1
19
17
18
18
19