Esp añol esp añol, Montaje de las ruedas en el carrito, Instalación del carrito en el tambor principal – Louisiana Grills Black Label Series 57 Inch Freestanding Smart Wood Pellet Grill Assembly Guide Manuel d'utilisation
Page 16: Instalación de los soportes del estante delantero
LOUISIANA GRILLS
16
ESP
AÑOL
ESP
AÑOL
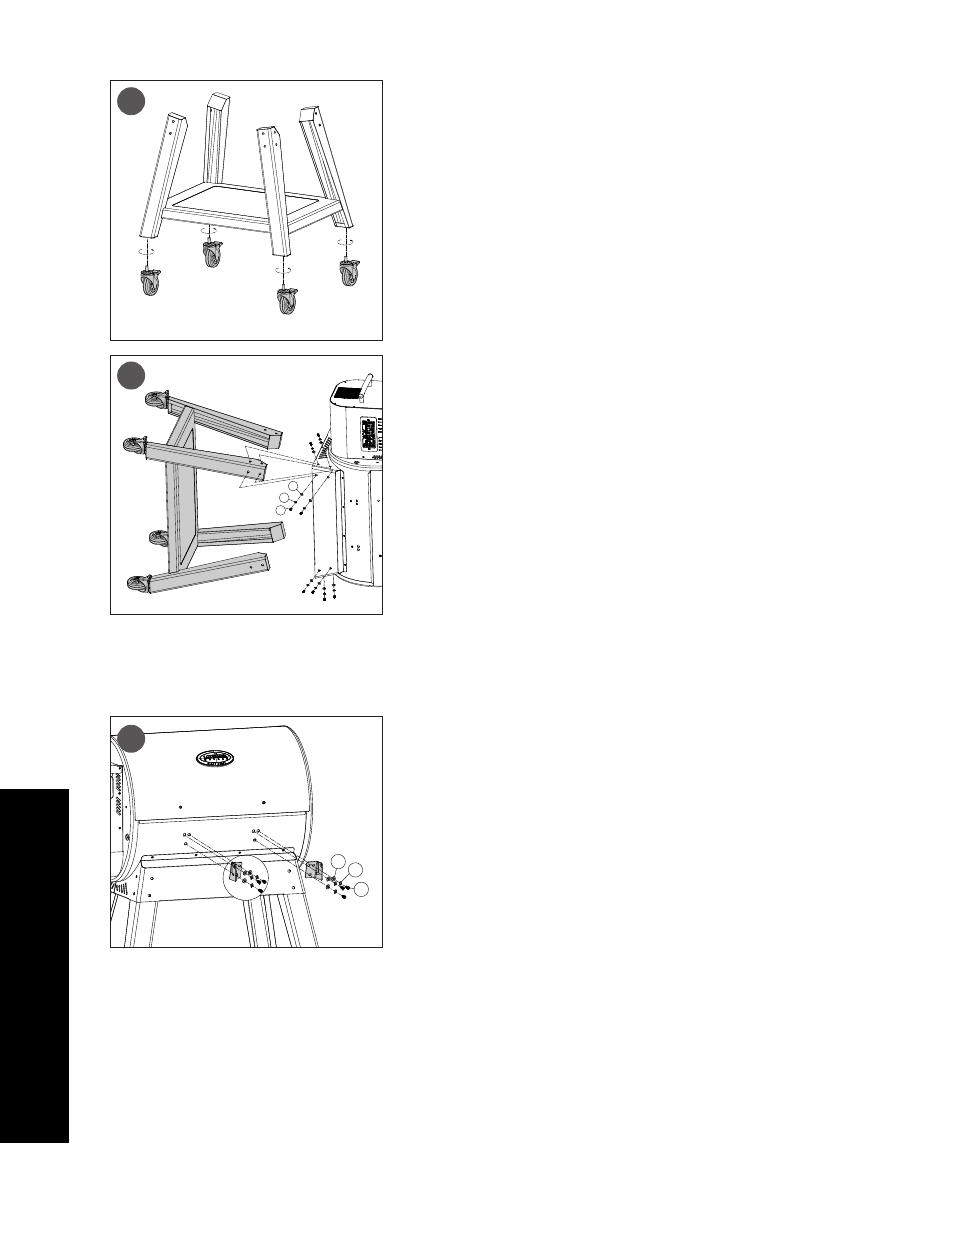
MONTAJE DE LAS RUEDAS EN EL CARRITO
PIEZAS NECESARIAS:
4
x
Rueda pivotante de cierre (#20)
INSTALACIÓN:
•
Inserte cada rueda pivotante bloqueable en la parte inferior de cada pata
de soporte, ajustándola a mano en el orificio. Asegúrese de que cada rueda
pivotante bloqueable haya quedado totalmente insertada, de forma que
el carro quede bien nivelado respecto al suelo. Bloquee todas las ruedas
pivotantes.
INSTALACIÓN DEL CARRITO EN EL TAMBOR
PRINCIPAL
PIEZAS NECESARIAS:
1
x
Conjunto de tambor principal (#5)
16
x
Tornillo (#A)
16
x
Arandela (#C)
16
x
Arandela de retención (#D)
INSTALACIÓN:
•
Inserte el carro montado en el soporte del tambor principal. Sujete cada una
de las patas al soporte utilizando cuatro arandelas, arandelas de retención y
tornillos.
CONSEJO: PARA QUE ESTE PASO DEL MONTAJE LE RESULTE MÁS FÁCIL, USE
UNA MESA BAJA.
•
Repita el mismo paso para montar el resto de las patas al soporte del tambor
principal.
CONSEJO: PARA FACILITAR EL MONTAJE DEL ÚLTIMO LADO, COLOQUE LA
UNIDAD CON CUIDADO APOYÁNDOLA SOBRE LA PARTE POSTERIOR Y APRIETE
LOS ÚLTIMOS CUATRO TORNILLOS DEL SOPORTE DEL TAMBOR PRINCIPAL.
•
Una vez que el carro esté bien atornillado, ponga la barbacoa de pie con
cuidado.
INSTALACIÓN DE LOS SOPORTES DEL
ESTANTE DELANTERO
PIEZAS NECESARIAS:
1
x
Soporte del estante delantero / izquierdo (#15)
1
x
Soporte del estante delantero / derecho (#16)
6
x
Tornillo (#A)
6
x
Arandela (#C)
6
x
Arandela de retención (#D)
INSTALACIÓN:
•
Atornille uno de los soportes del estante delantero a la parte delantera del
tambor principal con tres arandelas, arandelas de retención y tornillos.
Observe la ilustración para montarlo correctamente.
•
Repita la misma operación con el otro soporte del estante delantero.
2.MOUNTING THE WHEELS TO THE CART
4 x Locking Caster Wheel (#5)
Insert each locking caster wheel into the bottom of each support leg by hand-tightening into
the hole. Ensure the locking caster wheel is inserted completely.
A
16x
C D
16x 16x
A
D
C
3.INSTALLING THE CART TO THE BARREL
1 x Main Barrel (#1)
16x 1/4-20x5/8" Screw (#A)
16x 1/4
washer
(#C)
16x 1/4
spring washer
(#D)
Find a low table and place cardboard on it. Lay the main barrel on its side, hopper end pointed
upward, on the prepared low table. Note illustration.
Insert the assembled cart into the main barrel brace, and secure each leg to the brace using
four washers,
spring washer
and screws. Repeat same installation for the other three
support legs. Note illustration To ease installation of the final side, carefully turn the grill to lie
on its back to secure the last four screws to the main barrel brace.
A
A
6x
C D
6x 6x
C D
4.INSTALLING THE FRONT SHELF BRACKETS
1x Front Shelf Bracket /L (#6)
6x Front Shelf Bracket /R (#7)
6x 1/4-20x5/8" Screw (#A)
6x 1/4
washer
(#C)
6x 1/4
spring washer
(#D)
Attach one front shelf bracket to the front of the grill barrel by using three screws.
Install each screw half-way , then tighten completely when all three screws are mounted and
aligned properly.
Repeat the same installation for the other front shelf bracket.
2
3
4
20
20
20
20
5
16
15