English, Securing the lid stopper, Installing the hopper to the barrel – Pit Boss 40 Inch Freestanding Wood Pellet Grill Owners Manual Manuel d'utilisation
Page 9
ENGLISH
9
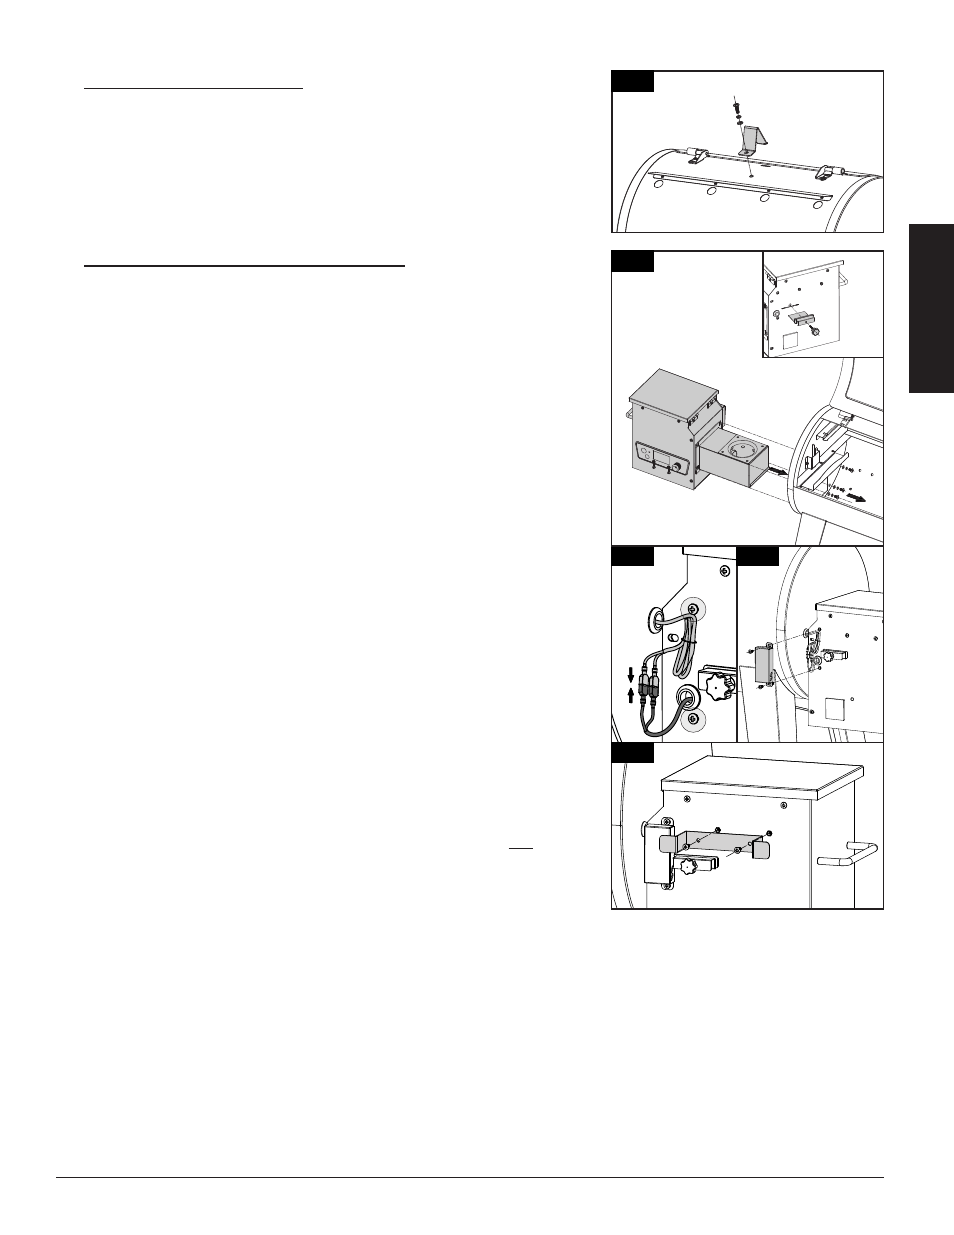
5. SECURING THE LID STOPPER
Parts Required:
1 x Lid Stopper (#5)
Installation:
• Secure the Lid Stopper onto the top of the Main Barrel using the
pre-installed hardware on top of the Main Barrel.
6. INSTALLING THE HOPPER TO THE BARREL
Parts Required:
1 x Power Cord Bracket (#1)
1 x Probe Wire Casing (#2)
1 x Hopper Assembly (#10)
1 x Plate Screw (#11)
1 x Drop Chute Plate (#12)
4 x Screw (#A)
4 x Washer (#B)
4 x Locking Washer (#C)
Installation:
• Secure the Plate Screw to the Drop Chute Plate, and insert into the
horizontal slit on the rear side of the hopper.
• Align the Burn Pot end of the Hopper Assembly into the opening on
the left side of the Main Barrel. Insert half-way, then carefully slide
the Hopper Assembly completely into the opening. Secure the Hopper
Assembly to the Main Barrel, from the inside, using four screws,
locking washers, and washers.
Take care not to over-tighten to
avoid stripping the screws.
Note illustration 6A.
• On the rear side of the hopper, connect the silver Grill Probe
temperature wires – extruding from the Main Barrel – to the wire
connections from the rear of the Hopper Assembly. Note 6B. Remove
the two pre-mounted screws. Tuck the excess wire into the Probe Wire
Casing, placing the wire distinctly in the divet along the edge to avoid
pinching. Next, secure the Probe Wire Casing to the hopper using the
two screws previously removed. Note 6C.
IMPORTANT: Ensure the Grill Probe temperature wires do not get
pinched. Damage to the Grill Probe temperatures wires may result in
incorrect readings, or inability to funtion.
• Secure the Power Cord Bracket using the two screws pre-installed
on the rear side of the hopper, above the Drop Chute Plate. Note
illustration 6D.
6B
6C
2
6D
1
6A
10
REAR
VIEW
11
12
5
5