页面 24, T v setup, Setup menu – Curtis RLC4033A Manuel d'utilisation
Page 24: How to navigate
T V SETUP
SETUP MENU
Setup
Setup
12
6
Tim e
Picture
Audio
Clock
Phase
Auto
Move
Adjust
Exit
MENU
50
50
50
0
H - pos
V - pos
Setup
12
6
Tim e
Picture
Audio
Clock
Phase
Auto
Move
Adjust
Exit
MENU
50
50
50
0
H - pos
V - pos
Setup
12
6
Tim e
Picture
Audio
Clock
Phase
Auto
Move
Adjust
Exit
MENU
50
50
50
0
H - pos
V - pos
Setup
12
6
Tim e
Picture
Audio
Clock
Phase
Auto
Move Next
Exit
MENU
50
50
50
0
H - pos
V - pos
Are you sure ?
No
Yes
Lock
12
6
Time
Channel
Menu Language
Transparency
Zoom Mode
Noise Reduction
Advance
Close Caption
XVS
Restore Default
English
Move Select Exit
MENU
Picture
Off
Normal
Off
Setup
Audio
On
12
6
Time
Menu Language
Transparency
Zoom Mode
Noise Reduction
Advance
Close Caption
XVS
Restore Default
English
Move Select Exit
MENU
Picture
Off
Normal
Off
Setup
Audio
On
Setup
12
6
Tim e
Picture
Audio
Clock
Phase
Auto
Move
Adjust
Exit
MENU
50
50
50
0
H - pos
V - pos
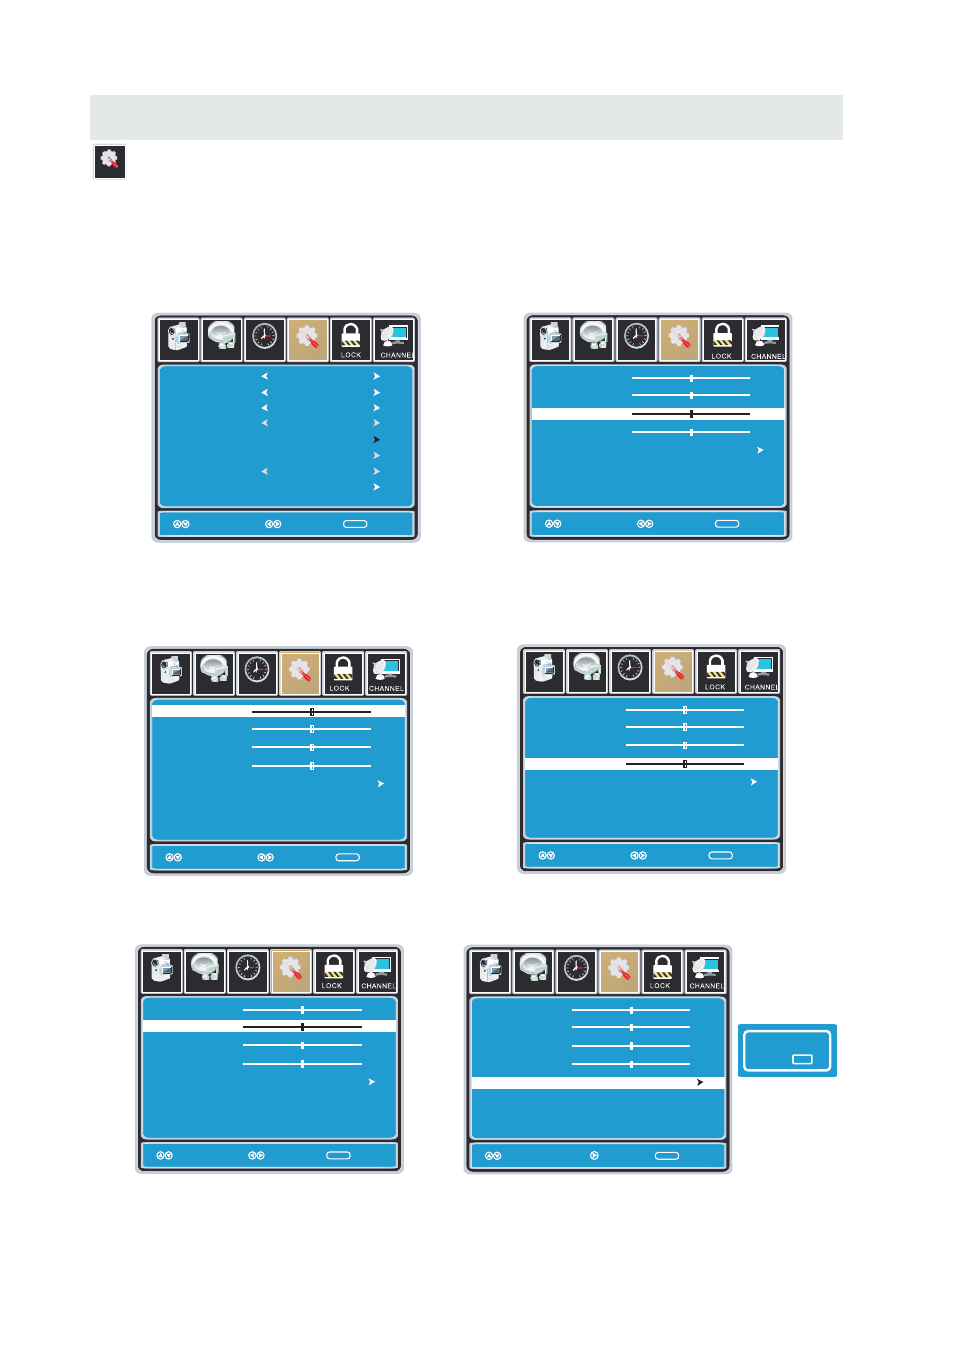
In the SETUP menu you may adjust the position of images displayed on screen once you connect
an input signal from your PC. Recommended resolution is 1920 x 1080.
If your PC system uses a standard signal mode, the screen will adjust automatically.
Connect an optional 3.5mm audio cable for stereo sound.
How to Navigate:
After connecting to a PC, press the SOURCE button and highlight VGA, then press the ENTER
button.
Press the MENU button on the remote control
and navigate using the ◄► buttons to select
SETUP. Press the ▼ button to highlight
Advanced, then press the ►button to select
from the following options.
Use the ▼ button to highlight Clock.
Navigate using the ◄► buttons to control the
width of the image.
Use the ▼ button to highlight H-POS.
Navigate using the ◄► but tons to adjust the
position of images displayed from side to side.
Use the ▼ button to highlight Phase.
Navigate using the ◄► buttons to improve focus
and image stability.
When
prompted,
Select "Yes"
to confirm.
Use the ▼ button to highlight V-POS.
Navigate using the ◄► buttons to adjust the
position of images displayed up and down.
Use the ▼ button to highlight AUTO.
Press the ► button to automatically adjust the
display to the best setting.
21
- LED2415A LED1526A LED1337A LCD4062A LCD3708A LCD3227A LCD2425A LCD1908A LCD1933A LCD3235A LCDVD2440A LEDVD1339A LEDVD2480A LEDVD2479A LEDVD2480B LCDVD199A LCD4077A LCD4620A LCD4686A LCD4686A-W LCDVD322A LCDVD326A PLCD3271A PLCD3273A-B PLCD3271A-C PLCD4692A PLDED3996A-C2 PLCDV3213A PLCDV3247A-C RLC3209A RLC3255A-B PLDV321300 RLC4062A RLC4686 RLC4688A RLC3708A RLC3273A-B RLC4688A-B RLCVD2480A RLED3219A