Fig. a fig. b – MAAX ASTM-1P/3P Manuel d'utilisation
Page 6
6
10049444 0504
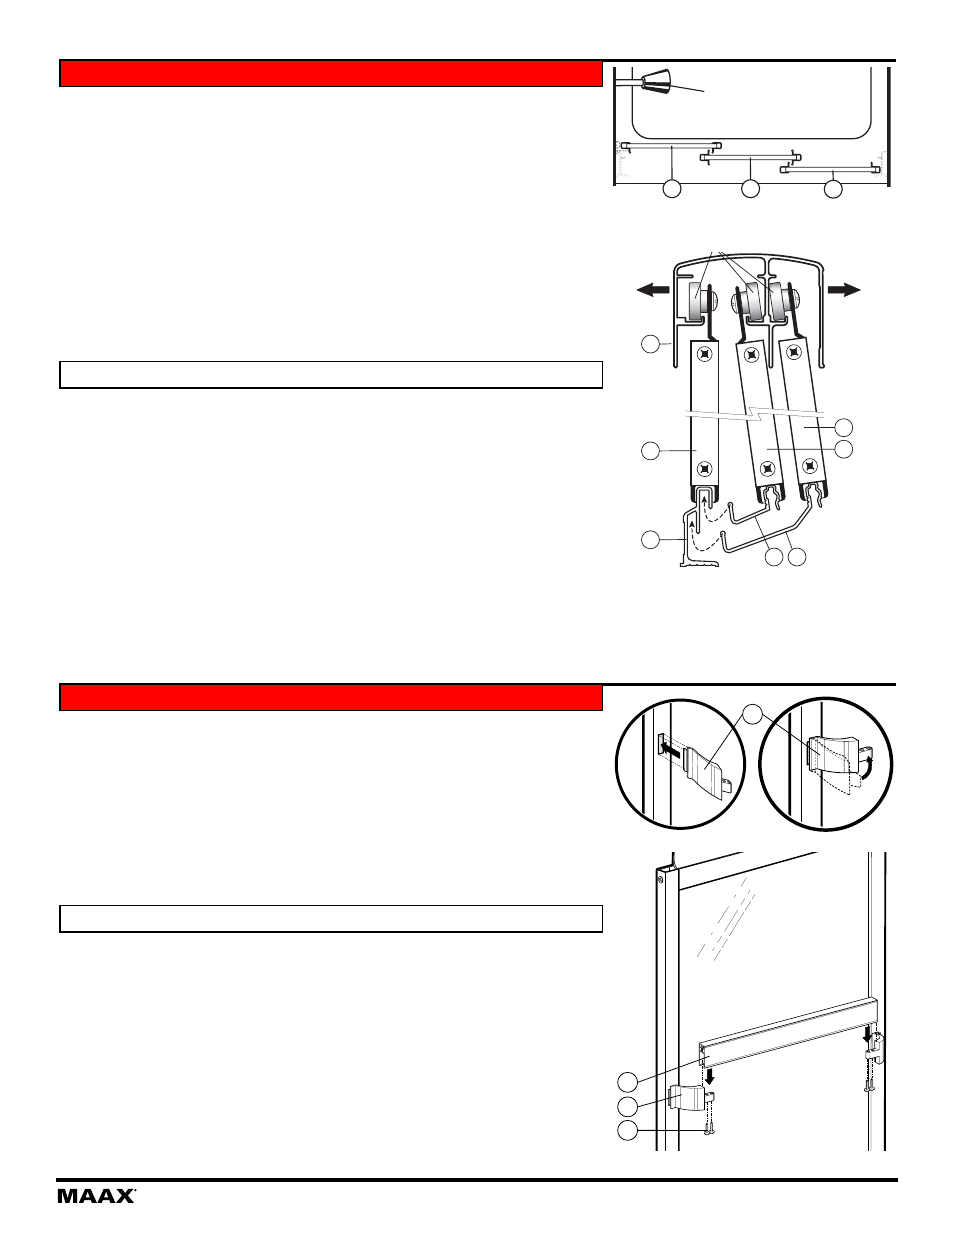
Note: The interior panel (3) must be on shower head’s side. Fig. A.
i.
Begin with the exterior panel (1).
ii.
From inside the tub, hang the exterior panel (1) so that its rollers rest in the header
(6) groove. Raise the panel slightly to position it onto the bottom track (7). Fig. B.
iii.
Place the middle panel (2) in the header (6) without hooking it up.
iv.
Place the retainer #1 (8) into upper channel of bottom track (7), and then, push up
the panel so that the rollers rest in the header grooves (6) (as shown).
v.
Be sure that the panel is secure.
vi.
Repeat the operation with the interior panel (3), placing retainer #2 (9) in the lower
channel of the bottom track (7).
vii. If required, adjust rolling of panels by repositioning the rollers as mentioned earlier
in step 7.
Note: Le panneau intérieur (3) doit être du côté de la pomme de douche. Fig. A.
i.
Commencez par installer le panneau extérieur (1).
ii.
De l’intérieur du bain, accrochez le panneau extérieur (1) sur le rail du haut (6), puis
déposez-le de façon à ce qu’il soit à cheval sur le rail du bas (7). Fig. B.
iii.
Introduire le panneau central (2) dans le rail du haut (6) sans l’accrocher.
iv.
Placez l’étrier #1 (8) dans la voie supérieure du rail du bas (7), puis, soulevez le
panneau pour accrocher les roulettes sur le rail du haut (6) (tel qu’illustré).
v.
Assurez-vous que le panneau est bien accroché.
vi.
Répétez l’opération avec le panneau intérieur (3) en placant l’étrier #2 (9) dans la
voie inférieure du rail du bas (7).
vii. Ajustez l’équerrage et le roulement des panneaux si requis, à l’aide des roulettes,
tel que mentionné à l’étape 7.
NOTE: The towel bars should be installed on interior (3) and exterior (1) panels.
i.
Insert the tab of one of the towel bar supports (18) into the notch of the door side
frame and rotate the towel bar support until it clicks into place. Fig. A.
ii
Repeat with the other towel bar supports (18).
iii.
Slide the towel bar (17) in the supports (18) and secure with the #6 x 3/4” screws
(16). Fig. B.
iv.
Repeat with the other towel bar.
NOTE: Vous devez installer les barres à serviettes sur les panneaux intérieur (3)
et extérieur (1).
i.
Installez un support de barre à serviettes (18) en insérant l'extrémité dans la fente
se trouvant sur le cadre de côté de la porte et en effectuant ensuite un mouvement
de rotation jusqu'à ce qu'un "click" se fasse entendre. Fig. A.
ii
Répétez les opérations avec l’autre support de barre à serviettes (18).
iii.
Faites glisser ensuite la barre à serviette (17) sur les supports (18) et fixez en place
avec les vis #6 x 3/4” (16) fournies à cet effet. Fig. B.
iv.
Répétez les opérations pour l’autre barre à serviettes.
ÉTAPE 10
STEP 10
ÉTAPE 9 -
STEP 9 -
6
1
7
8
9
3
2
INTERIOR
INTÉRIEUR
EXTERIOR
XTÉRIEUR
Shower head
Pomme de douche
Exterior panel
Panneau extérieur
Interior panel
Panneau intérieur
3
2
1
Fig. A
Fig. B
18
17
18
16
Fig. A
Fig. B