MAAX MOMENT 5830 Manuel d'utilisation
Installation
MAAX Lachine
160, boul.St-Joseph, Lachine (Québec) Canada H8S 2L3
www.maax.com
Installation instructions / Instructions d’installation
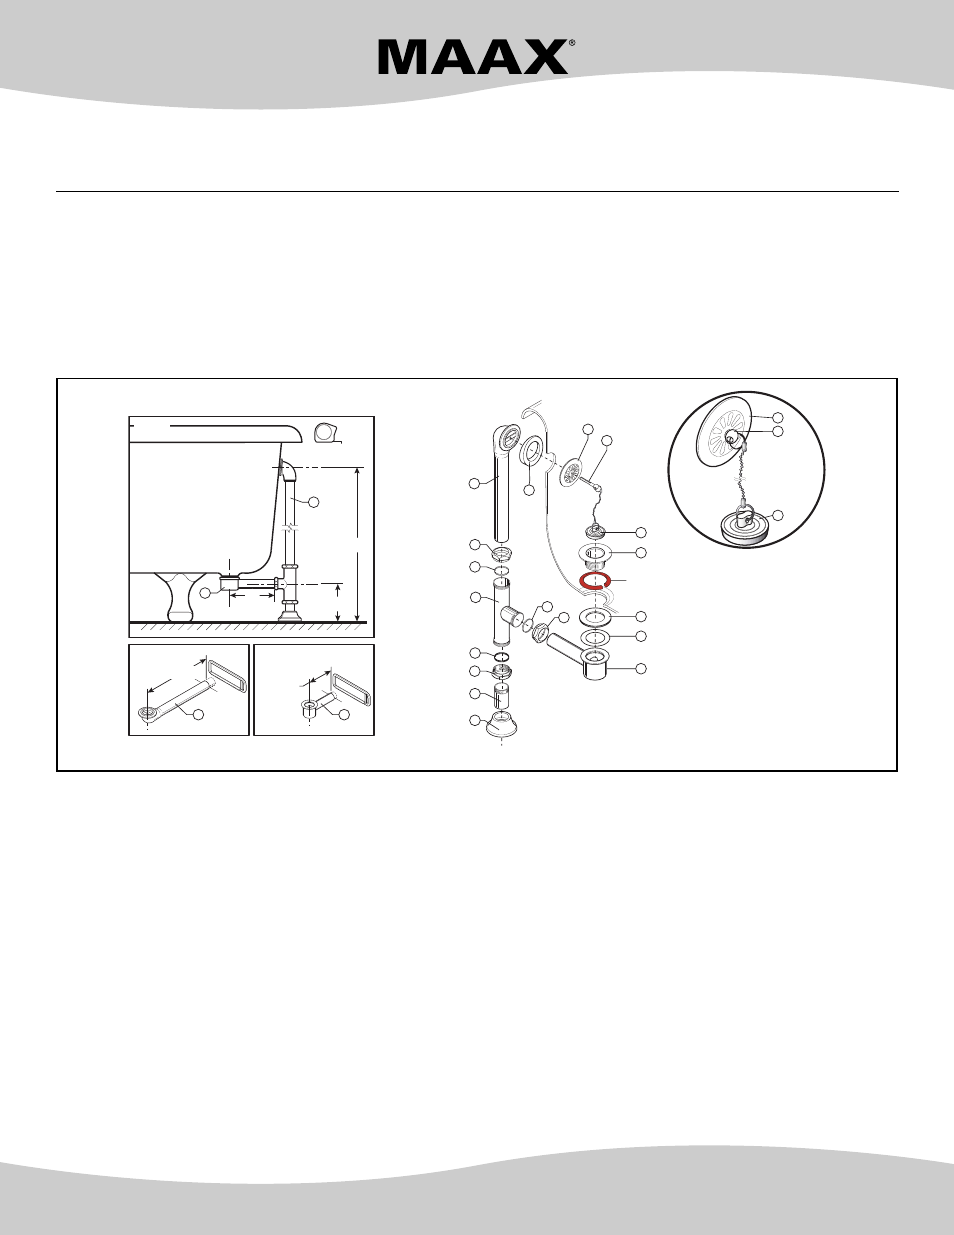
BATHTUB DRAIN AND OVERFLOW / DRAIN ET TROP-PLEIN DE BAIGNOIRE
10004147-XXX
INSTALLATION
• Cut the overflow pipe (1, Fig. B) and the connector drain
(10, Fig. C) as required to fit your bathtub model. Fig. A.
• Assemble the tapered washer (2) to the overflow (1) and
assemble the bathtub with the flange (3) and screw (4).
• Place the fibre gasket (11) and rubber gasket (12) on the
connector drain (10). Apply a small quantity of plumbing
glue on the bathtub's drain hole and assemble the
connector drain (10) to the bathtub with the basket (13).
• Connect the connector drain (10) and the overflow (1) to
the T connector (7) with the gaskets (6) and the
tightening nuts (5). Firmly tighten all the gaskets.
• Slide the flange (9) on the free end (8) and assemble the free
end (8) to the T connector (7) with the gasket (6) and nut (5).
• Set the stopper chain (14) on the screw (4) and lay the
stopper on the basket (13) of the drain. Fig. D.
• Run water in the bathtub to check the assembly is
watertight and retighten the gaskets or apply silicone if
necessary.
EN CAS DE PROBLÈME
Si vous éprouvez un problème quelconque avec notre produit
ou si certaines pièces manquent ou ont été endommagées,
NE TÉLÉPHONEZ PAS AU MAGASIN. Communiquez plutôt
avec un de nos représentants du service à la clientèle au
numéro 1 888 304-4388. Nos experts vous conseilleront et
s’efforceront de résoudre votre problème avec diligence. Les
pièces requises vous seront immédiatement envoyées. Nous
ne garantissons pas l’installation, mais si toutefois vous
éprouvez des difficultés, il nous fera plaisir de vous aider.
IN CASE OF PROBLEMS
If you have any problems with our product, DO NOT CALL
THE STORE. Contact one of our customer service
representatives at 1-888-304-4388. Our experts can advise
you and will do all they can to resolve your problem
diligently. The necessary parts will be sent to you
immediately. There is no warranty on the installation, but
if you have any problems, we will be happy to render
assistance.
0504
10024568
© 2004 MAAX Inc.
Silicone
2
3
4
14
13
12
11
10
5
6
7
6
6
5
9
8
5
1
Waste
Renvoi
Bathtub
Baignoire
3
4
14
LC
LC
Y
1
Y
2
X
Y
1
-Y
2
-1 3/8"
1
10
1
10
LC
LC
Fig. A
Fig. D
Fig. B
Fig. C
X +1/2"
INSTALLATION
• Couper le trop-plein (1, Fig. B) et le drain connecteur (10, Fig. C)
à la bonne longueur selon votre modèle de baignoire. Fig. A.
• Assembler la rondelle biseautée (2) au trop-plein (1) et
assembler à la baignoire avec la bride (3) et la vis (4).
• Déposer le joint de fibre (11) et le joint de caoutchouc (12) sur le
drain connecteur (10). Appliquer une petite quantité de mastic de
plomberie sur le trou du drain de la baignoire et assembler le
drain connecteur (10) à la baignoire avec le panier (13).
• Unir le drain connecteur (10) et le trop-plein (1) au
raccord en T (7) avec les joints (6) et les écrous de
serrage (5). Serrer fermement tous les joints.
• Glisser la rosace (9) sur l’about (8) et assembler l’about
(8) au raccord en T (7) avec le joint (6) et l’écrou (5).
• Fixer la chaîne du bouchon (14) sur la vis (4) et déposer
le bouchon sur le panier (13) du drain. Fig. D.
• Faire couler l’eau dans la baignoire pour vérifier
l’étanchéité de l’assemblage et resserrer les joints ou
appliquer du silicone au besoin.
Note: Apply Teflon tape (included) on all
threaded connections to avoid leaks.
Note: Appliquer du ruban téflon (inclus) sur
toutes les connections filetées pour
éviter les fuites.