A. inlet to cold water, Check that the water faucets are on, Level dryer – Maytag NGD7500VW Installation Manuel d'utilisation
Page 14: Complete installation, Check that you have all of your tools, Dispose of/recycle all packaging materials, Check that the dryer is level. see “level dryer, Read “dryer use, Electric models only, Gas models only
14
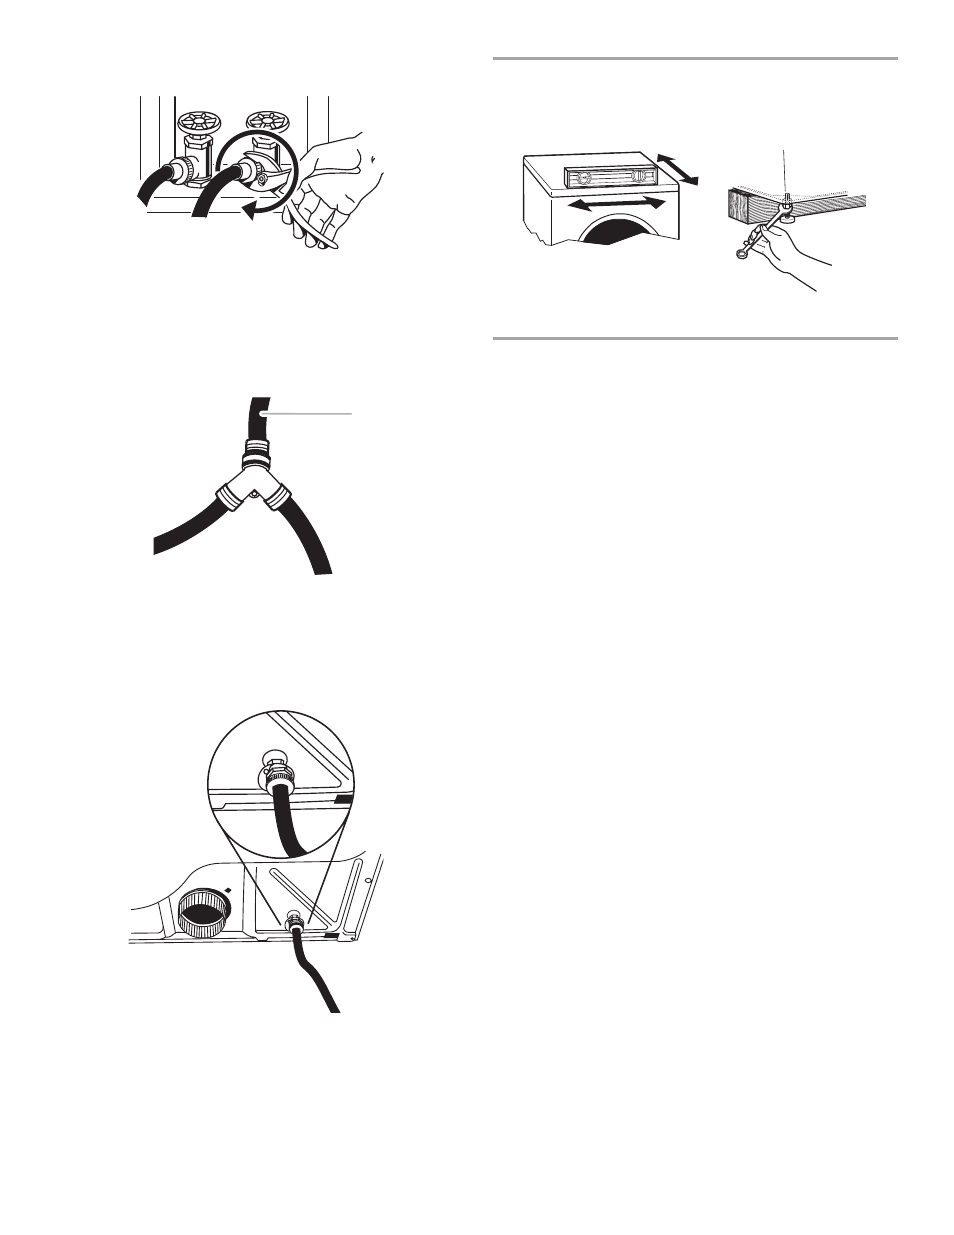
4. Using pliers, tighten the couplings with an additional two-thirds
turn.
NOTE: Do not overtighten. Damage to the coupling can result.
5. Attach “Y” connector to brass male end of small hose. Screw on
coupling by hand until it is seated on connector.
6. One end of the long hose has a wire mesh strainer inside the
coupling. Attach this end to the “Y” connector.
7. Attach washer cold inlet hose to other end of “Y” connector.
Screw on coupling by hand until it is seated on connector.
A
A. Inlet to cold water
8. Using pliers, tighten the couplings an additional two-thirds turn.
NOTE: Do not overtighten. Damage to the coupling can result.
9. Attach other end of long hose to fill valve at bottom of dryer back
panel. Screw on coupling by hand until it is seated on fill valve
connector.
10. Using pliers, tighten the coupling an additional two-thirds turn.
NOTE: Do not overtighten. Damage to the coupling can result.
11. Check that the water faucets are on.
12. Check for leaks around “Y” connector, faucet, and hoses.
LEVEL DRYER
Check the levelness of the dryer. Check levelness first side to side,
then front to back.
If the dryer is not level, prop up the dryer using a wood block. Use a
wrench to adjust the legs up or down and check again for levelness.
COMPLETE INSTALLATION
1. Check that all parts are now installed. If there is an extra part, go
back through the steps to see which step was skipped.
2. Check that you have all of your tools.
3. Dispose of/recycle all packaging materials.
4. Check the dryer’s final location. Be sure the vent is not crushed or
kinked.
5. Check that the dryer is level. See “Level Dryer.”
6. Remove the blue film on the console and any tape remaining on
the dryer.
7. Wipe the dryer drum interior thoroughly with a damp cloth to
remove any dust.
8. Read “Dryer Use.”
Electric Models Only
9. For power supply cord installation, plug into a grounded outlet.
Gas Models Only:
10. Check that gas supply is on.
11. Check for leaks.
Steam Models Only:
12. Be sure the water faucets are on.
13. Check for leaks around “Y” connector, faucet, and hoses.
14. If you live in a hard water area, use of a water softener is
recommended to control the buildup of scale through the water
system in the dryer. Over time, the buildup of lime scale may clog
different parts of the water system, which will reduce product
performance. Excessive scale buildup may lead to the need for
certain part replacement or repair.
All Models:
15. Select a Timed Dry heated cycle, and start the dryer. Do not select
the Air Only Temperature setting.
If the dryer will not start, check the following:
■
Controls are set in a running or “On” position.
■
Start button has been pushed firmly.
■
Dryer is plugged into a grounded 3 prong outlet and/or
electrical supply is connected.
■
Household fuse is intact and tight, or circuit breaker has
not tripped.
■
Dryer door is closed.
This dryer automatically runs an installation diagnostic routine at the
start of its first cycle.