Caple CR9202 Manuel d'utilisation
Page 5
INSTRUCTIONS FOR USE OF CONTROL DEVICES
(ACCORDING TO THE MODELS)
TURNSPIT (according to the models )
NOTE:
Use of the turnspit with the oven door closed.
Some models are designed for the turnspit to be used with the
oven door completely closed.
In this case the deflector S shown in fig. 6 is not
supplied.
Minute timer
Cooking time
Cooking end
Manual
Subtract time
Add time
USE OF THE GRILL
USE OF THE TURNSPIT
For utilization of the turnspit follow the instructions described.
- Put the food in spit L (see fig. 5), paying attention to block it
within the two forks F and to balance it, in order to avoid any
unnecessary effort in motor R (fig 5).
- Put the spit on support G, after having put its opposite end into
hole P of motor R.
- Place the drip-tray with a little water under the spit.
- Fit the knobs deflector S and place the door in half-open position
see fig. 6 .
- To remote the spit, operate in the opposite direction using knob
A and protecting glove in isolating wool (see fig. 5).
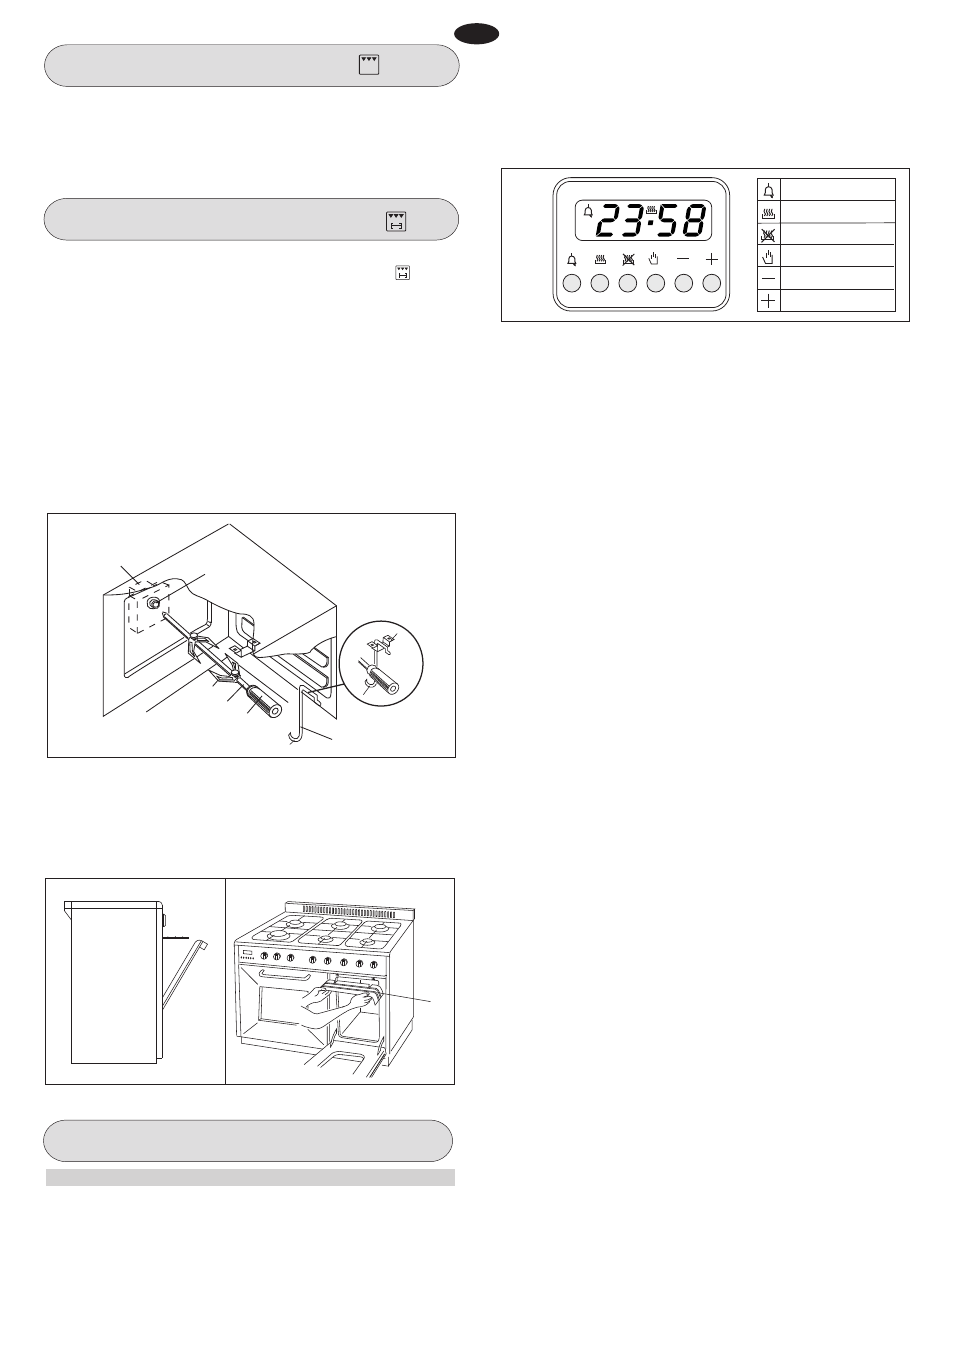
“LED” PROGRAMMER (Fig. 7)
Features
24 hours clock with automatic programme and minutes counter.
Functions
Cooking time, cooking end time, manual position, clock,
minutes counter, times to be set up to 23 hours 59 minutes.
Fig. 5
1
A
L
F
R
P
G
2
1
Fig. 6
S
Install the grid on the third shelf from the oven bottom, at about
12 cm from the surface.
The user can change the shelves, depending on his personal
whishes and on the different food.
Geat the oven 5 minutes before introducing the food.
Fig. 7
A
U
T
O
Display
4-figures, 7-segments diplay for cooking times and time of day.
Cooking time and manual function
=
saucepan symbol
Automatic function
=
AUTO
Minutes counter
=
bell symbol
The symbols light up when the corresponding functions are
selected.
In order to make the electric heating element work follow the
instructions described in paragraph 1 page 5 position , this
selection puts into function the turnspit as well.
Setting
To set, press and release the desired function, and within 5 seconds
set the time with + and - buttons.
+ and - buttons.
The + and - buttons increase or decrease the time at a speed
depending on how long the button is pressed.
Setting the time
Press any two buttons manual at the same time, and + or - button
to set the desired time. This deletes any previously set programme.
The contacts are switched off and the AUTO symbol flashes.
Manual use
By pressing the manual button the relay contacts switch on, the
AUTO symbol switches off and the saucepan symbol lights up.
Manual operation can only be enabled after the automatic
programme is over or it has been cancelled.
Automatic use
Press the cooking time or end time button to switch automatically
from the manual to the automatic function.
Semi-automatic use with cooking time setting
Press the cooking time button and set the desired time with + or
-. The AUTO and cooking time symbols light up continuously. The
relay switches on immediately. When the cooking end time
corresponds to the time of day, the relay and cooking time symbol
switch off, the sound signal rings and the AUTO symbol flashes.
Semi-automatic use with end time setting
Press the end time button. The time of day appears on the display.
Set the cooking end time with + button. The AUTO and cooking
time symbols light up continuously. The relay contacts switch on.
When the cooking end time corresponds to the time of day, the
relay and the cooking time symbol switch off. When the cooking
time is up, the AUTO symbol flashes, the sound signal rings and
both the relay and the cooking time button switch off.
Automatic use with cooking time and end time setting
Press the cooking time button and select the length of the cooking
time with + or - button. The AUTO and cooking time symbols light
up continuously. The relay switches on. By pressing the cooking
end time button the next cooking end time appears on the display.
Set the cooking end time with + button. The relay and the cooking
time symbol switch off.
The symbol lights up again when the time of day corresponds to
the cooking start time. When the cooking time is up, the AUTO
symbol flashes, the sound signal rings, the cooking time symbol
and the relay switch off.
Minutes counter
Press the minutes counter button and set the cooking time with
+ or - button.
The bell symbol lights up when the minutes counter is operating.
When the set time is up, the sound signal rings and the bell symbol
switches off.
6
GB