Ope ra tio n – Napoleon 700 Series 38 Inch Built-In Gas Grill Owner's Manual Manuel d'utilisation
Page 13
Napoleon.com
| BUILT-IN Series
Operation |
13
O
pe
ra
tio
n
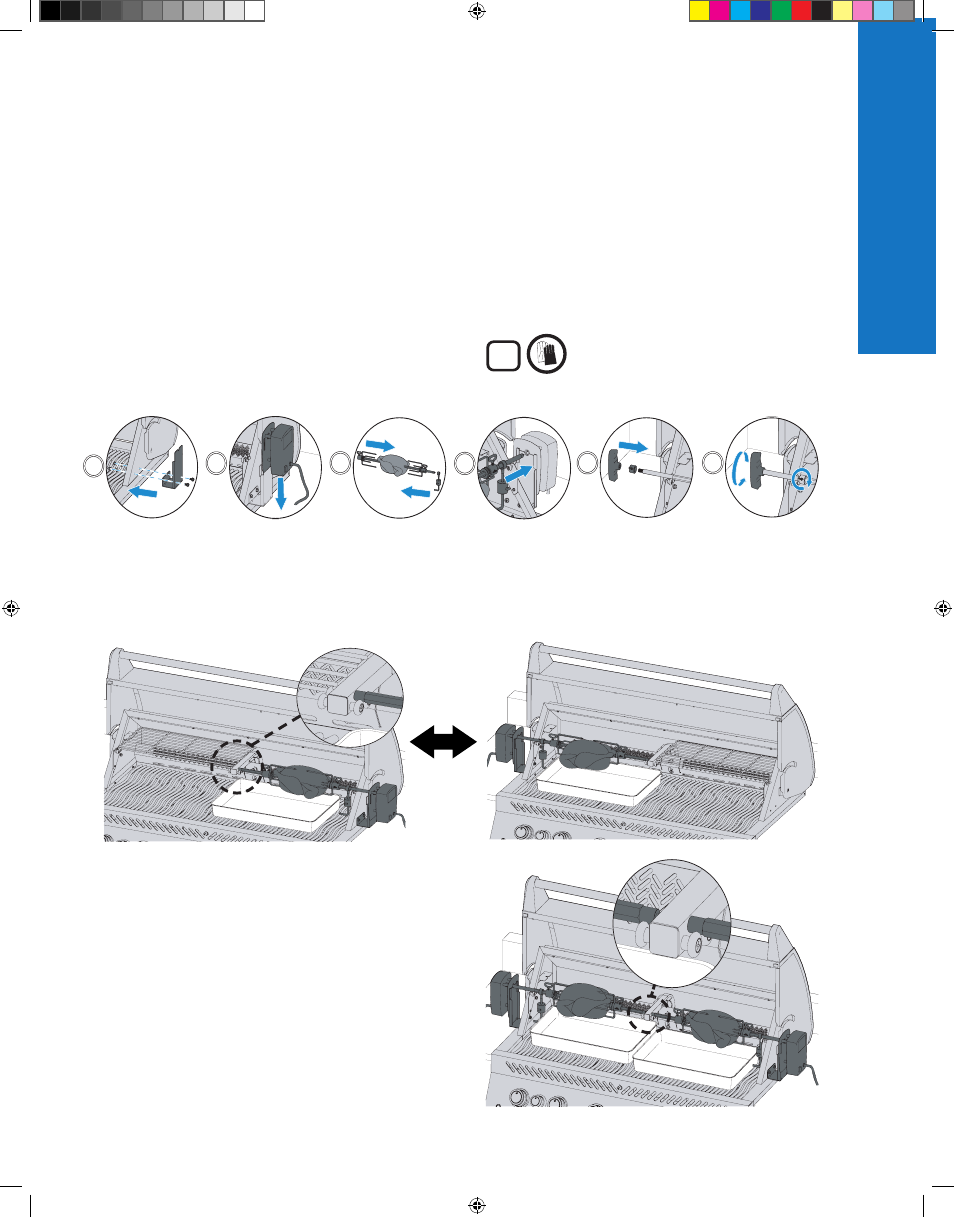
Assembling Your Rotisserie Kit (if equipped)
6
5
4
3
2
1
6
5
4
3
2
1
h
ow
to
uSe
the
r
ear
B
urner
& r
otiSSerie
6
5
4
3
2
1
6
5
4
3
2
1
6
5
4
3
2
1
6
5
4
3
2
1
BIG 44 Spit Rod: Option 1
• The rotisserie motor can be mounted on either side of the
grill using the mounting bracket.
• Be sure to remove the warming rack depending on which
side you wish to cook on.
• Follow instructions
3-4
from
'Using the Rear Burner and
Rotisserie Kit'.
• Place a metal dish under the meat to collect the
drippings.
6
5
4
3
2
1
6
5
4
3
2
1
6
5
4
3
2
1
6
5
4
3
2
1
BIG 44 Spit Rod:
Option 2
• With the purchase of the rotisserie add-on accessory, you
are able to have two rotisseries operating at the same time
for more cooking convenience.
• Be sure to remove both warming racks and install the
additional rotisserie motor to the opposite side.
• Follow instructions
3-4
from
'Using the Rear Burner and
Rotisserie Kit'
to load both spit rods.
• Place a metal dish under the meat to collect the drippings.
Note:
Remove the warming rack prior to using the rear burner and
spit rod. Extreme heat will damage the warming rack.
1. Install the rotisserie motor on the side of the grill using
the mounting bracket(s). Some models have pre-mounted
brackets.
2. Once the bracket has been fastened to the grill, slide the
rotisserie motor onto the bracket.
3. Slide the first rotisserie fork just past the middle of the spit
rod and tighten into place. Thread the meat onto the spit rod
and push the meat into the fork. Slide the second rotisserie
fork on the opposite end of the spit rod and push the fork into
the meat until secure. Tighten the fork into place.
4. Carefully insert the pointed end of the spit rod into
the rotisserie motor and set the opposite end across
the hangers. The heavy side of the meat will naturally
hang down to balance the load.
5. Slide the stop bushing onto the spit rod until it is past
the inside of the hood. This will secure the side to side
movement of the spit rod.
6. Tighten the stop bushing and spit rod handle. Place a
metal dish under the meat to collect the drippings.
IMPORTANT!
Always wear gloves when
handling components of the grill.
!
O
pe
ra
tio
n
- 700 Series 44 Inch Built-In Gas Grill Owner's Manual Freestyle Series 52 Inch Freestanding Gas Grill Owner's Manual Freestyle Series 49 Inch Freestanding Gas Grill Owner's Manual Built-In Series 500 Series 34 Inch Built-In Gas Grill Manual 700 Series 44 Inch Built-In Propane Grill Owner's Manual 700 Series 38 Inch Built- In Liquid Propane Gas Grill Owner's Manual 700 Series 32 Inch Built-In Liquid Propane Grill Owner's Manual