Multi-Contact MA066 Manuel d'utilisation
Page 4
Advanced Contact Technology
7
8
9
© b
y
Multi-Contact A
G, Switz
erland – MA066 – 07.2013, Inde
x b
, Global Communications – Modi
fi
cations sous réserv
e / Subject to alterations
Fabricant/Producer:
Multi-Contact AG
Stockbrunnenrain 8
CH – 4123 Allschwil
Tel.
+41/61/306 55 55
Fax
+41/61/306 55 56
www.multi-contact.com
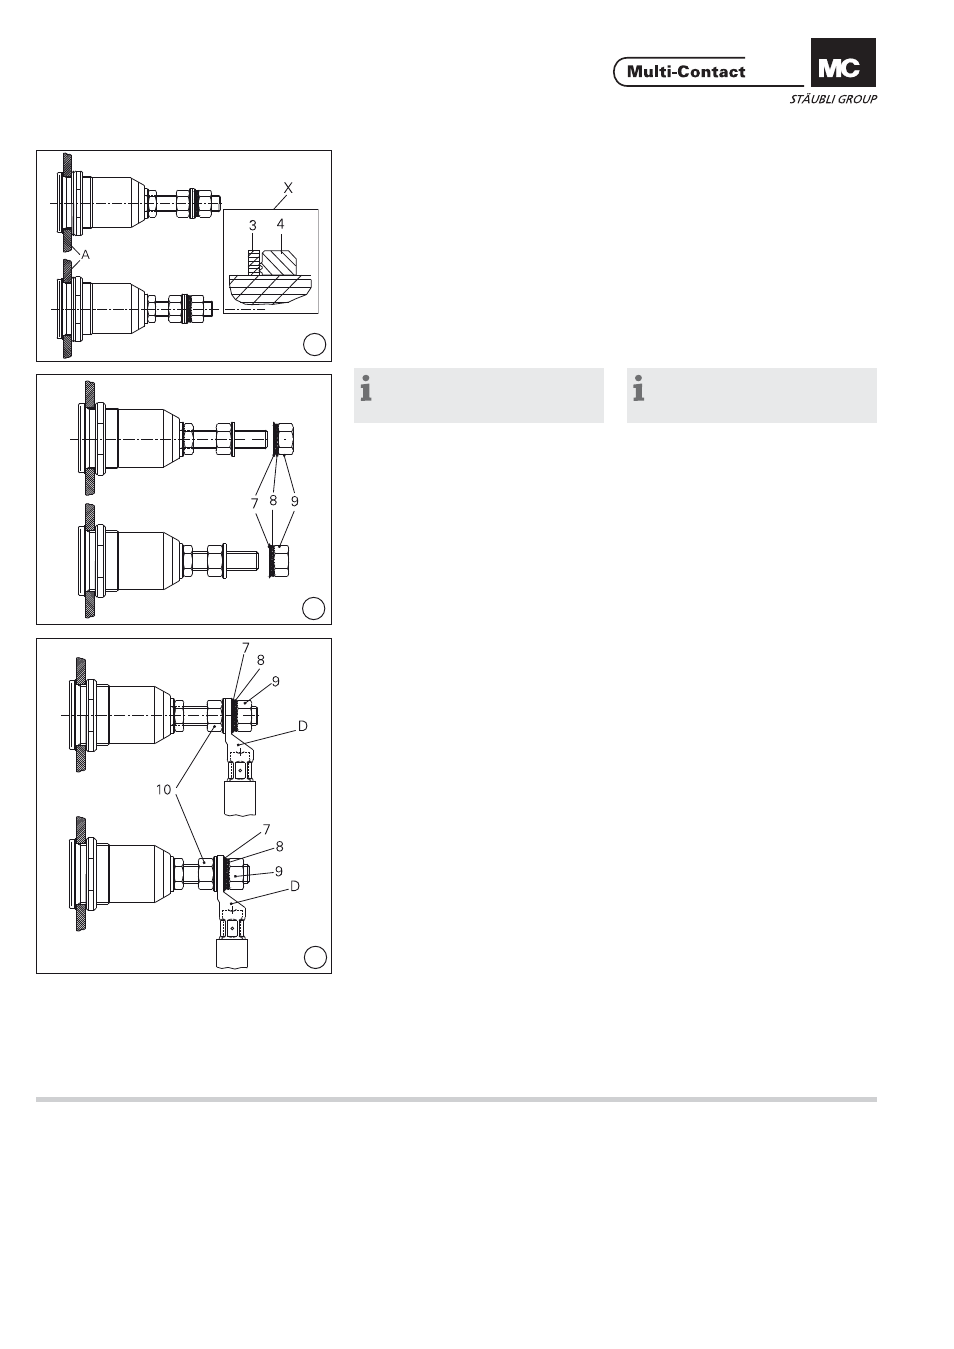
(ill. 7)
Monter la bague en PUR (3) et l‘écrou
à 6 pans (4). Veiller à orienter les stries
de l‘écrou à 6 pans vers la bague en
PUR (voir le dessin de detail X). Serrer
l‘écrou à 6 pans avec la clй а pipe et la
clé dynamométrique 46mm.
Couple de serrage: 200Nm.
(ill. 7)
Mount the PUR ring (3) and the ring
nut (4). Arrange the grooves of the
ring nut toward the PUR-ring (see
detail drawing X). Tighten the ring
nut with MC-socket wrench and with
torque spanner 46mm A/F.
Tightening torque: 200Nm.
2. Montage du couvercle de
protection
2. Protective cover assembly
Remarque:
Voir l’instruction de montage
MA036, www.multi-contact.com
Note:
See separate assembly instruction
MA036, www.multi-contact.com
3. Raccordement du câble
3. Cable connection
(ill. 8)
Démonter l‘écrou (9), la rondelle (7) et
la rondelle éventail (8).
(ill. 8)
Remove nut (9), washer (7), and lock
washer (8).
(ill. 9)
Engager la cosse (D) avec le câble
serti sur l‘embout fi leté. Remonter
l‘écrou (9), la rondelle (7) et la rondelle
éventail (8). Serrer l’écrou (9) avec la
clé dynamométrique 17mm et contrer
l’écrou (10) avec la clй а fourche
17mm. Couple de serrage: 10Nm.
(ill. 9)
Slip cable lug (D) with preassembled
cable onto the thread. Reinstall nut
(9), washer (7) and lock washer (8).
Tighten nut (9) with the torque span-
ner 17mm A/F and secure it with nut
(10) and the open-end spanner
17mm A/F. Tightening torque 10Nm.