Connecting to a gas supply, English – Pit Boss 52 Inch Portable Gas Grill Owners Guide Manuel d'utilisation
Page 6
ENGLISH
6
CONNECTING TO A GAS SUPPLY
GAS CYLINDER REQUIREMENTS
The grill is set and tested with liquid propane gas only. The regulator supplied is set for 27.94 cm (11 inch) water column (WC) and
is for use with liquid propane (LP) gas only. The factory-supplied regulator and hose must be used with a 9 kg (20 lbs) LP gas
cylinder, to the dimensions of 18-1/4” (46.35 cm) high, 12-1/4”(31 cm) diameter.
Contact your gas supplier for a special regulator
for bulk gas that fuels other appliances.
CAUTION: It is important to inspect the full length of the gas line hose. If it is evident there is excessive
abrasion or wear, or the hose is cut, the hose must be replaced prior to the appliance being used. The
replacement hose assembly shall be that specified by the manufacturer.
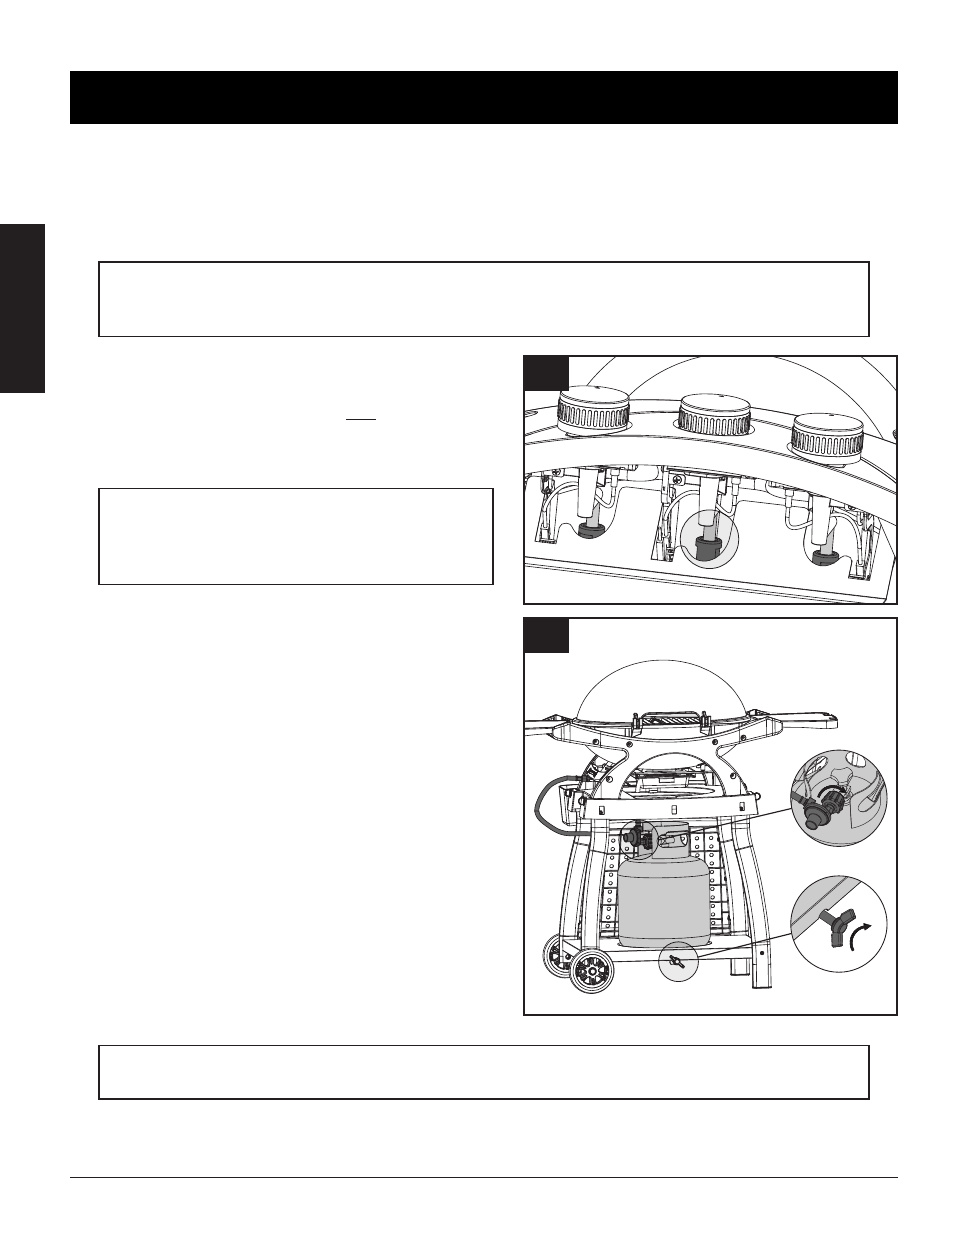
INSTALLING A GAS CYLINDER
1. Before connecting, visually check the connection between
the burner venturi pipe and orifice for each burner. Make sure
the burner venturi pipe fits over the orifice. Note illustration
A for proper installation. If the burner pipe does not rest flush
to the orifice, contact Customer Care for assistance.
WARNING: Failure to inspect this connection or
follow these instructions could cause a fire or an
explosion which can cause death, serious bodily
injury or damage to property.
2. Next, inspect the regulator and gas components. Check to
ensure there is no debris caught in the head of the LP gas
cylinder, head of the regulator valve, or in the head of the
burner and burner ports.
3. Place gas cylinder onto the debossed circle of bottom shelf.
Rotating clockwise, use the gas cylinder bolt to hold the gas
cylinder in position. Note illustration B. Make sure the gas
cylinder valve is in the CLOSED position. It is important to
ensure the gas cylinder is completely upright, as it is unsafe
to operate the grill if the gas cylinder is not installed properly.
4. Ensure the regulator valve on the grill is completely closed by
turning the knobs clockwise to the "OFF" position.
5. Remove the protective caps from the regulator valve opening
and the top of the gas cylinder. Save the caps. Check the gas
cylinder to assure it has proper external male threads (type 1
connection per ANS Z21.81).
6. Insert the gas cylinder valve into the threaded opening of the
regulator valve. Turn the quick coupling nut clockwise until
firm. Hand-tighten only. Note illustration B.
7. Gas cylinder is now installed.
WARNING: Shut off the gas cylinder if you smell gas. Attempt to re-install gas cylinder to ensure that tube
is connected properly.
A
B