Kichler 45086 Manuel d'utilisation
Luminaires Kichler
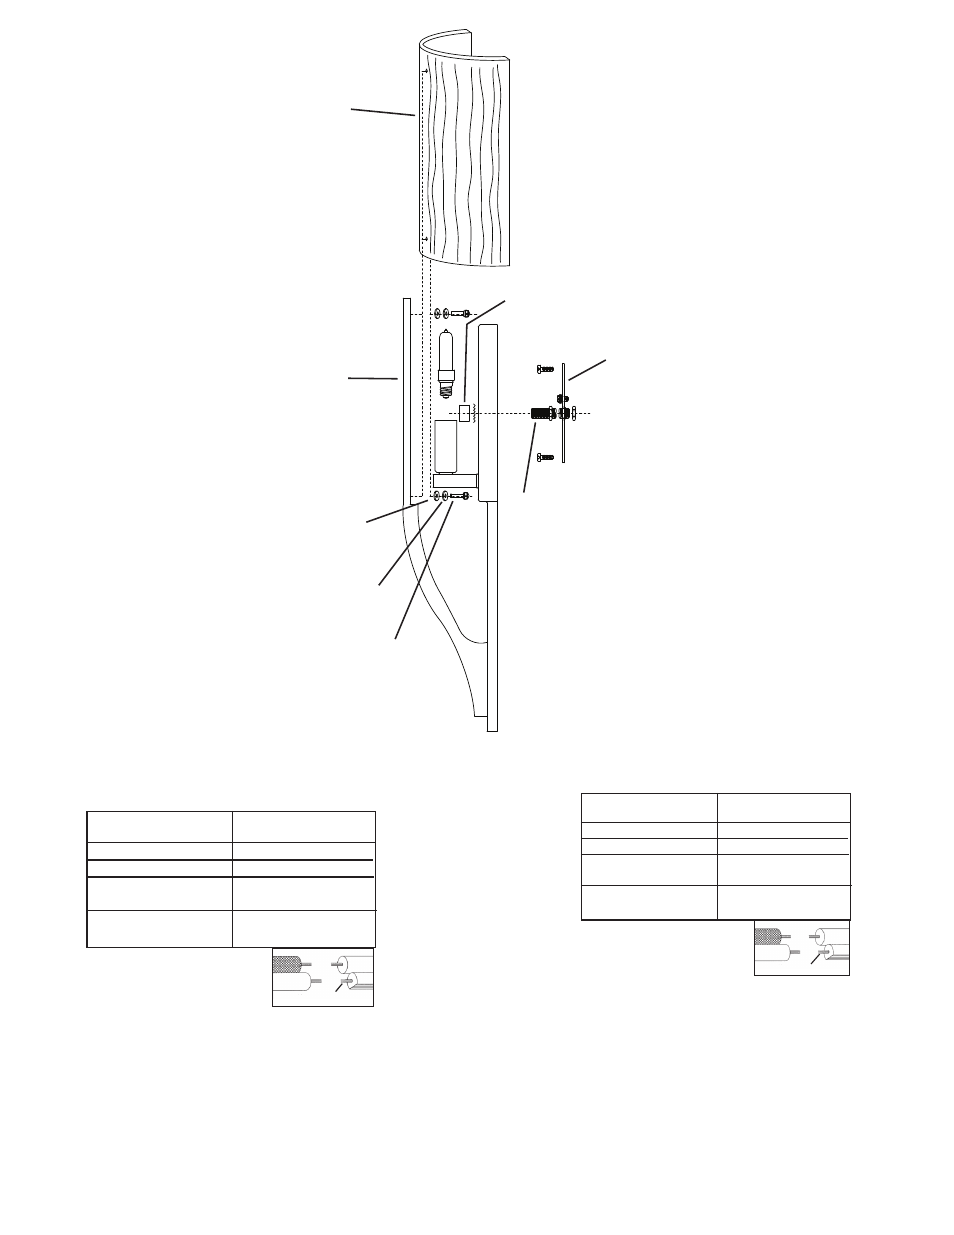
1) Turn off power.
2) Attach mounting strap to outlet box. (Screws not provided)
3) Thread hexnut onto threaded pipe so that 5 threads are exposed above
hexnut. Thread that end of threaded pipe into mounting strap and
tighten hexnut against mounting strap.
4) Make wire connections (connectors not provided.) Reference chart
below for correct connections and wire accordingly.
5) Push fixture to wall, carefully passing threaded pipe through hole.
6) Secure fixture to wall using threaded cap.
8) Insert recommended bulb.
9) Set glass behind metal bar.
10) Lower glass down onto lip of metal bar aligning holes in glass with holes
in metal bar.
11) Pass one flat washer then one rubber washer over end of each ball stud.
12) From back side of glass, thread ball studs into holes in glass and into
holes in bar.
13) Tighten ball studs to secure glass in place. (DO NOT over tighten.)
Connect Black or
Red Supply Wire to:
Connect
White Supply Wire to:
Black
White
*Parallel cord (round & smooth)
*Parallel cord (square & ridged)
Clear, Brown, Gold or Black
without tracer
Clear, Brown, Gold or Black
with tracer
Insulated wire (other than green)
with copper conductor
Insulated wire (other than green)
with silver conductor
*Note: When parallel wires (SPT I & SPT II)
are used. The neutral wire is square shaped
or ridged and the other wire will be round in
shape or smooth (see illus.)
Neutral Wire
Date Issued: 10/31/08
IS-45086-CB
INSTRUCTIONS
For Assembling and Installing Fixtures in Canada
Pour L’assemblage et L’installation Au Canada
THREADED CAP
BOuCHON FILETE
1) Couper l’alimentation secteur.
2) Visser le collier de fixaiton à la boîte de jonction (vis non fournies).
3) Visser l’écrou hexagonal sur le tube fileté de façon a laisser cinq fils a
découvert au-dessus de l’ecrou. Enfiler cette extrémite du tube filete \
dans le collier de faxation et serrer l’ecrou contre le colllier de fixation.
4) Connecter les fils (connecteurs non fournis). Se reporter au tableau ci-
dessous pour faire les connexions.
5) Pousser l’applique contre le mur, et faire passer les vis de fixaiton dans
les trous de passage en procédant avec précautions.
6) Fixer l’applique contre le mur à l’aide des rondelles freins et du bouchon
filete.
7) Introduire les ampoules recommandées.
9) Placer le verre derrière la barre métallique.
10) Abaisser le verre sur la lèvre métallique en prenant soin d’aligner les
trous situés dans le verre aux trous situés dans la barre métallique.
11) Passer une rondelle plate puis une rondelle caoutchoutée sur l’extrémité
de chacun des pivots à rotule.
12) Depuis la partie arrière du verre, visser les pivots à rotule dans les trous
du verre puis dans les trous de la barre.
13) Resserrer les pivots à rotule pour bien fixer le verre. (NE PAS serrer
avec excès).
THREADED PIPE
TuBE FILETé
MOuNTINg STRAP
COLLLIER DE FIxATION
Connecter le fil noir ou
rouge de la boite
Connecter le fil blanc de la boîte
A Noir
A Blanc
*Au cordon parallèle (rond et lisse)
*Au cordon parallele (à angles droits el strié)
Au bransparent, doré, marron, ou
noir sans fil distinctif
Au transparent, doré, marron, ou
noir avec un til distinctif
Fil isolé (sauf fil vert) avec
conducteur en cuivre
Fil isolé (sauf fil vert) avec
conducteur en argent
*Remarque: Avec emploi d’un fil paralléle
(SPT I et SPT II). Le fil neutre est á angles
droits ou strié et l’autre fil doit étre rond ou
lisse (Voir le schéma).
Fil Neutre
gLASS
VERRE
METAL BAR
LèVRE MéTALLIquE
BALL STuD
PIVOTS à ROTuLE
RuBBER WASHER
RONDELLE CAOuTCHOuTéE
FLAT WASHER
RONDELLE PLATE