Curtis SRCD1079BT-PL Manuel d'utilisation
Page 3
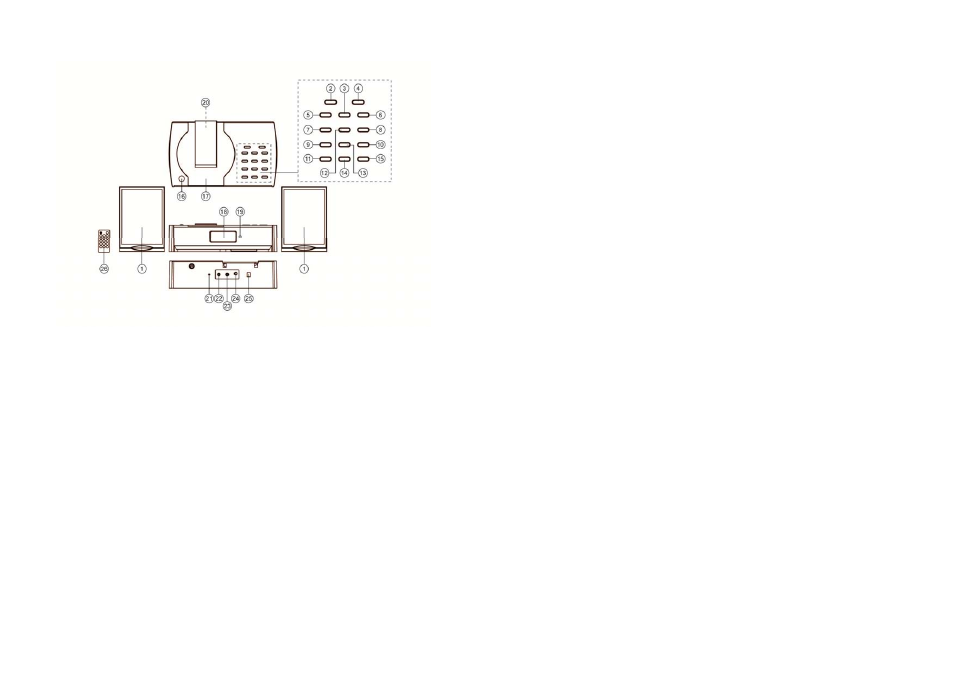
LOCATION OF CONTROLS
1.
Speakers
16.
CD Door OPEN Button
2.
POWER/AL. OFF Button
17.
CD Door
3. PLAY/PAUSE
Button
18.
Display
4. FUNC./CL.
ADJ.
Button
19.
Remote
Sensor
5.
SKIP
−/TUNE− Button
20.
CD Compartment Back Light
6.
SKIP
+/TUNE+ Button
21.
FM Wire Antenna
7.
MEM
−/AL 1 Button
22.
R-SP Jack
8.
MEM
+/AL 2 Button
23.
L-SP Jack
9. P-MODE/MONO
Button
24.
AUX-IN
Jack
10.
SLEEP Button
25.
DC-IN Jack
11. SNOOZE
Button
26.
Remote
12. STOP
Button
.
13. PROG/MEM
Button
14.
VOL
− Button
15.
VOL
+ Button
- EN 4 -
CONNECTING THE UNIT TO POWER
Plug one end of the AC/DC adaptor into the DC-In jack, and then plug the other end into AC wall outlet.
Before switching on the unit, make sure that the voltage of your electricity supply is the same as that
indicated on the rating plate.
CONNECTING THE LOUDSPEAKERS
Connect the cables of the two loudspeakers to the corresponding input (R) for the right speaker and
input (L) for the left speaker, located at the rear side of the unit.
Warning: Connect the loudspeakers before powering the unit. The unit may not work properly or get
damaged if you use speakers different than the ones supplied with the unit.
SETTING THE TIME
Before starting to set the time, make sure that the unit is in POWER OFF Mode.
1.
Press and hold the FUNC/CL ADJ button for 1-2 seconds, (you can also press and hold the CL.ADJ.
button for 1-2 second on the remote control), the hour digit in the display will start flashing.
2.
Use the SKIP
+/TUNE+ or SKIP−/TUNE− button to adjust the hour.
3.
When the correct hour is selected, press the FUNC/CL.ADJ. button again, the minute digit in the
display will start flashing.
4.
Use the SKIP
+/TUNE+ or SKIP−/TUNE− button to adjust the minute.
5.
When the correct time is selected, press the FUNC/CL ADJ button to store the time in the memory.
SETTING THE ALARM TIME
Before starting to set the alarm time, make sure that the unit is in POWER OFF mode.
1.
Press the MEM
−/AL1 or MEM+/AL2 button on the unit once and the AL1 or AL2 icon will appear in
the display.
2.
Press the FUNC/CL. ADJ. button to select the alarm wake up source. The options are buzzer,
Radio or CD.
3.
Press the VOL
+ or the VOL− to adjust the wake up sound level.
4.
Press and hold the MEM
−/AL1 or MEM+/AL2 button on the unit for 1-2 seconds, the alarm hour
digit will begin flashing.
5.
Use the SKIP
+/TUNE+ or SKIP−/TUNE− button on the unit to adjust the alarm hour.
6.
When the desired alarm hour is selected, press the MEM
−/AL1 or MEM+/AL2 button again, the
alarm minute digit will begin flashing.
7.
Use the SKIP
+/TUNE+ or SKIP−/TUNE− button on the unit to adjust the alarm minute.
8.
When the desired alarm time is selected, press the MEM
−/AL1 or MEM+/AL2 button again to
confirm.
TURN OFF THE ALARM
When the alarm activate, press the POWER/AL.OFF button to turn off the alarm.
SNOOZE FUNCTION
1.
Whenever the alarm activate, it can be temporarily suspended for a short period of 9 minutes by
pressing the SNOOZE button.
2.
The alarm will then automatically activate again after the 9 minutes SNOOZE period has ended.
3.
This procedure can be repeated for up to approximately one hour.
- EN 5 -