Recording(deck ii only) enregistrement, Erasing, Effacement – Teac W-600R Manuel d'utilisation
Page 9
9
ENGLISH
FRANÇAIS
Recording(DECK II only)
Enregistrement
(DECK II uniquement)
1
2
3
4
0 dB
5
7
6
Erasing
Anything previously recorded on the tape
will be automatically erased when you
make a new recording on it. It can also be
erased by "recording" on it with the REC
LEVEL control set to "0".
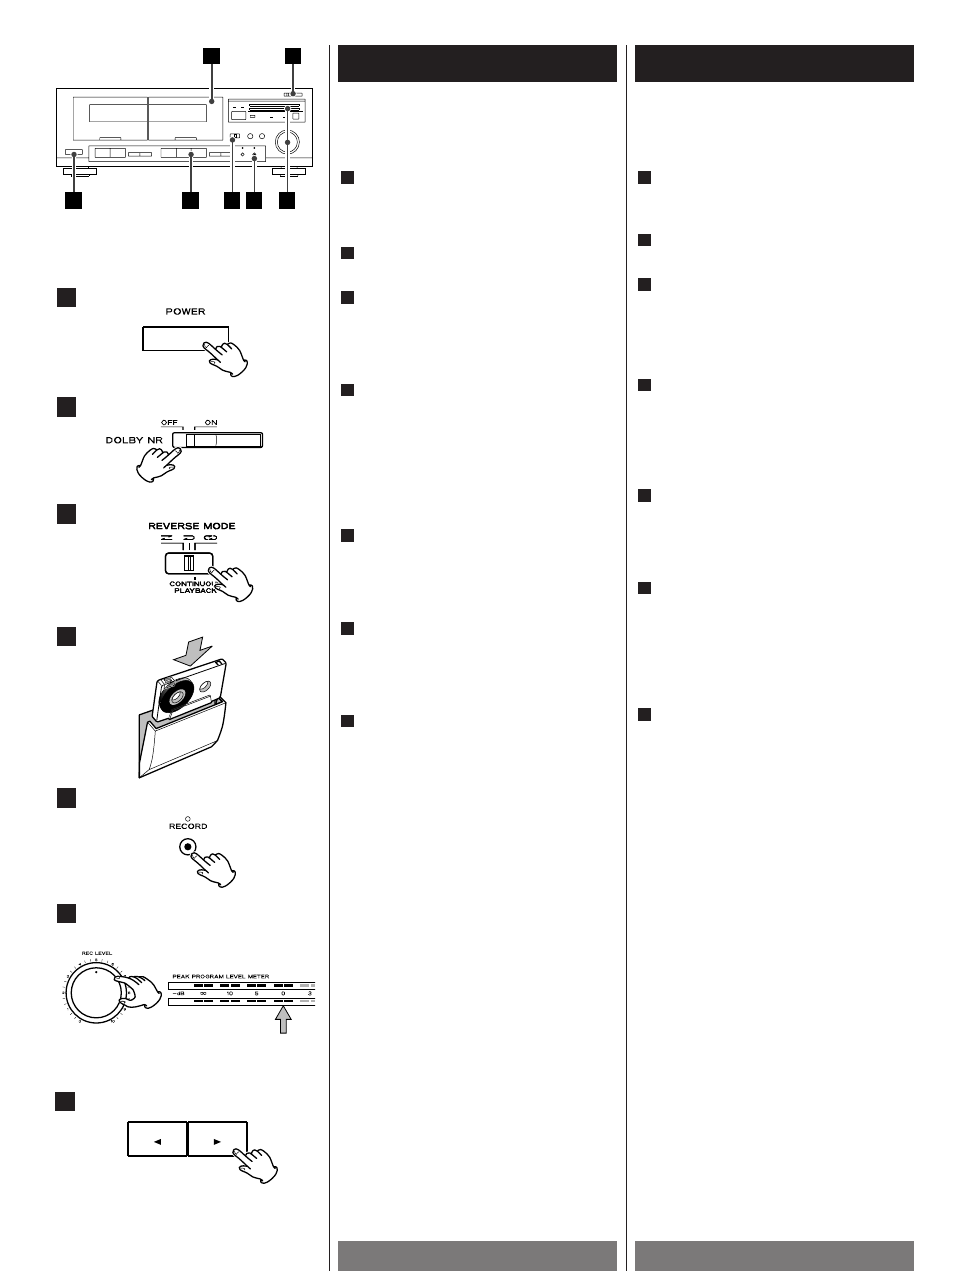
Recording from a Stereo System
Press the POWER switch.
Select the source of the stereo system to
be recorded.
Select ON or OFF of Dolby NR.
Select the desired reverse mode.
3
2
1
u:one side recording (Side A or Side B)
j:Side AqSideBqstop
Load a recordable cassette tape into
DECK @.
< You can use normal(Type! ) or
CrO
2
(Type@) tape.
< If the safety tabs of the cassette tape
have been broken off, cover the holes
with adhesive tape.
Press the RECORD button.
Then the RECORD indicator will light up
and the tape direction indicators will
blink.
Adjust the recording level with the REC
LEVEL control.
The loudest sound should briefly reach
around the "0 dB" point.
Select the recording direction by the
PLAY button(hory).
Recording will start.
< To record both sides of the tape, selsect
j and press the forward PLAY
button(y). If you press the reverse play
button(h ), only the back side will be
recorded.
< To stop recording temporarily, press the
PAUSE button. To restart the tape, press
the PAUSE button or PLAY button
(hory).
< To stop recording, press the STOP
button(H).
7
6
5
4
u:Enregistrement Face A ou Face B
j:Face AqFaceBqArrêt
Enregistrement à partir d’une chaîne stéréo:
Mettre l’appareil sous tension.
Apprêtez-vous à enregistrer la source.
Sélectionnez ON ou OFF de Dolby NR.
Sélectionnez le mode d’inversion
souhaité.
3
2
1
Placez une cassette vierge dans la
platine @ (DECK @).
< Cet appareil permet d' utiliser des
cassettes Normales (type! ) ou CrO
2
(type@).
Appuyez sur la touche RECORD.
Le voyant de direction clignote et les
voyants RECORD (enregistrement)
s’allument.
Régler le niveau d’enregistrement à l’aide
de la commande de réglage REC LEVEL de
manière que l’indicateur de niveau
atteigne brièvement le point “0 dB” à l’en-
registrement des signaux ayant le niveau
le plus élevé.
Choisissez le sens de l’enregistrement à
l’aide de la touche PLAY (houy).
L’enregistrement commence.
< Sélectionnez le mode d’inversionjet
appuyez sur la touche Lecture Avant
(y)pour enregistrer sur les deux faces
de la cassette. Si vous appuyez sur la
touche de Reprise Automatique en Sens
Inverse(h), l’enregistrement ne se fera
que sur la seconde face de la cassette.
< Pour interrompre l’enregistrement, ap-
puyer sur la touche PAUSE. Appuyer une
deuxième fois pour relancer la bande.
< Pour arrêter l’enregistrement, appuyer sur
la touche STOP(H).
7
6
5
4
Effacement
Tous les matériaux précédemment en-
registrés sur une bande seront effacés
par un nouvel enregistrement. Il est
également possible d’effacer une bande
en “enregistrant” avec la commande de
réglage du niveau REC LEVEL mise sur "0".
4
2
1
7
3
6
5