Sony VPLL-3009 Fixed Short Throw Lens (0.85:1 to 1.0:1) Manuel d'utilisation
Let’s try out your new linear pcm recorder, Operating instructions, Gb fr
PCM-A10 4-740-910-51(1)
Linear PCM Recorder
PCM-A10
Operating Instructions
GB
FR
© 2018 Sony Corporation Printed in China
4-740-910-
51
(1)
Refer to the Help Guide
This is the Operating Instructions, which provides you with instructions on
the basic operations of the linear PCM recorder.
The Help Guide is an online manual.
Refer to the Help Guide when you would like to know further details,
operations and possible solutions when a problem occurs.
Check the supplied items
• Linear PCM Recorder (1)
• Wind screen (1)
• Carrying case (1)
• Operating Instructions (this sheet)
• Warranty card (1)
• Application Software, Sound Organizer 2 (Installer file stored in the built-in
memory so that you can install it to your computer.)
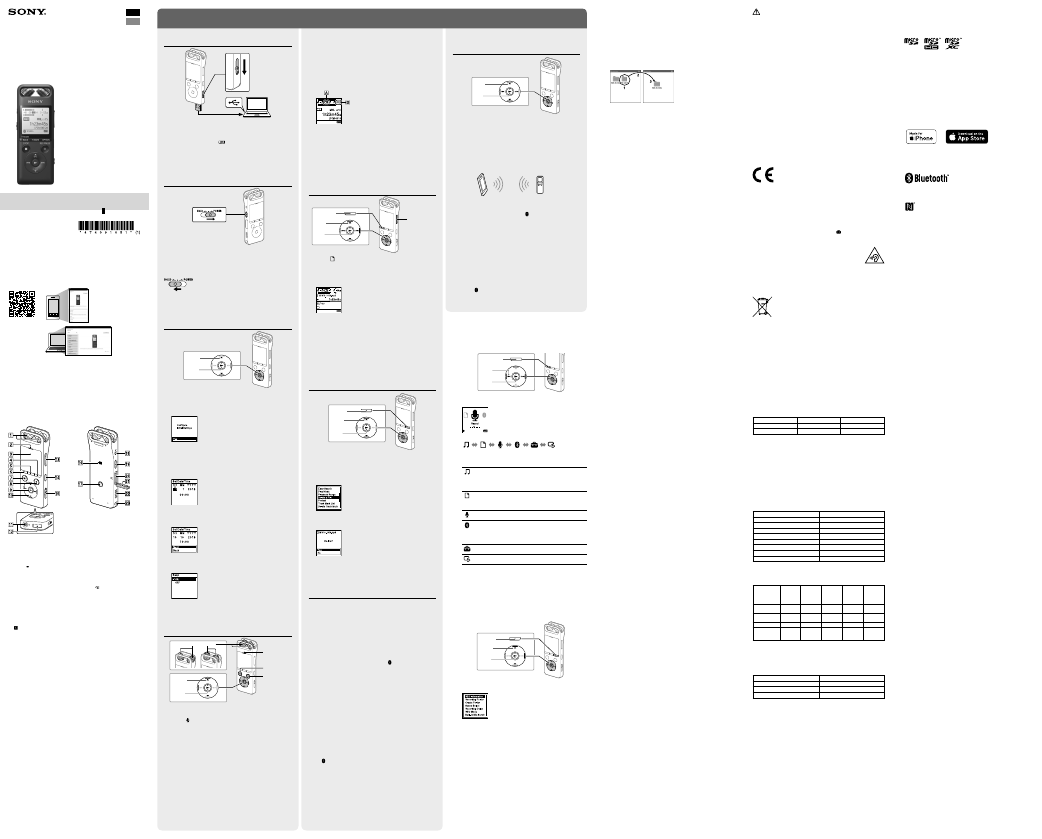
Parts and controls
Built-in microphones
Peak indicator
Display window
OPTION button
T-MARK (track mark) button
BACK/ HOME button
STOP button
REC/PAUSE (record/pause) button, recording indicator
(play/enter) button*¹
Control button (
DPC (Digital Pitch Control),
A-B (repeat A-B),
(review/fast backward),
(cue/fast forward))
(headphones) jack
USB connector cover (You can find the USB connector retracted behind
the cover.)
VOL –/+*¹ (volume –/+) button
REHEARSAL button
USB slide lever
(N-mark) (Put an NFC-enabled smartphone onto this mark to establish
an NFC pairing.)
Hole for attaching the tripod (No tripod is supplied with your
linear PCM recorder.)
(microphone) jack
HOLD•POWER switch*²
microSD card slot (The card slot is located under the cover.)
Slot cover
Built-in speaker
Strap hole (No strap is supplied with your linear PCM recorder.)
*¹ The
(play/enter) button and VOL + (volume +) button have a tactile dot. Use the tactile
dot as a reference when operating the linear PCM recorder.
*² Sliding the HOLD•POWER switch to “POWER” and holding it for 8 seconds or longer restarts
your linear PCM recorder. For detailed instructions, refer to the Help Guide.
Let’s try out your new linear PCM recorder
Charge
Charge the linear PCM recorder.
Slide the USB slide lever in the direction of the arrow, and insert the
USB connector into the USB port of a running computer.
When the battery is fully charged, the battery indicator changes from
the charging animation to “
.”
Disconnect the linear PCM recorder.
Make sure that the message “Accessing” is no longer on the
display window. Then refer to the Help Guide to remove the
linear PCM recorder safely.
Power on
Slide and hold the HOLD•POWER switch in the direction of “POWER” until
the window display appears.
To turn the power off, slide the HOLD•POWER switch to “POWER” and
hold it until “Power Off” appears on the display window.
To prevent unintentional operations (HOLD)
Slide the HOLD•POWER switch in the direction of “HOLD.”
¼
To release the linear PCM recorder from the HOLD status, slide the
HOLD•POWER switch towards the center.
Initial settings
Select
(
/
)
Enter
When you power on your linear PCM recorder for the first time, the
“Configure Initial Settings” screen appears on the display window. You
can then select the display language, set the clock, and turn on/off the
beep sound.
Select “Yes” to start the initial settings.
Select the display language.
You can select from the following languages:
Deutsch (German), English*, Español (Spanish), Français (French),
Italiano (Italian), Русский (Russian), Türkçe (Turkish)
* Default setting
Set the current year, month, day, hour, and minute.
¼
To go back to the previous clock setting item, press BACK/HOME.
Select “Next.”
Select “ON” or “OFF” to turn on or off the beep sound.
When the initial settings finish, the completion message and then the
HOME menu screen appears.
Note
You can change any of the initial settings at any time later. For detailed
instructions, refer to the Help Guide.
Record
Built-in microphones
STOP
REC/PAUSE
Recording
indicator
Peak indicator
Select
(
/
)
Enter
¼
Before you start recording, make sure that the HOLD status is released.
Select “ Record” from the HOME menu.
The recording standby screen appears.
Select a storage and a folder to save the recorded file.
¼
To save the recorded file on the microSD card, you need to change the file
storage destination folder. Select “Recording Folder” - “SD Card” from the
OPTION menu, and then start recording.
Adjust the angle of the linear PCM recorder's built-in
microphones with your fingertips so that they point in the
direction of the recording source.
Turn the linear PCM recorder so that its built-in microphones
point in the direction of the target sound source.
Press and hold
REC/PAUSE.
The recording indicator flashes in red and the linear PCM recorder
pauses for recording. When the built-in microphones pick up sounds,
the peak level meter bars change in length to indicate the recording
volume levels.
Using the HOME menu
You can use the HOME menu for a variety of operations, including
locating and playing a recorded file and changing the settings of your
linear PCM recorder.
Select
(
/
)
Enter
BACK/HOME
Press and hold BACK/HOME.
The HOME menu screen appears.
The HOME menu items are aligned in the following sequence.
Recorded
Files
Record
Settings
Bluetooth
Back
to XX*
Music
Select your desired function from the following:
Music
You can select and play one of the files you have
imported from a computer. To locate a music file,
select “All Songs,” “Albums,” “Artists,” or “Folders.”
When importing files, be sure to import them into
the MUSIC folder.
Recorded Files
You can select and play one of the files you have
recorded with your linear PCM recorder. To locate a
recorded file, select “Latest Recording,” “Search by
REC Date,” “Search by REC Scene,” or “Folders.”
Record
You can display the record standby screen, and then
start recording.
Bluetooth
You can display the menu screen for items that use
the Bluetooth function, such as REC Remote, NFC,
and Bluetooth audio devices.
Additionally, you can turn on/off the Bluetooth
function or make device registration (pairing).
Settings
You can display the Settings menu screen and
change various settings on the linear PCM recorder.
Back to XX*
You can go back to the screen that was displayed
before the HOME menu screen.
* The function you are currently using is displayed in “XX.”
¼
Press
STOP to return to the screen displayed before you entered the HOME
menu.
Using the OPTION menu
You can use the OPTION menu to perform a variety of functions, including
changing the settings of your linear PCM recorder.
The available items differ depending on the situation.
Enter
OPTION
Select
(
/
)
Select your desired function from the HOME menu, and then press
OPTION.
Select the menu item for which you want to change the setting.
Select your desired setting option.
Copying files from your
linear PCM recorder to a computer
You can copy the files and folders from your linear PCM recorder to a
computer to store them.
Follow the instructions in “Charge” to connect your
linear PCM recorder to a computer.
Drag and drop the files or folders you want to copy from
“PCMRECORDER” or “MEMORY CARD” to the local disk on the
computer.
To copy a file or folder (Drag and drop)
1
Click and hold,
2
drag,
3
and then drop.
PCMRECORDER or
MEMORY CARD
Your computer
Disconnect your linear PCM recorder from the computer.
Installing Sound Organizer 2
Install Sound Organizer on your computer.
Sound Organizer allows you to exchange files between your
linear PCM recorder and your computer.
Songs imported from music CDs and other media, MP3 and other audio
files imported to a computer can also be played and transferred to the
linear PCM recorder.
Notes
• Sound Organizer is compatible with Windows computers only. It is not
compatible with Mac.
• This linear PCM recorder is compatible with Sound Organizer 2 only.
• If you format the built-in memory, all data stored there will be deleted. (The
Sound Organizer software installer will also be deleted.)
¼
• When installing Sound Organizer, log in to an account with administrator
privileges.
• The installation procedure varies depending on the Windows version. The
following procedure uses Windows 10 as an example.
Follow the instructions in “Charge” to connect your
linear PCM recorder to a computer.
Make sure the linear PCM recorder is successfully detected by the
computer.
“Connecting” appears and stays on the linear PCM recorder's display
window while the linear PCM recorder is connected to the computer.
Right-click at the bottom left corner of the desktop, and then click
[File Explorer] on the menu.
Double-click [PCMRECORDER] - [FOR WINDOWS].
Double-click [SoundOrganizer_V2001] (or [SoundOrganizer_V2001.
exe]).
Follow the computer's on-screen instructions.
When the [Welcome to Sound Organizer 2 Installer] window
appears, click [Next].
Make sure that you accept the terms of the license agreement,
select [I accept the terms in the license agreement], and then click
[Next].
When the [Setup Type] window appears, select [Standard] or
[Custom], and then click [Next].
Follow the instructions on the screen and set the installation settings
when you select [Custom].
When the [Ready to Install the Program] window appears, click
[Install].
The installation starts.
When the [Sound Organizer 2 has been installed successfully.]
window appears, check [Launch Sound Organizer 2 Now], and
then click [Finish].
Note
You may need to restart your computer after installing Sound Organizer 2.
Precautions
On power
DC 3.7V : the built-in rechargeable lithium-ion battery
DC 5.0V : when charged using USB
Rated current consumption : 500mA
On safety
Do not operate the unit while driving, cycling or operating any motorized
vehicle.
On handling
• Do not leave the unit in a location near heat sources, or in a place subject
to direct sunlight, excessive dust or mechanical shock.
• Should any solid object or liquid fall into the unit, remove the battery
and have the unit checked by qualified personnel before operating it any
further.
• When using your linear PCM recorder, remember to follow the
precautions below in order to avoid warping the cabinet or causing the
linear PCM recorder to malfunction.
– Do not sit down with the linear PCM recorder in your back pocket.
– Do not put your linear PCM recorder into a bag with the headphones/
earphones cord wrapped around it and subject the bag to strong impact.
• Be careful not to allow water to splash on the unit. The unit is not
waterproof. In particular, be careful in the following situations.
– When you have the unit in your pocket and go to the bathroom, etc.
When you bend down, the unit may drop into the water and may get
wet.
– When you use the unit in an environment where the unit is exposed to
rain, snow, or humidity.
– In circumstances where you get sweaty. If you touch the unit with wet
hands or if you put the unit in the pocket of sweaty clothes, the unit may
get wet.
• Listening with this unit at high volume may affect your hearing.
• For traffic safety, do not use this unit while driving or cycling.
• Do not use this unit at a place where the inability to hear surrounding
sounds may present a danger.
• You may feel pain in your ears if you use the headphones when the
ambient air is very dry.
This is not because of a malfunction of the headphones, but because of
static electricity accumulated in your body. You can reduce static electricity
by wearing non-synthetic clothes that prevent the emergence of static
electricity.
On noise
• Noise may be heard when the unit is placed near an AC power source, a
fluorescent lamp or a mobile phone during recording or playback.
• Noise may be recorded when an object, such as your finger, etc., rubs or
scratches the unit during recording.
On maintenance
To clean the exterior, use a soft cloth slightly moistened in water. Then use a
soft dry cloth to wipe the exterior. Do not use alcohol, benzine or thinner.
If you have any questions or problems concerning your unit, please consult
your nearest Sony dealer.
Notes on the Bluetooth function
• Bluetooth wireless technology allows connection at a distance of up
to about 10 m. However, the effective range may vary depending on
obstructions (people, metals, walls, etc.) or signal status.
• Because Bluetooth and wireless LAN (IEEE802.11b/g) devices use the
same frequency (2.4 GHz), signal interference may occur, resulting in
communication speed decrease, noise, or inability to connect, if Bluetooth
communications are used near a wireless LAN device. In such cases, take
the following measures.
– Perform Bluetooth communications at least 10 m away from the wireless
LAN device when connecting your linear PCM recorder and a Bluetooth
device.
– Place your linear PCM recorder and the Bluetooth device as close
together as possible.
– Turn off the wireless LAN device when performing Bluetooth
communications within about 10 m of a wireless LAN device.
• Radio waves emitted from a Bluetooth device may affect the operation of
equipment such as electronic medical devices. Turn off your linear PCM
recorder and other Bluetooth devices in the following locations as failure
to do so may cause an accident.
– In hospitals, near priority seats on trains, in airplanes, in places such as
gasoline stations where flammable gases are present, near automatic
doors or fire alarms.
Press
or
to select the optimum recording volume level for
the sound source.
You can check the current recording volume level on the peak level
meters. Adjust the recording volume so that the recording volume
level stays around -12 dB (
), which fits within the optimum range.
If too loud sounds are detected during recording, “OVER” (
)
appears on the display window and the peak indicator lights. In such
a case, turn down the recording volume by pressing
until “OVER”
disappears and the peak indicator goes out to avoid sound distortion.
You can press and hold
or
to keep turning up or down the
recording volume.
¼
With the rehearsal function, you can easily adjust the recording volume
level. For the rehearsal function, refer to the Help Guide.
Press
REC/PAUSE.
“REC” appears on the display window and the recording indicator
lights in red.
Press
STOP to stop recording.
“Saving...” and then recording standby screen appear on the display
window.
Listen
BACK/HOME
Select
(
/
/
/
)
Enter
VOL –/+ button
Select “ Recorded Files” from the HOME menu.
Select “Latest Recording,” “Search by REC Date,” “Search by REC
Scene,” or “Folders.”
Select your desired file.
Playback starts.
Press VOL + or VOL - to adjust the volume.
Press
STOP to stop playback.
¼
Right after you stopped recording, you can press
to play the file you have
just recorded.
To add a track mark
You can add a track mark at a point at which you want to divide a file later
or locate during playback. You can add a maximum of 98 track marks to
each file.
You can also add track marks during recording.
Delete
Enter
OPTION
Select
(
/
)
Note
Once a file is deleted, you cannot restore it.
Select the file you want to delete from the list of recorded files
or play back the file you want to delete.
Select “Delete a File” from the OPTION menu.
“Delete?” appears and the selected file starts playing for your
confirmation.
Select “Yes.”
“Please Wait” appears and stays until the selected file is deleted.
Enjoy music wirelessly
Listen to audio from the
BLUETOOTH® audio device
You can establish a wireless connection between a Bluetooth audio
device and the linear PCM recorder and listen to audio from the Bluetooth
audio device.
Make device registration (pairing)
To establish a wireless connection between Bluetooth audio devices for
the first time, you need to have the devices registered with each other.
This device registration process is called “pairing.”
Place the Bluetooth audio device to which you establish a
Bluetooth connection in pairing mode.
Be sure to place the linear PCM recorder within 1 m from the
Bluetooth audio device.
While recording is on standby, select “ Bluetooth” -
“Audio Device” - “Add Device (Pairing)” from the HOME menu.
When either “Turn Bluetooth On?” or “Disconnect Connected Audio
Device. Continue?” appears on the display window, select “Yes.”
When “Search for Audio Devices. Prepare the Other Device to
Connect.” appears on the display window, press the
button
to start searching.
The search for Bluetooth audio devices that are available for device
registration starts and the list of the found devices appears on the
display window.
Select the Bluetooth device that you want to register for
establishing a Bluetooth connection.
When the device is registered, “Connection Complete” appears on the
display window.
Start playback on the linear PCM recorder.
Now, you can listen to audio from the Bluetooth audio device.
To disconnect the Bluetooth connection between the
linear PCM recorder and the Bluetooth audio device
Select “ Bluetooth” - “Audio Device” - “Disconnect” from the HOME menu.
When the Bluetooth connection is disconnected, playback stops.
To switch the audio output destination between the
Bluetooth headphones and the connected headphones
While a Bluetooth connection is established, no audio is output to the
headphones connected to the headphones jack.
To use the connected headphones for listening, disconnect the Bluetooth
connection.
Notes
• You cannot monitor the recording audio with the connected Bluetooth audio
device.
• The recording audio is output to the
(headphones) jack. Use the
headphones for monitoring.
Operations with the smartphone
(REC Remote)
Select
(
/
/
/
)
Enter
With the Bluetooth function of your linear PCM recorder, you can operate
your linear PCM recorder (recording, changing the recording settings, etc.)
using a smartphone.
To operate your linear PCM recorder using a smartphone
You need to install REC Remote on the smartphone and make a pairing
between the smartphone and your linear PCM recorder.
Pairing means having Bluetooth devices registered with each other to
establish a wireless connection for the first time.
To make a pairing with the linear PCM recorder using REC Remote, you
need the latest version of REC Remote. If your smartphone has REC
Remote already installed, be sure to upgrade it to the latest version.
Search Google Play or App Store for REC Remote and install it
on the smartphone.
On the linear PCM recorder, select “ Bluetooth” - “REC Remote”-
“Add Device (Pairing)” from the HOME menu and follow the
on-screen instruction to turn on the Bluetooth function.
On the smartphone, start REC Remote and select “PCM-A10”
(your linear PCM recorder) from the available device list. For
detailed instructions, refer to the help of REC Remote and the
manual supplied with the smartphone.
Now you can use the smartphone for linear PCM recorder operations.
To turn on or off the Bluetooth function of your
linear PCM recorder
When you turn off the Bluetooth function, the linear PCM recorder is
disconnected from all the devices connected via Bluetooth connections,
including a Bluetooth audio device and a smartphone with REC Remote
installed.
Select “ Bluetooth” - “Bluetooth ON/OFF” from the HOME
menu.
To turn on the Bluetooth function, select “ON.” To turn it off,
select “OFF.”
WARNING
• Do not expose the batteries (battery pack or batteries installed) to
excessive heat such as sunshine, fire or the like for a long time.
• Do not dismantle, open or shred secondary cells or batteries.
• Do not expose cells or batteries to heat or fire. Avoid storage in direct
sunlight.
• In the event of a cell leaking, do not allow the liquid to come in contact
with the skin or eyes. If contact has been made, wash the affected area
with copious amounts of water and seek medical advice.
• Secondary cells and batteries need to be charged before use. Always
refer to the manufacturer’s instructions or equipment manual for proper
charging instructions.
• After extended periods of storage, it may be necessary to charge
and discharge the cells or batteries several times to obtain maximum
performance.
• Dispose of properly.
CAUTION
Danger of explosion if battery is incorrectly replaced.
Replace only with the same or equivalent type.
Risk of explosion if battery is replaced by an incorrect type. Dispose of used
batteries according to the instructions.
Notice for the customers: the following information is only applicable to
equipment sold in the countries applying EU directives
This product has been manufactured by or on behalf of Sony Corporation.
EU Importer: Sony Europe Limited.
Inquiries to the EU Importer or related to product compliance in Europe
should be sent to the manufacturer’s authorized representative, Sony
Belgium, bijkantoor van Sony Europe Limited, Da Vincilaan 7-D1, 1935
Zaventem, Belgium.
Hereby, Sony Corporation declares that this equipment is in compliance with
Directive 2014/53/EU.
The full text of the EU declaration of conformity is available at the following
internet address:
This radio equipment is intended to be used with the approved version of
software that are indicated in the EU Declaration of Conformity. The software
loaded on this radio equipment is verified to comply with the essential
requirements of the Directive 2014/53/EU.
You can view the software version by selecting “
Settings” - “Common
Settings” - “System Information” from the HOME menu.
To prevent possible hearing damage, do not listen at high volume levels for
long periods.
The validity of the CE marking is restricted to only those countries where it is
legally enforced, mainly in the countries EEA (European Economic Area) and
Switzerland.
This equipment has been tested and found to comply with the limits set out
in the EMC regulation using a connection cable shorter than 3 meters.
Disposal of waste batteries and electrical and electronic
equipment (applicable in the European Union and other
countries with separate collection systems)
This symbol on the product, the battery or on the packaging indicates that
the product and the battery shall not be treated as household waste. On
certain batteries this symbol might be used in combination with a chemical
symbol. The chemical symbol for lead (Pb) is added if the battery contains
more than 0.004% lead. By ensuring that these products and batteries
are disposed of correctly, you will help to prevent potentially negative
consequences for the environment and human health which could be
caused by inappropriate waste handling. The recycling of the materials
will help to conserve natural resources. In case of products that for safety,
performance or data integrity reasons require a permanent connection
with an incorporated battery, this battery should be replaced by qualified
service staff only. To ensure that the battery and the electrical and electronic
equipment will be treated properly, hand over these products at end-of-
life to the appropriate collection point for the recycling of electrical and
electronic equipment. For all other batteries, please view the section on
how to remove the battery from the product safely. Hand the battery over
to the appropriate collection point for the recycling of waste batteries. For
more detailed information about recycling of this product or battery, please
contact your local Civic Office, your household waste disposal service or the
shop where you purchased the product or battery.
Operating frequency and maximum output power of wireless system
Wireless system
Operating frequency
Maximum output power
Bluetooth
2400-2483.5 MHz
< 8 dBm
NFC
13.56 MHz
-
Notice for users
All rights reserved. This manual or the software described herein, in whole
or in part, may not be reproduced, translated or reduced to any machine
readable form without prior written approval from Sony Corporation.
What you record is for personal enjoyment and use only. Copyright laws
prohibit other forms of use without the permission of the copyright holders.
Specifications
Capacity (User available capacity*¹*²)
16 GB (approx. 12.80 GB = 13,743,895,347 Byte)
Maximum recording time*³ (Built-in memory)
The maximum recording time of all the folders is as follows.
LPCM 96 kHz/24 bit (STEREO)
6 hours 35 minutes
LPCM 48 kHz/24 bit (STEREO)
13 hours 15 minutes
LPCM 48 kHz/16 bit (STEREO)
19 hours 50 minutes
LPCM 44.1 kHz/24 bit (STEREO)
14 hours 25 minutes
LPCM 44.1 kHz/16 bit (STEREO)
21 hours 35 minutes
MP3 320 kbps (STEREO)
95 hours 25 minutes
MP3 192 kbps (STEREO)
159 hours
MP3 128 kbps (STEREO)
238 hours
MP3 48 kbps (MONO)
636 hours
Battery Life (a built-in rechargeable lithium-ion battery)*⁴
The battery life spans provided here are all approximate periods of time.
For the battery life of the linear PCM recorder in any other mode, refer to the
Help Guide.
REC Mode
Recording
Playback
with the
built-in
speaker
Playback
with the
headphones
Recording
with REC
Remote
Playback
via the
Bluetooth
connection
LPCM
96 kHz/24 bit
15 hours
9 hours
18 hours
10 hours
14 hours
LPCM
44.1 kHz/16 bit
20 hours
9 hours
22 hours
12 hours
18 hours
MP3 192 kbps
22 hours
10 hours
25 hours
12 hours
18 hours
Music file
(LPCM
192 kHz/24 bit)
-
7 hours
13 hours
-
10 hours
Dimensions (w/h/d) (not incl. projecting parts and controls)
Approx. 39.2 mm × 109.5 mm × 16.0 mm
Mass
Approx. 82 g
Temperature/Humidity
Operating temperature
5°C - 35°C
Operating humidity
25% - 75%
Storage temperature
-10°C - +45°C
Storage humidity
25% - 75%
Compatible memory cards
• microSDHC cards from 4 GB to 32 GB
• microSDXC cards of 64 GB or more
*¹ A small amount of the built-in memory is used for file management and therefore not
available for user storage.
*² When the built-in memory is formatted with the linear PCM recorder.
*³ Default settings for the recording scenes.
*⁴ Measured values acquired under our measurement conditions. These values may decrease
depending on the usage conditions.
Trademarks and licenses
• Microsoft, Windows and Windows Media are registered trademarks or
trademarks of Microsoft Corporation in the United States and/or other
countries.
• microSD, microSDHC and microSDXC logos are trademarks of SD-3C, LLC.
• MPEG Layer-3 audio coding technology and patents licensed from
Fraunhofer IIS and Thomson.
• Google Play is a trademark of Google LLC.
• Apple, the Apple logo, iPhone and Mac are trademarks of Apple Inc.,
registered in the U.S. and other countries.
App Store is a service mark of Apple Inc., registered in the U.S. and other
countries.
• Use of the Made for Apple badge means that an accessory has been
designed to connect specifically to the Apple product(s) identified in
the badge, and has been certified by the developer to meet Apple
performance standards. Apple is not responsible for the operation of this
device or its compliance with safety and regulatory standards.
• Compatible iPhone models
iPhone X, iPhone 8, iPhone 8 Plus, iPhone 7, iPhone 7 Plus, iPhone SE,
iPhone 6s, iPhone 6s Plus, iPhone 6, iPhone 6 Plus, iPhone 5s, iPhone 5c,
iPhone 5
• The BLUETOOTH® word mark and logos are registered trademarks owned
by Bluetooth SIG, Inc. and any use of such marks by Sony Corporation
is under license. Other trademarks and trade names are those of their
respective owners.
• The N-Mark is a trademark or registered trademark of NFC Forum, Inc. in
the United States and in other countries.
All other trademarks and registered trademarks are trademarks or registered
trademarks of their respective holders. Furthermore, “™” and “®” are not
mentioned in each in this manual.
This product is protected by certain intellectual property rights of Microsoft
Corporation. Use or distribution of such technology outside of this product
is prohibited without a license from Microsoft or an authorized Microsoft
subsidiary.
The “Sound Organizer 2” uses software modules as shown below:
Windows Media Format Runtime
Notes on the License
This linear PCM recorder comes with software that are used based on
licensing agreements with the owners of that software.
Based on requests by the owners of copyright of these software
applications, we have an obligation to inform you of the following. Please
read the following sections.
Licenses (in English) are recorded in the built-in memory of your
linear PCM recorder. Establish a Mass Storage connection between the
linear PCM recorder and a computer to read licenses in the “LICENSE” folder.
On GNU GPL/LGPL applied software
The software that is eligible for the following GNU General Public License
(hereinafter referred to as “GPL”) or GNU Lesser General Public License
(hereinafter referred to as “LGPL”) are included in the linear PCM recorder.
This informs you that you have a right to have access to, modify, and
redistribute source code for these software programs under the conditions
of the supplied GPL/LGPL.
Source code is provided on the web. Use the following URL to download it.
We would prefer you do not contact us about the contents of source code.
Licenses (in English) are recorded in the built-in memory of your
linear PCM recorder. Establish a Mass Storage connection between the
linear PCM recorder and a computer to read licenses in the “LICENSE” folder.