SOMFY TELIS 1 CHRONIS RTS Manuel d'utilisation
Ís/ ãè8a xî, Telis 1 chronis rts
- 1/2
E
1
2
3
10s.
1. Introduction
La télécommande Telis 1 Chronis RTS permet de piloter
une application ou groupe d’applications se situant dans la même
pièce, équipées de la Radio Technology Somfy (RTS).
La Telis 1 Chronis RTS peut être utilisée soit en mode manuel, soit
en mode automatique.
Le mode manuel permet de piloter manuellement les applications
associées à la télécommande. Les programmations du mode
automatique sont désactivées dans ce mode. En mode manuel
« OFF » est affiché
Le mode automatique permet de piloter automatiquement
les applications associées à la télécommande en lançant un
ordre de montée
et un ordre de descente
par jour. Une
pré-programmation des jours est déjà effectuée d’origine. Ces
horaires peuvent être modifiés. Une deuxième programmation
appelée «
WORK» peut être effectuée et attribuée à un ou plusieurs
jours (un ordre de montée et un ordre de descente également).
Sécurité
1.1. Sécurité et responsabilité
Avant d’installer et d’utiliser ce produit, lire attentivement cette
notice. Ce produit Somfy doit être installé par un professionnel
de la motorisation et de l’automatisation de l’habitat auquel cette
notice est destinée. L’installateur doit par ailleurs se conformer aux
normes et à la législation en vigueur dans le pays d’installation, et
informer ses clients des conditions d’utilisation et de maintenance
du produit. Toute utilisation hors du domaine d’application défini par
Somfy est non conforme. Elle entraînerait, comme tout irrespect des
instructions figurant dans cette notice, l’exclusion de la responsabilité
et de la garantie Somfy. Avant toute installation, vérifier la compatibilité
de ce produit avec les équipements et accessoires associés.
1.2. Consignes spécifiques de sécurité
Pour ne pas endommager le produit :
1) Éviter les chocs !
2) Éviter les chutes !
3) Ne pas faire de projection de liquides ni l’immerger.
4) Ne pas utiliser de produits abrasifs ni de solvants pour le nettoyer.
Sa surface peut être nettoyée à l’aide d’un chiffon doux et humide.
Ne pas laisser à la portée des enfants.
2. Contenu
$
Figure A
Désignation
Q.
a
Telis 1 Chronis RTS
1
b Support mural avec cache-vis
1
c
Kit visserie
1
d Piles de type AAA (LR3)
2
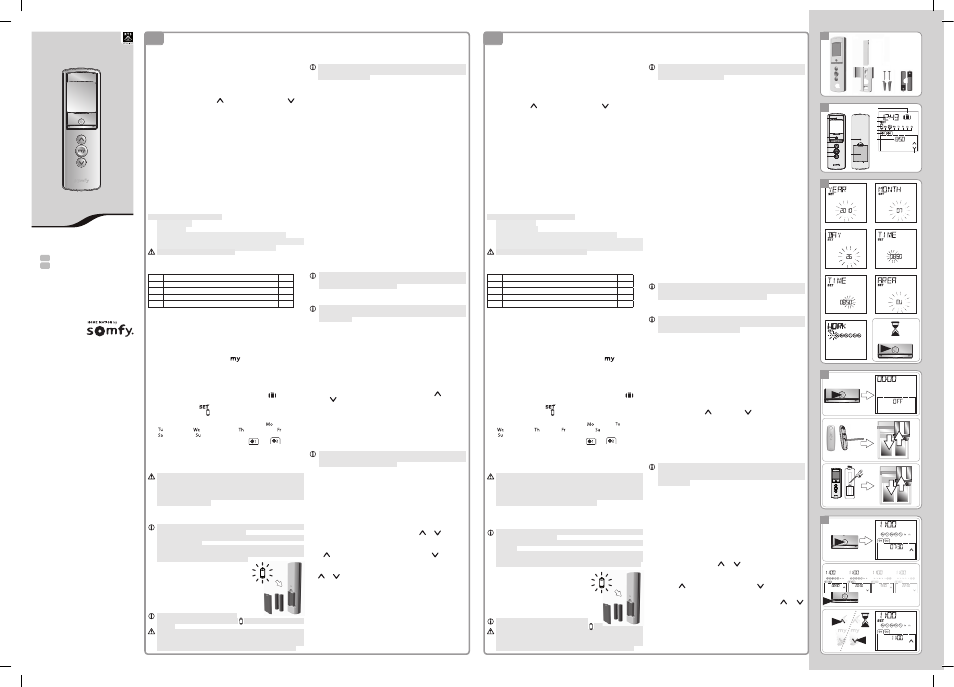
3. La Telis 1 Chronis RTS en détails
$
Figure B
e) Voyant rouge (indicateur d’émission radio),
f) Touche de sélection (),
g) Touches de navigation (ou),
h) Touche c (monter, allumer, ouvrir, orienter et augmenter
l’éclairage ou le chauffage),
i) Touche e (stopper, aller en position favorite [
]),
j) Touche a (descendre, éteindre, fermer, orienter et diminuer
l’éclairage ou le chauffage),
k) Bouton PROG.,
l) Capot des piles.
• Ecran :
m) Simulation de présence active en mode automatique :
,
n) Heure courante,
o) Mode réglage actif :
,
p) Symbole piles faibles : ,
q) Jours de la semaine (programmation travail/repos ne s’affichent
pas en programmation quotidienne) :
= lundi, = mardi,
= mercredi, = jeudi, = vendredi, = samedi,
= dimanche,
r) Ordres automatiques programmés (1
à 2
),
s) Horaire choisi pour le déclenchement de l’ordre en mode
automatique. En mode manuel « OFF » est affiché.
t) Ordres c, a.
4. Mise en service
Il est recommandé de programmer chaque moteur au préalable à
partir d’un point de commande RTS individuel de type Telis 1 RTS
et de régler les fins de course de chaque moteur avant d’utiliser la
Telis 1 Chronis RTS. Néanmoins la Telis 1 Chronis RTS peut-être
utilisée comme toute télécommande RTS pour la mise en service
des moteurs (réglage des fins de course…).
La notice ne décrit que la mise en service à l’aide d’un point de
commande RTS individuel de type Telis 1 RTS. Pour une mise en
service à l’aide de tout autre point de commande RTS, se référer à
la notice correspondante.
Après 2 minutes d’inactivité, l’écran de la Telis 1 Chronis RTS
s’éteint automatiquement.
Lorsque l’écran est éteint, appuyer d’abord sur une touche pour
l’allumer.
Lors des réglages, à tout moment un appui maintenu sur la
touche de sélection () permet de revenir en mode manuel ou
automatique. Seuls les paramètres validés sont sauvegardés.
4.1. Mise en place des piles
-
Ouvrir le capot à l’arrière de la
Telis 1 Chronis RTS.
-
Mettre en place les 2 piles de type AAA
(LR3) en respectant la polarité indiquée.
-
Remettre le capot arrière sur la
Telis 1 Chronis RTS.
-
Activer la Telis 1 Chronis RTS en
appuyant sur n’importe quelle touche.
Ne jamais utiliser de piles rechargeables.
Remplacer les piles quand le symbole ( ) apparaît sur l’écran.
En cas d’absence d’alimentation prolongée (piles usées ou
retirées), il faudra effectuer de nouveau le réglage des
paramètres généraux de la télécommande. Par contre, la
programmation des ordres automatiques est sauvegardée.
4.2. Réglage des paramètres généraux de la
télécommande
Lors de la première mise en place des piles, le mode «Réglage
de la télécommande» est activé directement : «SET» (Réglage) et
«YEAR» (Année) s’affichent sur l’écran, l’année clignote.
Après une absence d’alimentation prolongée, au passage en
mode automatique, le mode «Réglage de la télécommande»
est aussi activé directement.
À chaque étape, le paramètre à régler clignote.
-
Pour modifier le paramètre, appuyer sur les touches de
navigation (ou) (un appui maintenu fait défiler les caractères
plus rapidement).
-
Pour enregistrer le paramètre et passer au paramètre suivant,
faire un appui bref sur la touche de sélection ().
-
A tout moment, le mode «Réglage de la télécommande»
peut être désactivé par un appui maintenu sur la touche de
sélection (). Seuls les paramètres validés sont sauvegardés.
Les paramètres apparaissent dans l’ordre suivant :
$
Figure C
1)
L’année courante «YEAR».
2)
Le numéro du mois courant «MONTH».
3)
Le numéro du jour courant «DAY».
4)
L’heure courantes «TIME».
5)
Les minutes «TIME».
6)
La zone d’habitation «AREA»*.
7)
Les jours de travail/repos «WORK»**.
8)
Faire un appui maintenu sur la touche de sélection ()
pour valider le dernier paramètre jusqu’à ce que la
Telis 1 Chronis RTS revienne en mode automatique : le mode
«Réglage de la télécommande» est désactivé.
* Zone d’habitation «AREA»
La Telis 1 Chronis RTS est configurée d’origine pour changer
d’heure automatiquement entre l’heure d’été et l’heure d’hiver selon
la zone d’habitation. Sélectionner la zone d’habitation entre les
Etats-Unis (US) et l’Europe (EU), ou choisir OFF pour désactiver le
changement automatique et l’effectuer manuellement.
** Jours de travail/repos «WORK»
1)
Sélectionner les jours de travail à programmer avec les touches
de navigation (ou) .
2)
Faire un appui bref sur la touche de sélection () pour valider
le choix, les jours non cerclés seront des jours de repos par
défaut.
A tout moment, le mode «Réglage de la télécommande» peut être
désactivé par un appui maintenu sur la touche de sélection ().
Seuls les paramètres validés sont sauvegardés.
4.3. Association ou suppression d’une application
$
Figure D
La procédure à suivre pour associer une application à la
Telis 1 Chronis RTS et la supprimer est identique. Elle peut se
faire uniquement en mode manuel.
1)
Si la Telis 1 Chronis RTS est mode automatique, faire un
appui bref sur la touche de sélection () pour passer en mode
manuel.
2)
Appuyer sur le bouton PROG. du point de commande RTS
individuel déjà enregistré jusqu’au va-et-vient de l’application :
le mode programmation est activé pendant 2 min.
3)
Faire un appui bref sur le bouton PROG. de la
Telis 1 Chronis RTS : l’application effectue un va-et-vient, elle
est associée ou supprimée de la Telis 1 Chronis RTS.
-
Pour associer ou supprimer l’application ou d’autres applications,
recommencer la procédure 1 à 3.
4.4. Programmation des jours de la semaine
En mode automatique, la Telis 1 Chronis RTS permet l’envoi
automatique d’un ordre
et d’un ordre
pour chaque jour de la
semaine à un ou plusieurs groupes d’applications.
Ces ordres automatiques peuvent être :
• identiques tous les jours de la semaine (réglage par d’origine),
aucun jour n’apparaît sur l’écran,
• divisés en deux groupes de jours dans la semaine, par
exemple ; 5 jours de travail (cerclés) ayant des horaires de
montée et descente identiques, et 2 jours de repos (non
cerclés) ayant des horaires de montée et descente identiques,
qui sont différents des jours de travail.
À tout moment, le mode «Programmation des ordres
automatiques» peut être désactivé par un appui maintenu sur
la touche de sélection (). Seuls les paramètres validés sont
sauvegardés.
Pour modifier les ordres automatiques programmés, deux
méthodes sont possibles :
-
Pour attribuer l’heure courante à un ordre programmé, aller au
chapitre «Mémorisation rapide d’un ordre automatique».
-
Pour programmer un ordre automatique à un autre horaire, aller
au chapitre «Édition d’un ordre automatique».
4.4.1. Mémorisation rapide d’un ordre automatique
$
Figure E
1)
Si la Telis 1 Chronis RTS est en mode manuel, faire un appui
bref sur la touche de sélection () pour passer en mode
automatique.
2)
Appuyer sur les touches de navigation (ou) pour
sélectionner l’ordre choisi
ou
à éditer (pour tous les jours
ou pour les groupes de journées si les jours de travail ou de
repos ont été configurés).
3)
Appuyer plus de 10 secondes sur la touche c pour modifier
un ordre
ou a pour modifier un ordre
, «SET» s’affiche
à l’écran et l’ordre clignote 3 fois. Relâcher l’appui lorsque
«SET» disparaît de l’écran : l’heure à laquelle cet ordre est
exécuté est mémorisée comme ordre automatique
ou
.
-
Pour
mémoriser rapidement un autre ordre automatique
reprendre la procédure à partir de l’étape 1.
2 x LR03 AAA 1.5V
1. Introduction
The Telis 1 Chronis RTS remote control transmitter and
Timer allows you to control an end-product or group of end-products
in the same room, using Radio Technology Somfy (RTS).
The Telis 1 Chronis RTS can be used in manual mode or automatic
mode.
Manual mode allows you to manually control the end-products
assigned to the remote control transmitter. Programming in automatic
mode is deactivated in this mode. In manual mode, “OFF” is displayed
Automatic mode allows you to automatically control the
end-products assigned to the remote control transmitter by
executing one up command
and one down command
per
day. The days are preprogrammed in the factory configuration.
These times can be modified. A second program called “
WORK”
can be set and assigned to one or more days so that different
daily and weekend schedules can be programmed(also one up
command and one down command).
Safety
1.1. Safety and liability
Please read this guide carefully before installing and using this
product. This Somfy product must be installed by a professional
motorization and home automation installer/dealer for whom this
guide is intended. The installer must comply with local codes
and standards and inform the customers of the operating and
maintenance conditions for the product. Any use outside the scope
of application defined by Somfy is prohibited. This will void the
warranty and release Somfy from all liability, as will any failure to
comply with the instructions given herein. Never begin installing
before checking the compatibility of this product with the associated
devices and accessories.
1.2. Specific safety advice
To avoid damaging the product:
1) Avoid impacts!
2) Do not drop!
3) Do not spill liquid on the product or immerse it in liquid.
4) Do not use abrasive products or solvents to clean the product.
Its surface can be cleaned with a soft, damp cloth.
Keep out of the reach of children.
2. Contents
$
Figure A
Description
Q.
a
Telis 1 Chronis RTS
1
b Wall mount with screw cover
1
c
Screw kit
1
d AAA (LR3) batteries
2
3. The Telis 1 Chronis RTS buttons and display
$
Figure B
e) Red indicator light (radio transmission indicator)
f) Selection button ()
g) Arrow buttons (or)
h) c button (up, switch on, open, position and increase lighting
or heating)
i) e button (stop, go to favorite [
] position)
j) a button (down, switch off, close, position and reduce lighting
or heating)
k) PROG button
l) Battery compartment cover
• Screen:
m) Simulated presence active in automatic mode:
,
n) Current time
o) Set mode active:
p) Low battery symbol:
q) Days of the week (work or daily/rest or weekend programming
is not displayed in daily programming):
= Monday,
= Tuesday,
= Wednesday, = Thursday, = Friday,
= Saturday, = Sunday
r) Programmed automatic commands (1
to 2
)
s) Time selected for executing command in automatic mode. In
manual mode, “OFF” is displayed
t) c, a. commands
4. Set-up
Before using the Telis 1 Chronis RTS, we recommend that each
motor is pre-programmed in advance using an individual
Telis 1 RTS control point and that the end limits of each motor
are set. However, like any RTS remote control transmitter, the
Telis 1 Chronis RTS can be used for motor set-up operations
(limit adjustment, etc.).
This guide describes set-up using only an individual RTS control
point such as Telis 1 RTS. For set-up using a different RTS control
point, refer to the corresponding manual.
After 2 minutes of inactivity, the Telis 1 Chronis RTS screen
switches automatically to sleep mode.
When the screen is off or in sleep mode, briefly press any
button to turn it on.
When editing settings, pressing and holding the selection
button () allows you to return to manual or automatic mode.
Only confirmed parameters are saved.
4.1. Battery installation
-
Remove the battery cover from the back
of the Telis 1 Chronis RTS.
-
Insert the 2 AAA (LR3) batteries following
the polarity indicated.
-
Replace the battery compartment cover
on the back of the Telis 1 Chronis RTS.
-
If necessary, wake or turn on the Telis 1
Chronis RTS by briefly pressing any button.
Never use rechargeable batteries.
Replace the batteries when the ( ) symbol appears on the
display.
If there is no power supply for an extended period of time
(batteries are discharged or removed), the general/manual
parameters of the remote control transmitter will need to be
reset. However, the automatic orders are saved in memory.
4.2. Setting the general parameters of the remote
control transmitter
When the batteries are first installed, “Remote control settings”
mode is activated directly: “SET” and “YEAR” appear on the screen,
with the year flashing.
After an extended period of time with no power supply, when
automatic mode is selected, “Remote control settings” mode is
also activated directly.
At each stage, the parameter to be set will be flashing.
-
Press the arrow buttons (or) to modify the parameter (press
and hold the button to scroll the characters faster).
-
To save the parameter and move to the next parameter, briefly
press the selection button ().
-
“Remote control settings” mode can be deactivated at any time
by pressing and holding the selection button (). Only confirmed
parameters are saved.
The parameters appear in the following order:
$
Figure C
1)
“YEAR” (current year).
2)
“MONTH” (number of the current month).
3)
“DAY” (number of the current day).
4)
“TIME” (current hour).
5)
“TIME” (minutes).
6)
“AREA” (country of residence)*.
7)
“WORK” (daily/weekend)**.
8)
Press and hold the selection button () to confirm the last
parameter until the Telis 1 Chronis RTS returns to automatic
mode: the "Remote control settings" mode is deactivated.
* “AREA” (country of residence)
The Telis 1 Chronis RTS is pre-programmed at the factory to
automatically switch between summer time and winter time based
on the country of residence. Select the location of residence as the
United States (US) or Europe (EU), or choose OFF to deactivate
the automatic time change function (daylight savings) and to make
the change manually.
** “WORK” (daily/weekend)
1)
Select the work days you want to program using the arrow
buttons (or).
2)
Briefly press the selection button () to confirm the selection; by
default, the days not circled will be rest days or weekend days.
“Remote control settings” mode can be deactivated at any time
by pressing and holding the selection button (). Only
confirmed parameters are saved.
4.3. Assigning or deleting an end-product
$
Figure D
The procedure for assigning an end-product to the Telis 1
Chronis RTS and deleting it is the same. It can only be done in
manual mode.
1)
If the Telis 1 Chronis RTS is in automatic mode, briefly press the
selection button () to switch to manual mode.
2)
Press and hold the PROG button on the individual RTS control
point that has already been programmed until the end-product
moves back and forth or jogs: programming mode is activate
for 2 minutes.
3)
Briefly press the PROG button on the Telis 1 Chronis RTS: the
end-product moves back and forth or jogs and is assigned to or
deleted from the Telis 1 Chronis RTS.
-
To assign or delete the end-product or other end-products, repeat
steps 1 to 3.
4.4. Programming the days of the week
In automatic mode, the Telis 1 Chronis RTS allows an
command
and an
command to be sent automatically to one or more
groups of end-products for each day of the week.
These automatic commands can be:
• the same every day of the week (factory setting) in which case
no day appears on the screen,
• divided into two groups of days during the week (daily/
weekend), for example 5 work days (circled) which have the
same up and down times, and 2 rest days (not circled) which
have the same up and down times and are different from the
work days.
“Automatic order programming” mode can be deactivated at
any time by pressing and holding the selection button (). Only
confirmed parameters are saved.
To modify programmed automatic orders, two methods may
be used:
-
To assign the current time to a programmed order, see section
“Quick setting of an automatic command”.
-
To program an automatic order to occur at another time, see
section “Editing an automatic order”.
4.4.1. Quick setting of an automatic command
$
Figure E
1)
If the Telis 1 Chronis RTS is in manual mode, briefly press the
selection button () to switch to automatic mode.
2)
Press the arrow keys (or) to select the
or
command
that you wish to edit (for all days or for groups of days if work or
rest days have been configured).
3)
Press and hold for more than 10 seconds the c button to modify
a
command or the a button to modify a
command;
“SET” is displayed on the screen and the order flashes 3 times.
Release the button when “SET” disappears from the screen: the
time at which this order is executed is recorded as an automatic
or
order.
-
To
quickly store another automatic order, repeat the procedure
starting at step 1.
2 x LR03 AAA 1.5V
Somfy worldwide
Argentina : Somfy Argentina
Tel : +55 11 (0) 4737-3700
Australia : Somfy PTY LTD
Tel : +61 (2) 8845 7200
Austria : Somfy GesmbH
Tel : +43 (0) 662 / 62 53 08 - 0
Belgium : Somfy Belux
Tel : +32 (0) 2 712 07 70
Brasil : Somfy Brasil Ltda
Tel/fax : +55 11 3695 3585
Canada : Somfy ULC
Tel : +1 (0) 905 564 6446
China : Somfy China Co. Ltd
Tel : +8621 (0) 6280 9660
Croatia : Somfy Predstavništvo
Tel : +385 (0) 51 502 640
Cyprus : Somfy Middle East
Tel : +357(0) 25 34 55 40
Czech Republic : Somfy spol. s.r.o.
Tel : (+420) 296 372 486-7
Denmark : Somfy Nordic Danmark
Tel : +45 65 32 57 93
Export : Somfy Export
Tel : + 33 (0)4 50 96 70 76
Tel : + 33 (0)4 50 96 75 53
Finland : Somfy Nordic AB Finland
Tel : +358 (0)9 57 130 230
France : Somfy France
Tel : +33 (0) 820 374 374
Germany : Somfy GmbH
Tel : +49 (0) 7472 930 0
Greece : Somfy Hellas S.A.
Tel : +30 210 6146768
Hong Kong : Somfy Co. Ltd
Tel : +852 (0) 2523 6339
Hungary : Somfy Kft
Tel : +36 1814 5120
India : Somfy India PVT Ltd
Tel : +(91) 11 4165 9176
Indonesia : Somfy Jakarta
Representative Office
Tel : +(62) 21 719 3620
Iran : Somfy Iran
Tel : +98-217-7951036
Israel : Sisa Home
Automation Ltd
Tel : +972 (0) 3 952 55 54
Italy : Somfy Italia s.r.l
Tel : +39-024847181
Japan : Somfy KK
Tel : +81 (0)45 481 6800
Jordan : Somfy Jordan
Tel : +962-6-5821615
Kingdom of Saudi Arabia:
Somfy Saoudi
Riyadh :
Tel : +966 1 47 23 020
Tel : +966 1 47 23 203
Jeddah :
Tel : +966 2 69 83 353
Somfy Kuwait
Tel/fax : +965 4348906
Lebanon :
Tel : +961 (0) 1 391 224
Malaisia : Somfy Malaisia
Tel : +60 (0) 3 228 74743
Mexico : Somfy Mexico
SA de CV
Tel : 52 (55) 4777 7770
Morocco : Somfy Maroc
+212-22443500
Netherlands : Somfy BV
Tel : +31 (0) 23 55 44 900
Norway : Somfy Nordic Norge
Tel : +47 41 57 66 39
Poland : Somfy Sp z o.o.
Tel : +48 (22) 50 95 300
Portugal : Somfy Portugal
Tel : +351 229 396 840
Romania : Somfy SRL
Tel : +40 - (0)368 - 444 081
Russia : Somfy LLC.
Tel : +7 495 781 47 72
Serbia : Somfy Predstavništvo
Tel : 00381 (0)25 841 510
Singapore : Somfy PTE Ltd
Tel : +65 (0) 6383 3855
Slovak republic : Somfy, spol. s r.o.
Tel : +421 337 718 638
Tel : +421 905 455 259
South Korea : Somfy JOO
Tel : +82 (0) 2594 4331
Spain : Somfy Espana SA
Tel : +34 (0) 934 800 900
Sweden : Somfy Nordic AB
Tel : +46 (0) 40 16 59 00
Switzerland : Somfy A.G.
Tel : +41 (0) 44 838 40 30
Syria : Somfy Syria
+963-9-55580700
Taïwan : Somfy Development
and Taiwan Branch
+886 (0) 2 8509 8934
Thailand : Bangkok
Regional Office
+66 (0) 2714 3170
Tunisia : Somfy Tunisia
+216-98303603
Turkey : Somfy TurkeyMah
+90 (0) 216 651 30 15
United Arab Emirates :
Somfy Gulf
+971 (0) 4 88 32 808
United Kingdom : Somfy Limited
+44 (0) 113 391 3030
United States : Somfy Systems
+1 (0) 609 395 1300
EN
www.somfy.com
Ref. 51
15958A
Telis 1 Chronis RTS
EN
Installation Manual
FR
Notice d’installation
ÍS/
ÃÈ8A
XÎ
FR
2 x LR03
AAA 1,5 V
a
b
c
d
A
i
e
f
g
h
j
k
l
n
p
o
q
r
s
t
m
B
D
PROG
PROG 1s
PROG
PROG 1s
Telis 1 Chronis RTS
3
5
7
2
4
6
8
C
4 s.
1
1
2
3
Telis_1_Chronis_RTS_US_5115958A000.indd 1
16/01/2014 10:43