MAAX ANTIGUA Manuel d'utilisation
Page 3
160, boul.St-Joseph, Lachine (Québec) Canada H8S 2L3
www.maax.com
2011-06-09
10012148
© MAAX Canada Inc., 2008
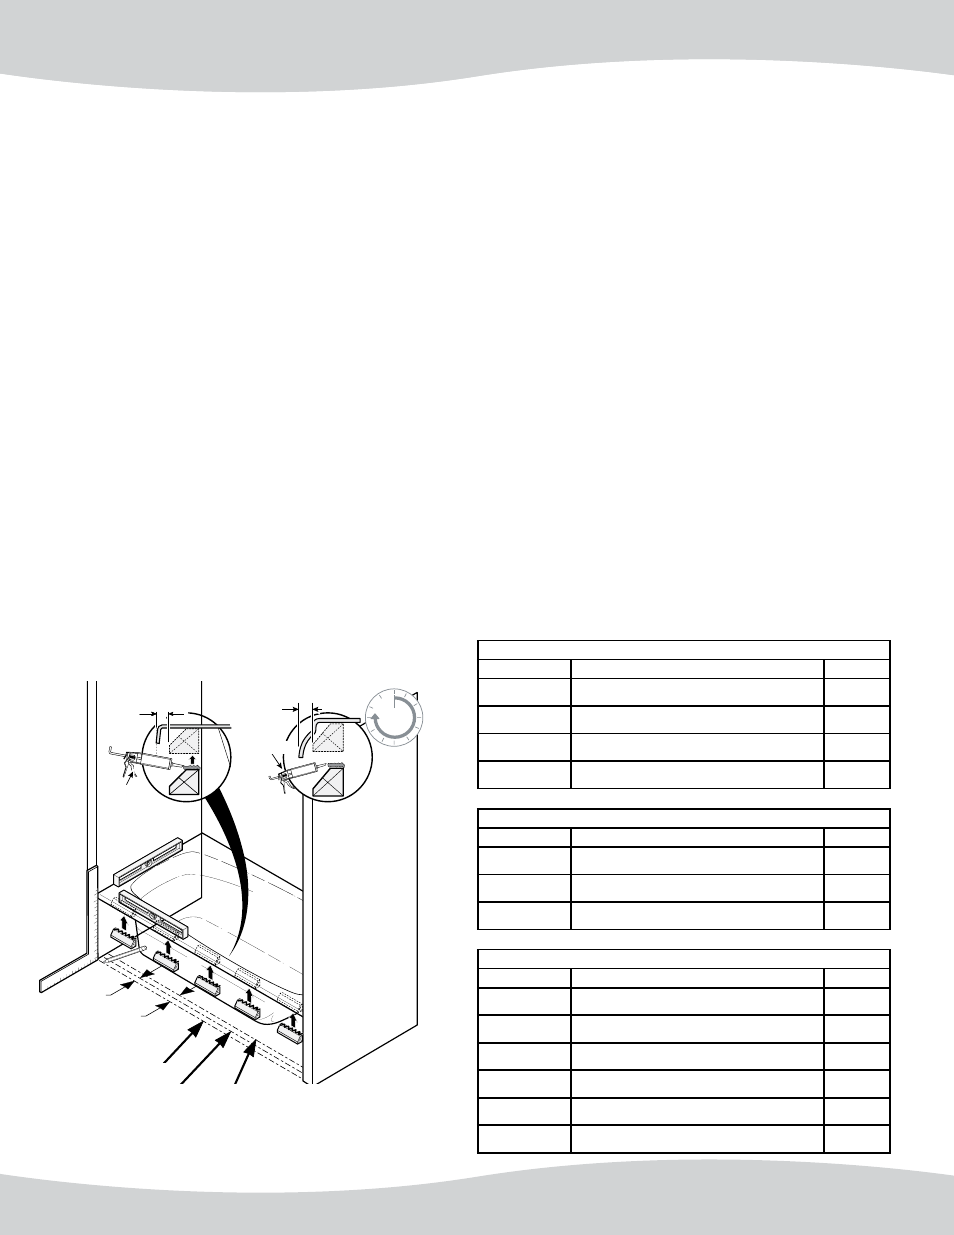
iMPoRtaNt:
Pour certains tabliers, le cadre de support devra être
entaillé afin de s’ajuster aux formes prémoulées du
tablier. Fig. 4c.
3. iNstaLLatioN du taBLier
Sabler légèrement le côté arrière du tablier aux endroits
où les pièces de Velcro seront installées. Nettoyer la
surface à l’aide d’un linge propre et doux. retirer la
pellicule qui protège le côté autocollant des pièces de
Velcro et coller les pièces de Velcro derrière le tablier tel
qu’illustré à la Fig. 2.
LaisseR sécheR 24 heuRes.
Marquer la position des pièces de Velcro sur les 2”x4”.
S’assurer que la position des pièces de Velcro du tablier
correspond à la position des marques sur les pièces de
2”x4”. retirer la pellicule qui protège le côté autocollant
des pièces de Velcro et les coller sur les pièces de 2”x4”.
Glisser la partie supérieure du tablier sous le rebord de
la baignoire, entre celui-ci et la pièce de bois et abaisser
le bas du tablier contre le 2”x4” de manière à ce que les
pièces de Velcro adhèrent à l’arrière du tablier.
Fig. 3.
Glisser la partie supérieure du tablier sous le rebord de
la baignoire, entre celui-ci et la pièce de bois
(Fig. 3) et
abaisser le bas du tablier contre le 2”x4” et fixer le tablier
en position à l’aide des vis fournies. Installer les cache-vis.
Fig. 4a.
1/2"
(13 mm)
1 1/2"
(38 mm)
Silicone
1/2"
(13 mm)
1/2"
(13 mm)
hours
heures
24
Silicone
Fig. 1
A
B
105607
105608
105609
iMPoRtaNt:
For some models, a cut-out may need to be made in
the wood framing to accomodate the apron design.
Fig. 4c.
3. aPRoN iNstaLLatioN
Lightly sand the back side of the apron where the Velcro
strips will be installed. Clean surface with soft clean
cloth. remove the protective film on the back of the
Velcro strips and place the strips on the back of the
apron as shown in
Fig. 2.
aLLow to dRy FoR 24 houRs.
Mark the Velcro pieces position on the framework. Make
sure that the Velcro pieces position on both apron and
framework fit together. remove the protective film on
the back of the Velcro strips and fix the strips to the
framework.
Install the apron by sliding the upper edge of the apron
under the edge of the bathtub and push down the apron
against the 2”x4” so that the Velcro sticks to the back
side of the apron.
Fig. 3.
Install the apron by sliding the upper edge of the apron
under the edge of the bathtub
(Fig. 3) and push down the
apron against the 2”x4”. Install #8 x ¾” screws and screw
caps included.
Fig. 4a.
Model / Modèles : 102639, 105227, 102725, 102732, 102726, 102733, 101239, 105608, 105609
# Parts / Pièces
description
Qty / Qte
10002835
Screw #8 X ¾ " SS Type A Flat
Vis #8 X ¾ " SS Type A Plate
6
10048084-003
Snap cap decorative white
Capuchon decoratif blanc
6
10002880
Tub wall washer ( Snap base # 6-8)
receveur cache vis # 6-8
6
10005184
Block - Yellow pine 2 ¼ " X 3 ½ "
Bloc - pin jaune 2 ¼ " X 3 ½ "
5
Model / Modèles : 101237, 101283, 101295
# Parts / Pièces
description
Qty / Qte
10024216
Velcro hook white 18 X 25 mm
Velcro piquant blanc 18 X 25 mm
6
10024217
Velcro loop white 18 X 25 mm
Velcro doux blanc 18 X 25 mm
6
10005184
Block - Yellow pine 2 ¼ " X 3 ½ "
Bloc - pin jaune 2 ¼ " X 3 ½ "
5
Model / Modèles : 102728, 102735
# Parts / Pièces
description
Qty / Qte
10002835
Screw #8 X ¾ " SS Type A Flat
Vis #8 X ¾ " SS Type A Plate
6
10048084-003
Snap cap decorative white
Capuchon decoratif blanc
6
10002880
Tub wall washer ( Snap base # 6-8)
receveur cache vis # 6-8
6
10005184
Block - Yellow pine 2 ¼ " X 3 ½ "
Bloc - pin jaune 2 ¼ " X 3 ½ "
5
10024216
Velcro hook white 18 X 25 mm
Velcro piquant blanc 18 X 25 mm
6
10024217
Velcro loop white 18 X 25 mm
Velcro doux blanc 18 X 25 mm
6