Fig. 3, Fig.3 – Medal Sports CTC1414815 Manuel d'utilisation
Page 9
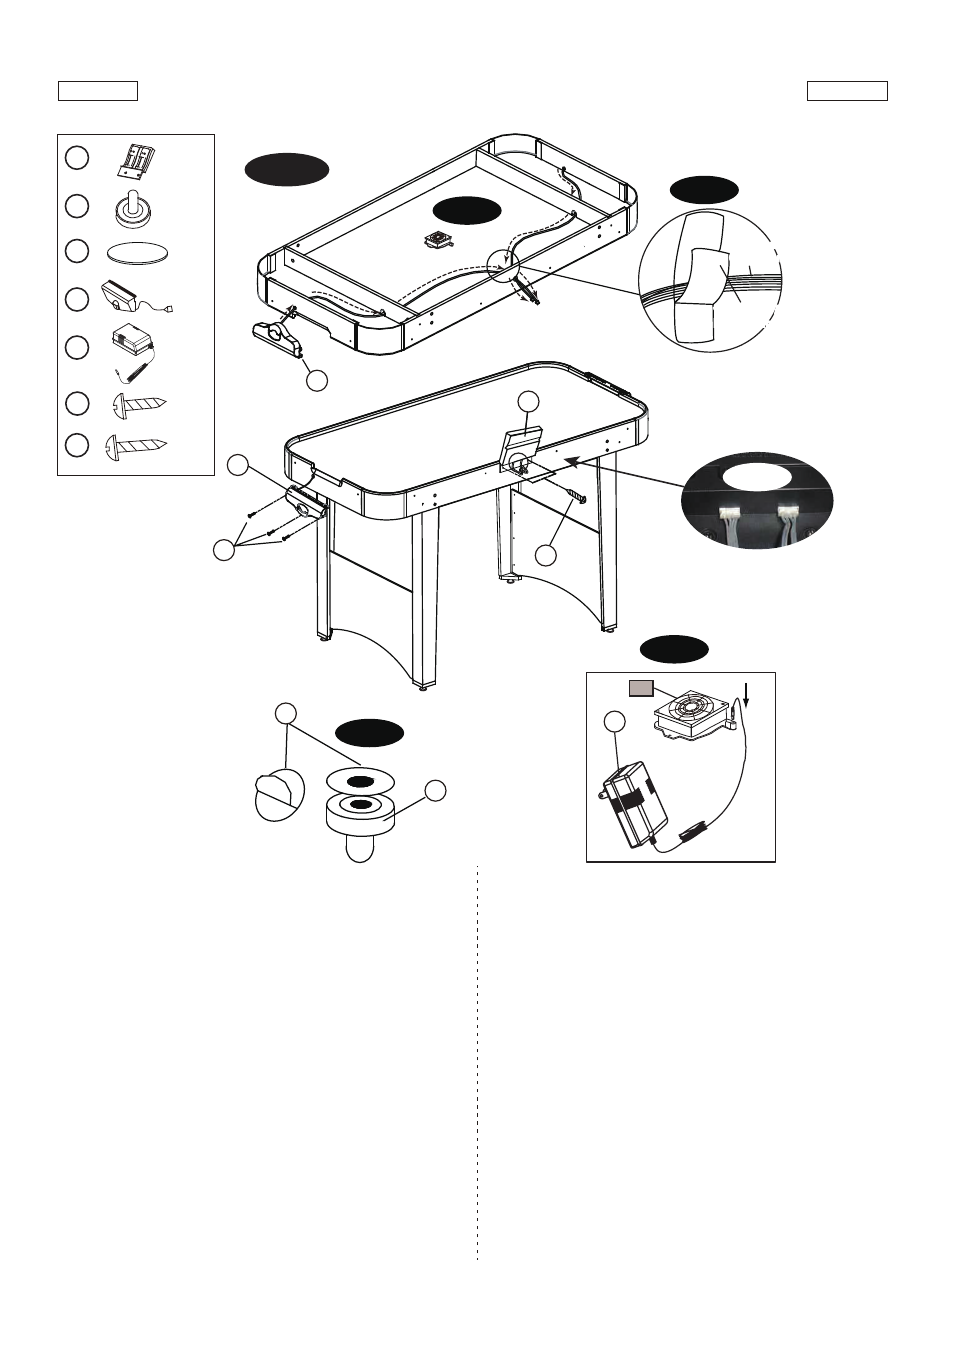
FIG.3
7. Faites passer le câble de Goal (#10) par les ouvertures
des tabliers finals et le support du terrain de jeu dans
l’ouverture du tablier latéral puis utilisez les bandes Velcro
pour fixer le câble du marqueur.
Voir FIG. 3A & 3B.
8. Fixez les Goals (#10) à chaque Tablier Final avec trois vis
(#A4).
Voir FIG. 3.
9. Fixez le marqueur Electronique (#6) sur le tablier latéral
dans les orifices pré-percés avec deux vis (#A5). Insérez
le câble du Marqueur dans le Marqueur Electronique (#6).
Voir FIG. 3 & 3C.
10. Otez le papier à l’arrière du Tampon Feutre (#9) et
collez-les au fond des Lanceurs (#8).
Voir FIG. 3D.
11. Insérez l’adaptateur (#11) sur le Moteur DC (#P1).
Voir FIG. 3E.
FIG.3
7. Thread the wire from Goal Box (#10) through the
openings of the end aprons and support of the
playfield to the opening of side apron and use Velcro
Straps to fix Scorer Wire.
See FIG. 3A & 3B.
8. Attach the Goals (#10) to each End Apron using
three Screws (#A4).
See FIG. 3.
9. Attach the Electronic Scorer (#6) to the side apron in
the pre-drilled holes using two Screws (#A5). Insert
the Scorer Wire into the Electronic Scorer (#6).
See FIG. 3 & 3C.
10. Tear off the backside paper of the Felt Pad (#9)
and stick them at the bottom of the Pushers (#8).
See FIG. 3D.
11. Insert the Adaptor (#11) into the DC Motor (#P1).
See FIG. 3E.
FIG. 3
X 2
X 2
X 1
X 2
X 2
X 1
6
8
9
10
11
A5
X 6
A4
FIG. 3D
9
8
FIG. 3E
6
A4
A5
10
FIG. 3C
FIG. 3A
FIG. 3B
10
underside the table /
Sous la table
scorer wire /
Câble de marqueur
scorer wire /
Câble de marqueur
velcro strap /
Bande Velcro
velcro strap /
Bande Velcro
P1
11
Français
English
1414815
8
(Continued on the next page.)
(Suite page suivante.)
www.themdsports.com