Fcc notice – Curtis SRCD261 Manuel d'utilisation
Page 2
13) Unplug this apparatus during lightning storms or when unused for long periods of time.
14) Refer all servicing to qualified service personnel. Servicing is required when the apparatus has been
damaged in any way, such as power-supply cord or plug is damaged, liquid has been spilled or
objects have fallen into the apparatus, the apparatus has been exposed to rain or moisture, does
not operate normally, or has been dropped.
15) Grounding or Polarization – This product may be equipped with a polarized alternating-current line
plug (a plug having one blade wider than the other). This plug will fit into the power outlet only one
way. This is a safety feature. If you are unable to insert the plug fully into the outlet, try reversing the
plug. If the plug should still fail to fit, contact your electrician to replace your obsolete outlet. Do not
defeat the safety purpose of the polarized plug.
16) Alternate Warnings - This product is equipped with a three-wire grounding-type plug, a plug having a
third (grounding) pin. This plug will only fit into a grounding-type power outlet. This is a safety feature.
If you are unable to insert the plug into the outlet, contact your electrician to replace your obsolete
outlet. Do not defeat the safety purpose of the grounding-type plug.
17) Ventilation – Slots and openings in the cabinet are provided for ventilation and to ensure reliable
operation of the product and to protect it from overheating, and these openings must not be blocked
or covered. The openings should never be blocked by placing the product on a bed,,sofa, rug, or
other similar surface. This product should not be placed in a built-in installation such as a bookcase
or rack unless proper ventilation is provided or the manufacturer’s instructions have been adhered
to.
18) The MAINS plug or an appliance coupler is used as the disconnect device, the disconnect device
shall remain readily operable.
19) 回: CLASS II apparatus with double insulation, and no protective earth provided.
FCC NOTICE
This equipment has been tested and found to comply with the limits for a Class B digital device, pursuant
to Part 15 of the FCC Rules. These limits are designed to provide reasonable protection against harmful
interference in a residential installation. This equipment generates, uses and can radiate radio frequency
energy and, if not installed and used in accordance with the instructions, may cause harmful interference
to radio communications.
However, there is no guarantee that interference will not occur in a particular installation. If this
equipment does cause harmful interference to radio or television reception, which can be determined by
turning the equipment off and on, the user is encouraged to try to correct the interference by one or more
of the following measures:
– Reorient or relocate the receiving antenna.
– Increase the separation between the equipment and receiver.
– Connect the equipment into an outlet on a circuit different from that to which the receiver is needed.
– Consult the dealer or an experienced radio/TV technician for help.
- EN 2 -
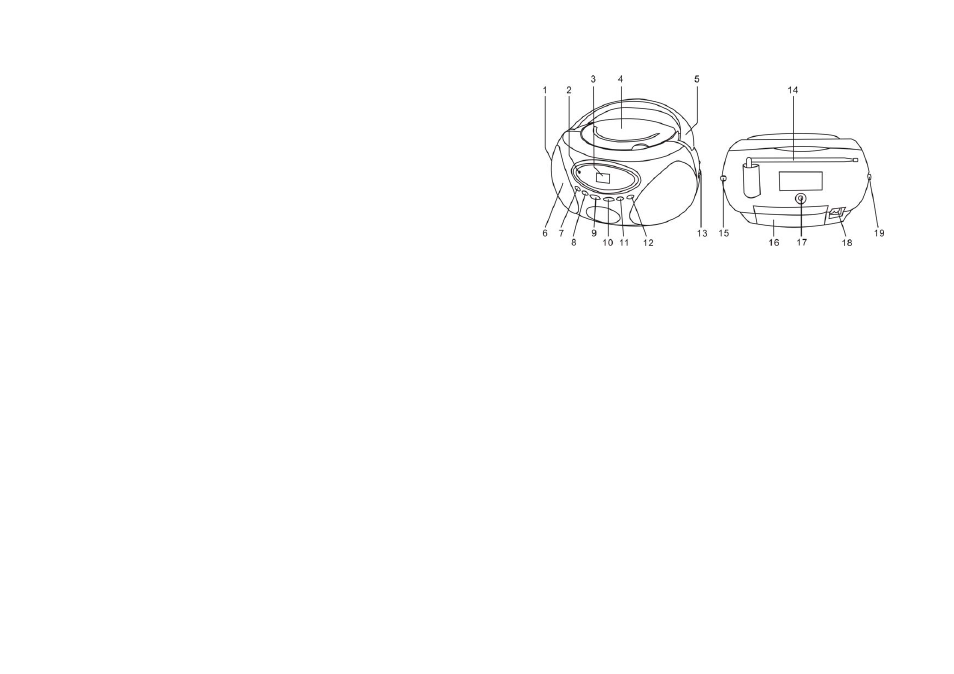
LOCATION OF CONTROLS
1
Volume Control
11
CD Stop Button
2
Power Indicator
12
CD Play/Pause Button
3
LED Display
13
Tuning Control
4 CD
Door
14 FM
Antenna
5
Carry Handle
15
Band Switch (AM/FM)
6 Speaker
16 Battery
Door
7
CD Repeat Button
17
Aux. Line-in Jack
8
CD Program Button
18
AC Socket
9 CD
Skip/Search
Button
19
Function Switch (CD-AUX/OFF-RADIO)
10 CD
Skip/Search
Button
AC OPERATION
Connect the plug to the AC socket of the unit and the other end to a standard AC outlet.
ATTENTION
1.
Do not plug or unplug the power cable while you have wet hands;
2.
When planning not to use this unit for a long time, disconnect the power cable from the wall outlet;
3.
When disconnecting the power cord from the wall outlet, do not pull on the cord in order to avoid
shock risks caused by damaged cable.
BATTERY OPERATION
Disconnect the AC Cord Set completely. Open the Battery Compartment Door and insert 6 pieces UM-2
"C" size batteries into the battery compartment with battery polarity as shown inside the battery
compartment.
- EN 3 -