Sony SU-27HX1 Manuel d'utilisation
Su-27hx1, Instructions, Instrucciones
1
INSTRUCTIONS
The SU-27HX1 TV stand is designed for use only with Sony 27-inch TV set
listed to the right.
INSTRUCCIONES
Este soporte del televisor SU-27HX1 ha sido diseñado para ser usado
solamente con el televisor Sony de 68.6 cm (27 pulg.) notado a la derech
INSTRUCTIONS
Le meuble de télévision SU-27HX1 est conçu pour être utilisé avec un
téléviseur Sony de 68.6 cm (27 pouces) indiqué à droite.
NOTES ON USE
●
Do not place the stand in a location near a heat
source, such as a radiator, or in a place subject
to di rect sunlight.
●
Clean the stand periodically with a soft cloth.
If fi nger prints, food and beverage stains, etc.,
are dif fi
cult to remove, use a cloth moistened
with a mild detergent solution. Do not use a
scouring powder, abrasive pad or sol vent.
NOTAS ACERCA DEL USO
●
No instale el soporte del televisor en un lugar cerca de
una fuente de calor, tal como un radiador, ni tampoco
bajo la luz directa del sol.
●
Limpie el soporte periódicamente con un paño suave.
Si tiene difi cultad para eliminar huellas dactilares,
manchas de comida o de bebida use un paño mojado
en una solución detergente suave. No utilice polvos
o esponjas abrasivas, ni tampoco solventes.
NOTES D’EMPLOI
●
N’installez pas le meuble à proximité d’une source
de chaleur, notamment un radiateur, ou dans un
endroit exposé aux rayons directs du soleil.
●
Nettoyez régulièrement le meuble avec un chiffon
doux. S’il est diffi
cile de faire disparaître des
empreintes, des taches de boisson ou d’aliments,
par exem
ple, utilisez un chiffon humide et une
solution à base de détergent doux. N’utilisez pas de
poudre à récurer, de tampon abrasif ou de solvant.
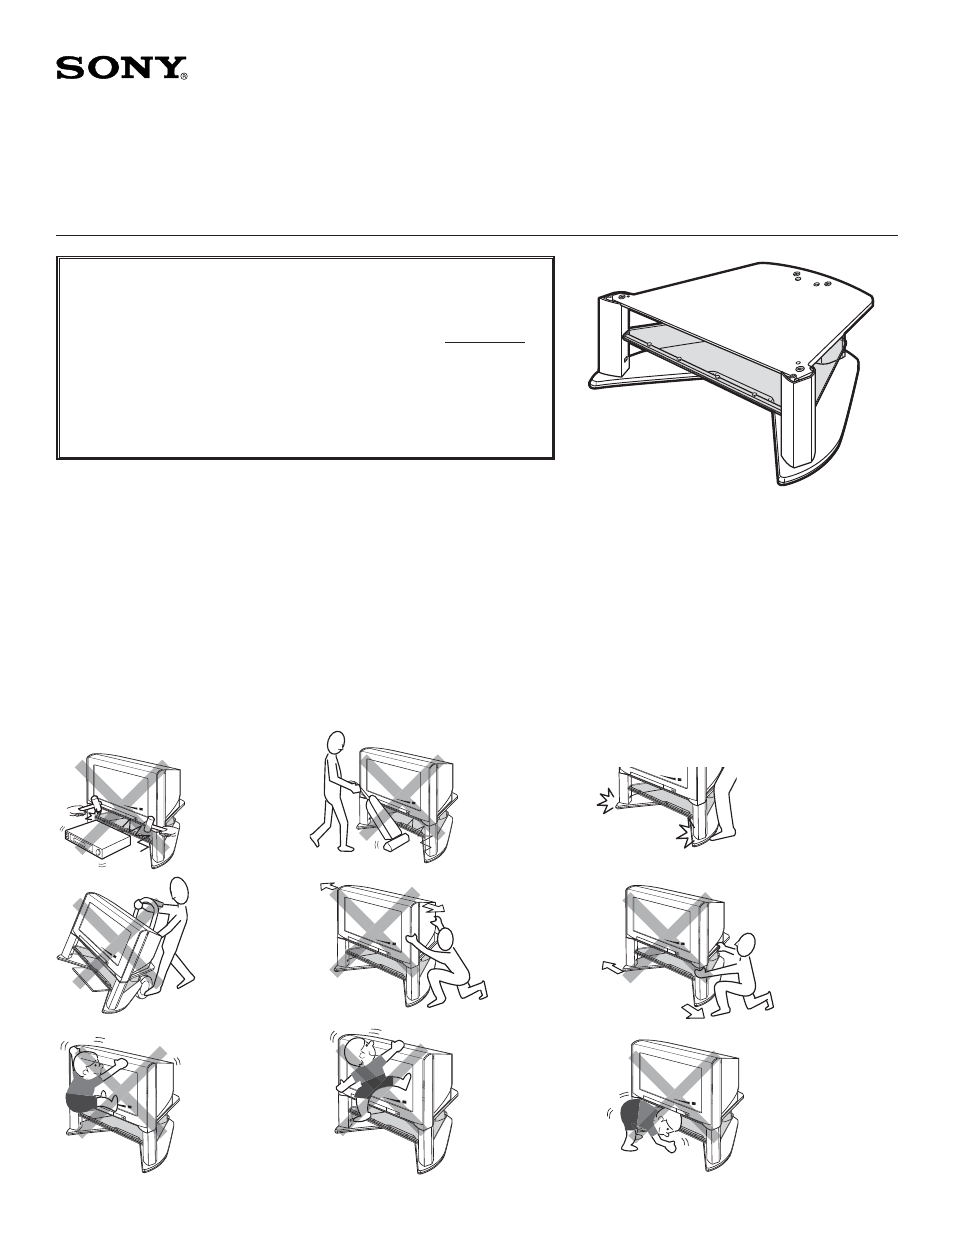
ASSEMBLED STAND
SOPORTE ENSAMBLADO
MEUBLE ASSEMBLÉ
WARNING / ADVERTENCIA / AVERTISSEMENT
©
2004 by Sony Electronics Inc.
SU-27HX1:
KV-27HS420
KV-29DRC420
TV STAND/SOPORTE DEL TELEVISOR/
MEUBLE DE TÉLÉVISION
SU-27HX1
Be cautious of the base board
when walking near the stand to
prevent foot injury.
Favor de tener precaución
cuando se camine cerca del
estante para evitar accidentes.
Être prudent avec la planche de
base lors du passage proche
du meuble afi n d’eviter une
blessure aux pieds.
Do not give the glass
shelf a sudden shock.
No le dé una sacudida
brusca a la repisa de
vidrio.
Ne pas soumettre
l’étagére en verre á un
choc brusque.
To avoid serious injury, do
not allow children to hang
from the television set.
Para evitar lesiones
severas, no permita que
los niños se cuelguen del
conjunto del televisor.
Pour éviter les blessures
graves, ne laissez aucun
enfant s’accrocher au
téléviseur.
To avoid injury to the user
and damage to the stand, do
not use the shelf as a step.
Para evitar lesiones al
usuario y daño al mueble, no
use la repisa como escalón.
Pour éviter que l’utilisateur
se blesse et que le meuble
soit endommagé, ne l’utilisez
pas comme marchepied.
Do not allow children to crawl
under/between glass shelves.
No permita que los niños
se arrastren bajo/entre las
repisas de vidrio.
Ne pas laisser les enfants
ramper sous ou entre les
étagéres en verre.
Do not use dolly.
No usar diablito.
Ne pas utiliser un diable.
Do not push/pull TV set.
No empujar o jalar el
televisor.
Ne pas pousser/tirer le
téléviseur.
Do not push/pull on
legs of TV stand.
No empujar o jalar
sobre los pilares del
soporte de televisor.
Ne pas pousser/tirer sur
les jambes du meuble
de télévision.
Do not hit edge of glass
shelf with a vacuum cleaner
No golpear la orilla de la
repisa de vidrio con una
aspiradora
Ne pas heurter le rebord de
l’étagére en verre avec un
aspirateur.