MAAX MOMENT 5830 Manuel d'utilisation
Maison MAAX
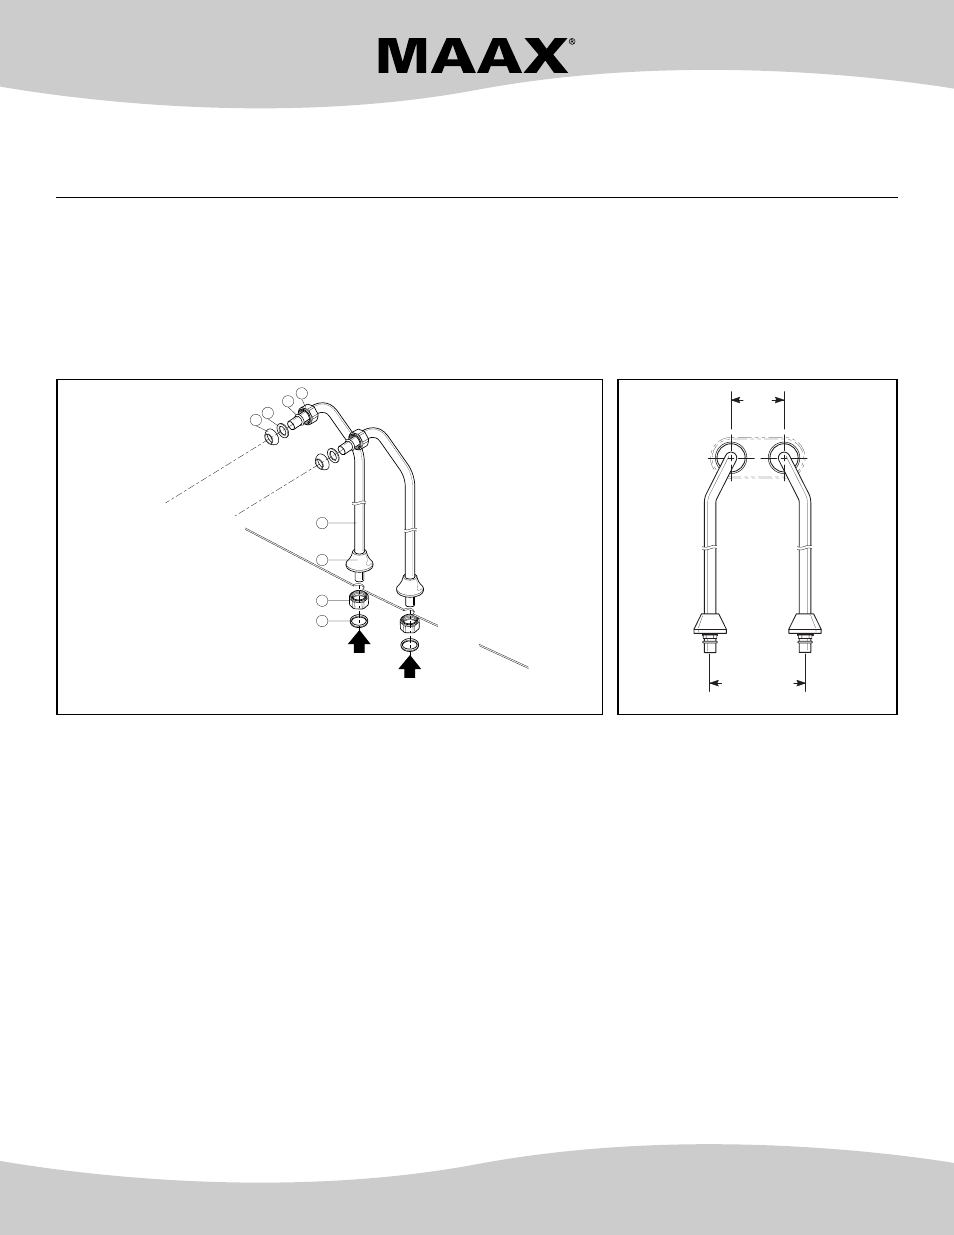
INSTALLATION
• Mesurer la hauteur du sol jusqu'au centre des tubes
d'entrée d'eau du robinet, à l'endroit où seront connectés
les tubes de canalisation (5) et couper la partie inférieure
des tubes de canalisation (5) pour obtenir la hauteur
précédemment mesurée. I
MPORTANT
: Ne pas couper
l'extrémité supérieure des tubes de canalisation, ce
qui pourrait entraîner des dommages importants et ce qui
annulerait la garantie. Une bague (3) est fixée au haut de
ces tubes et celle-ci permet de maintenir la pression entre
l’écrou (4) et les tubes filetés du robinet.
• À l’extrémité supérieure des tubes de canalisation (5),
glisser les rondelles de friction en métal (2) et les rondelles
coniques en caoutchouc 1/2" (1).
• Assembler les tubes de canalisation (5) au robinet et fixer
en position en glissant l’écrou 3/4”-14 (4) sur les tubes de
canalisation (5), l'extrémité femelle vers le robinet, et
visser les écrous (4) aux tubes filetés du robinet.
• Glisser les rosaces 1/2" (6) sur l'extrémité inférieure des
tubes de canalisation (5) et glisser un écrou 3/4"-14 (7),
l'extrémité femelle vers le sol, et la rondelle 1/2" (8).
Appliquer du téflon sur toutes les connections filetées et
visser l'ensemble en position.
INSTALLATION
• Measure the height from the floor to the centre of the
faucet's water entry tubes, at the site where the piping
tubes (5) will be connected and cut the lower part of the
piping tubes (5) to obtain the height previously
measured. I
MPORTANT
: Do not cut the upper extremity
of the piping tubes, which could cause serious damage
and void the warranty. A collar (3) is set at the top of
these tubes and makes it possible to maintain pressure
between the nut (4) and the threaded tubes of the
faucet.
• At the upper extremity of the piping tubes (5), slide the
metal friction washers (2) and the 1/2" rubber tapered
washers (1).
• Assemble the piping tubes (5) to the faucet and set into
position by sliding the 3/4"-14 nut (4) on the piping tubes
(5), the female end towards the faucet and slide the nuts
(4) onto the threaded tubes of the faucet.
• Slide the 1/2" flanges (6) on the lower extremity of the
piping tubes (5) and slide a 3/4"-14 nut (7), the female
extremity towards the floor and the 1/2" washer (8). Apply
Teflon on all threaded connections and screw the
assembly into position.
5
6
7
8
1
2
3
4
Hot Water
Eau chaude
Cold Water
Eau froide
Floor
Plancher
Bathtub faucet
Robinet de baignoire
10007298-XXX
Installation Instructions / Instructions d’installation
PIPING KIT / CANALISATION
10004146-XXX
8" (203 mm)
Centers/Centre
3 3/8"
(86 mm)
Note : Apply Teflon tape (included) on all
threaded connections to avoid leaks.
Note : Appliquer du ruban téflon (inclus)
sur toutes les connections filetées
pour éviter les fuites.
IN CASE OF PROBLEMS
If you have any problems with our product, DO NOT
CALL THE STORE. Contact one of our customer service
representatives at 1 888 304-4388. Our experts can
advise you and will do all they can to resolve your
problem diligently. The necessary parts will be sent to you
immediately. There is no warranty on the installation,
but if you have any problems, we will be happy to render
assistance.
EN CAS DE PROBLÈME
Si vous éprouvez un problème quelconque avec notre produit
ou si certaines pièces manquent ou ont été endommagées,
NE TÉLÉPHONEZ PAS AU MAGASIN. Communiquez plutôt
avec un de nos représentants du service à la clientèle au
numéro 1 888 304-4388. Nos experts vous conseilleront et
s’efforceront de résoudre votre problème avec diligence. Les
pièces requises vous seront immédiatement envoyées. Nous
ne garantissons pas l’installation, mais si toutefois vous
éprouvez des difficultés, il nous fera plaisir de vous aider.
MAAX Lachine
160, boul.St-Joseph, Lachine (Québec) Canada H8S 2L3
www.maax.com
0405
10024567
© MAAX Canada Inc., 2005