Kichler 45088 Manuel d'utilisation
Luminaires Kichler
IMPORTANT SAFETY INSTRUCTIONS
LIGHTED BULB IS HOT!
WARNING: To reduce the risk of FIRE or INJURY TO PERSON:
• Turn off and allow to cool before replacing bulb.
• Bulb gets HOT QUICKLY! Contact switch only when turning off.
• DO NOT remain in light if skin feels warm. (Light is intense,
may cause “sunburn”)
• DO NOT look directly at lighted bulb.
• Keep materials away from bulb that may burn.
• Use ONLY with wattage specified or lower.
• DO NOT touch bulb at any time, use a soft cloth. Oil from skin
may damage bulb.
• DO NOT operate fixture with missing or damaged glass.
1) Assemble mounting screws to backpan using hexnut.
2) At the center of the backpan are knockout slots. Remove
the set that matches your outlet box.
3) Secure the backpan to the outlet box.
4) Anchor the backpan to the wall using the set of holes at
each end of fixture using wood screws, toggle bolts, plastic
anchors, etc.
5) TURN OFF POWER.
IMPORTANT: Before you start, NEVER attempt any work
without shutting off the electricity until the work is done.
a) Go to the main fuse, or circuit breaker, box in your
home. Place the main power switch in the “OFF”
position.
b) Unscrew the fuse(s), or switch “OFF” the circuit breaker
switch(s), that control the power to the fixture or room
that you are working on.
c) Place the wall switch in the “OFF” position. If the fixture
to be replaced has a switch or pull chain, place those in
the “OFF” position.
6) Connect fixture ground wire to outlet box ground wire with
wire connector. Never connect ground wire to black or white
power supply wire.
7) Make wire connections (connectors not provided). Reference
chart below for correct connections and wire accordingly.
8) Carefully push wire connections back into outlet box making
sure all connections remain secure.
9) Slip faceplate over mounting screws and backpan.
NOTE: Be certain wires do not get pinched between
backpan and faceplate.
10) Secure faceplate to backpan using threaded balls.
11) Insert recommended bulb. CAUTION: DO NOT touch bulb
with bare hands. If this happens, clean bulb with denatured
alcohol and a lint free cloth.
12) Slip glass sleeve over bulb.
13) Place front glass in between faceplate and curved bar,
aligning holes in glass with holes on inside of bar.
14) Push small rubber washers onto ball studs.
15) From back of glass, thread ball studs into holes in glass and
and curved bar.
16) Tighten ball studs to secure glass to bar. (DO NOT over
tighten.)
17) Set top glass on top of fixture aligning holes in glass with
holes in tabs on back plate.
18) Push small rubber washers onto Phillip head screws.
19) From top of glass, thread Phillip head screws into holes in
glass and tabs. Tighten screws to secure glass to fixture.
(DO NOT over tighten.)
20) Raise bottom glass up to fixture, aligning holes in glass with
holes in tabs on backplate.
21) Push small rubber washers onto Phillip head screws.
22) From bottom of glass, thread Phillip head screws into holes
in glass and tabs. Tighten screws to secure glass to fixture.
(DO NOT over tighten.)
Connect Black or
Red Supply Wire to:
Connect
White Supply Wire to:
Black
White
*Parallel cord (round & smooth)
*Parallel cord (square & ridged)
Clear, Brown, Gold or Black
without tracer
Clear, Brown, Gold or Black
with tracer
Insulated wire (other than green)
with copper conductor
Insulated wire (other than green)
with silver conductor
*Note: When parallel wires (SPT I & SPT II)
are used. The neutral wire is square shaped
or ridged and the other wire will be round in
shape or smooth (see illus.)
Neutral Wire
Date Issued: 1/04/13
IS-45088-CB
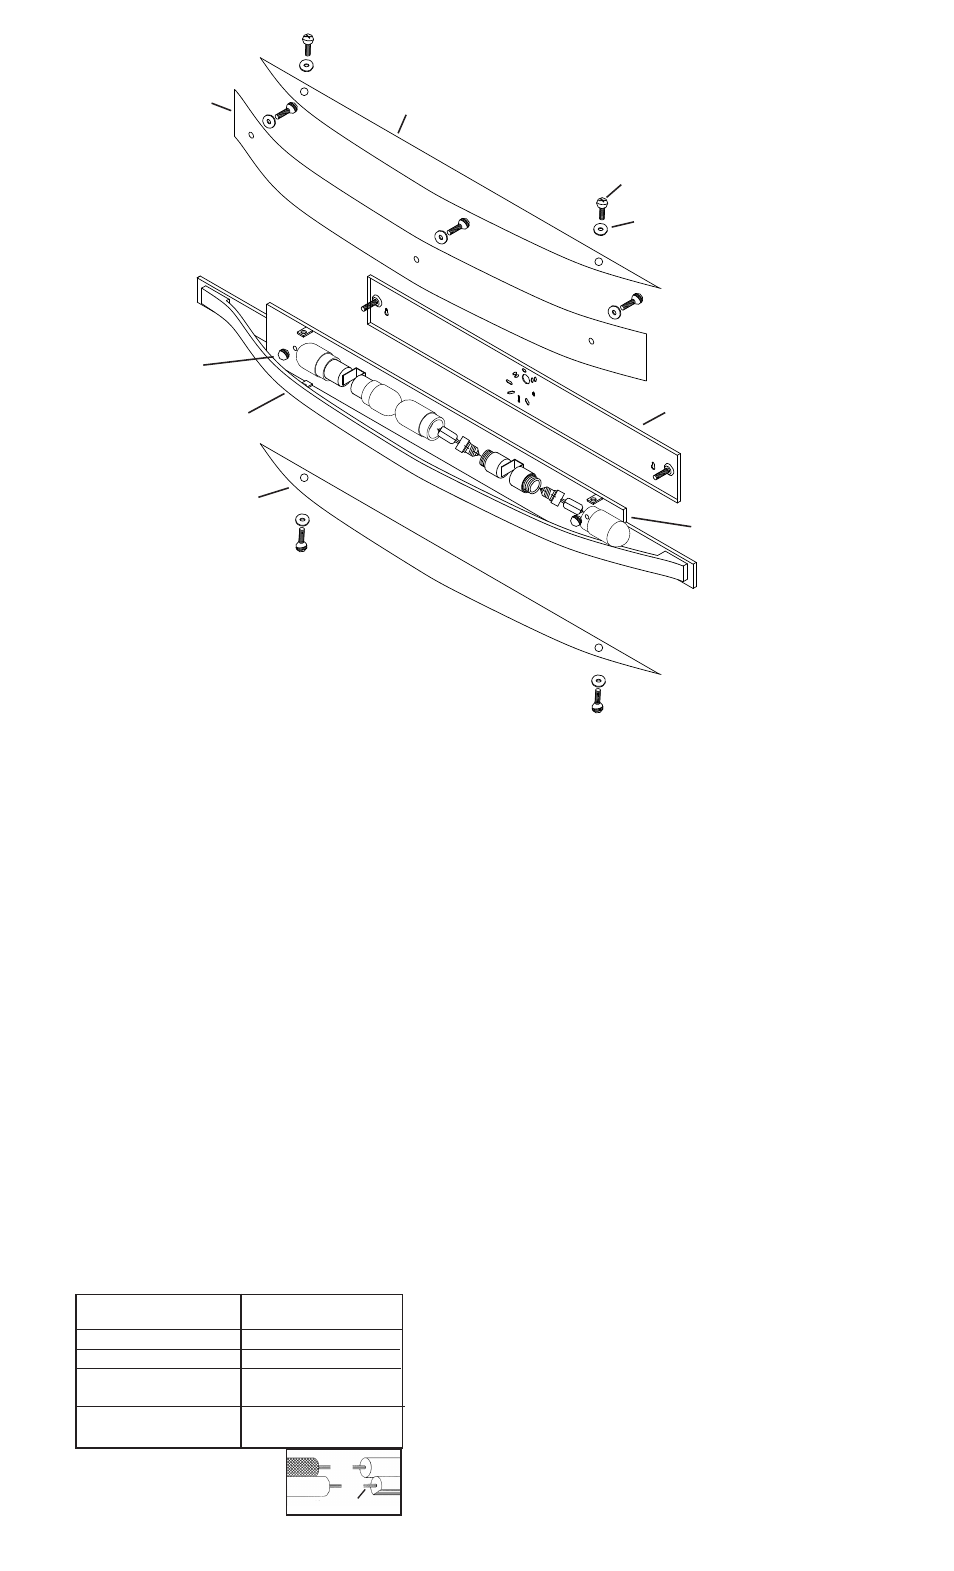
FACEPLATE
PLAQUE FRONTALE
INSTRUCTIONS
For Assembling and Installing Fixtures in Canada
Pour L’assemblage et L’installation Au Canada
FRONT GLASS
VERRE
BACKPAN
PANNEAU ARRIÈRE
THREADED BALL
BOULE
PHILLIP HEAD SCREW
VIS À TÊTE
SMALL RUBBER WASHER
PETITE RONDELLE
CAOUTCHOUTÉE
CURVED BAR
BARRE COURBÉE
TOP GLASS
VERRE SUPÉRIEUR
BOTTOM GLASS
VERRE INFÉRIEUR