Kichler 15745 Manuel d'utilisation
Kichler
Kichler
®
Design Pro LED
Hardscape Fixture Installation Instructions
P/N: 15745AZT/BBR/CO, 15746AZT/BBR/CO, 15756AZT/BBR/CO
Dev. No: CP300289AZT/BBR/CO, CP300347AZT/BBR/CO, CP300348AZT/BBR/CO
READ ALL INSTRUCTIONS CAREFULLY BEFORE BEGINNING INSTALLATION
KEEP THESE INSTRUCTIONS
This fixture is intended for installation in accordance with the National Electric Code (NEC) and Local code specifications. Failure to adhere to
these codes and instructions may result in serious injury and/or property damage and will void the warranty.
1)
WARNING: This fixture is not to be installed within 10 feet (3M) of a pool, spa, or fountain.
2) This fixture is to be used only with a power unit (transformer) rated a maximum of 300 W (25 AMPS) 15 volts.
3) The 18AWG fixture wire is not intended for direct burial.
4) Direct burial rated wire is to be buried a minimum of 6” (152mm) beneath the surface of the ground. NOTE: If additional Direct Burial wire is needed,
contact your local Kichler
®
landscape distributor.
• 8 GA wire can be purchased in length of 250’ (76 M), 15503-BK.
• 10 GA wire can be purchased in length of 250’ (76 M), 15504-BK.
• 12 GA wire can be purchased in lengths of 100’ (30 M), 15501-BK; 250’ (76 M), 15502-BK; 500’ (152M), 15505-BK; and 1000’ (304 M),
15506-BK.
5) DO NOT INSTALL in walls where the capstones overhang the wall less than 3/4” [19 mm]
6) Wiring connections must be made with approved/listed wire connection device(s) suitable for the application. Do not exceed manufacturers’ wiring
combination specifications for size and quantity of conductors.
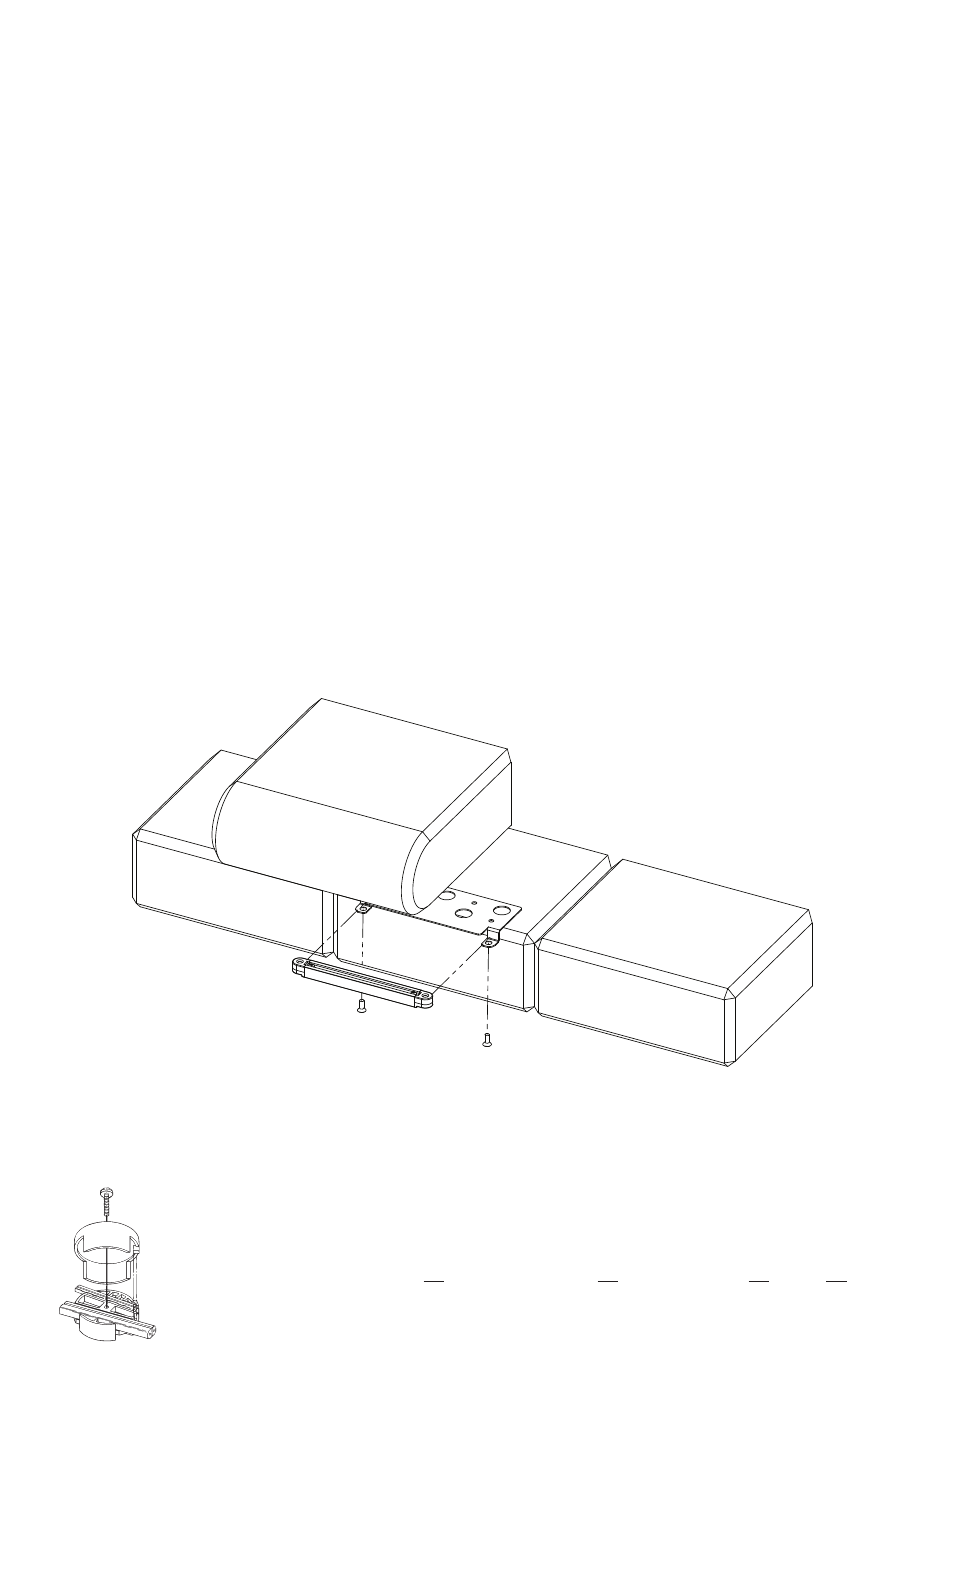
INSTALLATION OF 15745, 15746, or 15756 IN BRICK or MASONRY WALL
(SEE FIG. A)
1) Turn off power.
2) Determine the desired location for each fixture before construction of wall is started.
3) Insert stainless steel mounting plate in between layers of hardscape material. The use of adhesive or mortar (not provided) to secure the fixture in
place is optional.
4) Route the fixture wire through the wall to the main low voltage supply cable using standard masonry procedures. A “V” shaped notch can be cut into
the hardscape material to aide in wire management if desired.
5) Attach fixture to bracket using screws provided.
6)
Connect fixture wires to main low voltage supply cable using the connector(s) provided.
FIG. A
Date Issued: 6/25/10
IS-15745-CB
WARRANTY
WE WARRANT THE LANDSCAPE PRODUCTS FEATURED IN OUR LANDSCAPE LIGHTING CATALOG (WITH THE EXCEPTION OF LIGHT BULBS) FOR FIVE YEARS AGAINST
DEFECTS IN MATERIALS AND WORKMANSHIP IF IT WAS PROPERLY INSTALLED AND FAILED UNDER NORMAL OPERATING CONDITIONS, PROVIDED IT IS RETURNED TO
THE POINT OF PURCHASE, WHERE IT WILL BE REPAIRED OR, AS IT MAY BE DETERMINED, TO REPLACE THE LANDSCAPE PRODUCT OR PARTS USED ON THAT PRODUCT.
QUIC DISC
™
WIRING INSTRUCTIONS
Turn off power.
The full length of the 18 GA fixture wire may be used to connect with the 10 GA or 12 GA cable provided the following conditions are
met:
• Wiring is to be protected by routing close to the fixture or accessory or secured to a building structure such as house or deck.
• 18 GA fixture wiring is to be cut off so that it is attached to the connector within 6 inches of the fixture or building structure.
• If it is necessary to make the connections underground, then no more than 6 inches of the 18 GA fixture wire is to be buried.
The Quic Disc
™
connector is designed to install one fixture and accommodates one 18 GA fixture wire and one 10 GA or one 12 GA
supply wire.
Place the 10 gauge supply wire across the area marked 10 GA on Quic Disc
™
or place the 12 gauge supply wire across the area
marked 12 GA on Quic Disc
™
.
Place the 18 gauge fixture wire across the area marked 18 GA on the Quic Disc
™
. After the wires are in place, connecta the top of the
Quic Disc
™
to the base with supplied screw, making sure that the wires remain flat in the bottom portion of the Quic Disc
™
, and the
screw is tightened all the way down.
The copper contacts will automatically pierce the wires’ insulation. Excess 18 GA fixture wire that sticks out the end of the Quic Disc
™
is to be cut off.
Make no other wiring connections to the 18 GA fixture wire.
OUTDOOR USE ONLY
DOM ETRE INSTALLE A L’EXTERIEUR
INSTRUCTIONS
For Assembling and Installing Fixtures in Canada
Pour L’assemblage et L’installation Au Canada