Kichler 16202 Manuel d'utilisation
Luminaires Kichler
FOR USE WITH LANDSCAPE LIGHTING SYSTEMS ONLY.
1) The device is accepted as a component of a landscape lighting system
where the suitability of the CSA or UL labeled combination shall be
determined by CSA, UL respectively or the local inspection authorities
having jurisdiction.
2) Fixture shall be connected to an extra low voltage transformer approved
for use with landscape lighting systems.
3) This fixture is to be connected to a secondary wiring of the following
type:
12 GA 60°C minimum type;
SPT-3 suitable for outdoor use; or
approved landscape lighting cable.
4) WARNING: This fixture is not to be installed within 10 feet (3M) of a pool,
spa or fountain.
5) Wiring connections must be made with approved/listed wire connection
device(s) suitable for the application. Do not exceed manufacturers’ wiring
combination specifications for size and quantity of conductors.
CAUTION
WHEN INSTALLING KICHLER LANDSCAPE LIGHTING (LINE VOLTAGE OR LOW VOLTAGE),
CARE SHOULD BE TAKEN TO KEEP CLEAR OF POTENTIALLY COMBUSTIBLE MATERIALS.
WHEN MAINTAINING THE FIXTURES, BE SURE TO REMOVE LEAVES, PINE NEEDLES,
GRASS CLIPPINGS, MULCH, OR ANY DEBRIS THAT HAS ACCUMULATED ON THE LIGHT
BULB, LENS, OR BODY OF THE FIXTURE.
ASSEMBLY AND INSTALLATION
1) Determine desired location for mounting fixture.
2) At desired location, hammer stake into ground. To avoid damage to stake,
place a board on top of stake while hammering. If ground is hard and
stake is difficult to install, make a crosscut in ground using a flat shovel.
3) Clear away area in ground at wireway slot in top of stake.
4) Lay 12V cable into wireway slot and screw fixture into stake. Aim fixture
in desired direction and secure by tightening locknut. If necessary, use
wrench or pliers for final tightening of nut.
5) Adjust angle of accent light by loosening Phillips head screw.
6) Adjust angle of cowl by loosening thumb screw.
7) TURN OFF POWER.
8) First connect the green ground wire from fixture to the 120V supply ground
wire.
9) Make remaining wire connections (connectors not provided). Reference
chart for correct connections and wire accordingly.
A UTILISER UNIQUEMENT POUR LES SYSTÈMES D’ÉCLAIRAG PAYSAGER
1) Le dispositif est accepté en tant que composant d’un système d’é
clairage paysager lorsque la compatibilité de la combinaison étiquetée
UL ou CSA (ACNOR) doit être déterminée par CSA, UL respectivement
ou les autorités d’inspection locales ayant compétence.
2) L’appareil doit étre connecté à un transformateur supplémentaire à
basse tension approuvé pour une utilisation avec les systémes
d’éclairage paysager.
3) Cet apareil doit étre connecté à un câblage secondaire du type suivant:
12GA 60°C type minimum;
SPT-3 combatible pour utilisation extreme;
ou câble d’éclairage paysager agréé.
4) AVERTISSEMENT : Ne pas installer le luminaire dans les 3 m d’une
piscine, spa ou fontaine.
5) Les raccordements des câbles doivent être effectués avec des dispositifs
pour raccordement de câble adaptés à l’application. Respecter strictement
les spécifications de combinaisons de câble du fabricant pour la taille et la
quantité de conducteurs.
ATTENTION
LORS DE L’INSTALLATION D’ECLAIRAGE DE JARDIN KICHLER 9TNESION DU SECTEUR OU
BASSE TENSION), PRENEZ SOIN DE LE MAINTENIR DEGAGE DE TOUT MATERIAU
COMBUSTIBLE.
LORS DE L’ENTRETIEN DE LA LAMPE, ASSUREZ - VOUS DE RETIRER LES FEULLES, LES
AIGUILLES DE PIN, LES BRINS D’HERBE, L’HUMUS, ET TOUT DEBRIS QUI S’EST ACCUMULE
SUR L’AMPOULE DE LA LAMPE, LE DIFFUSEUR OU LE CORP DE LA LAMPE.
MONTAGE ET INSTALLATION
1) Déterminer l’emplacement où installer le luminaire.
2) Planter le poteau dans le sol. Pour éviter d’endommager le poteau avec le
marteau, poser dessus un morceau de bois. Si le sol est très dur, faire
deux entailles en croix dans le sol avec une pelle plate.
3) Dégager le sol au niveau de la fente guide-fils située sur la partie
supérieure du poteau.
4) Passer le fil de 12 V dans la fente guide-fils et visser le luminaire sur le
poteau. Diriger le luminaire dans la direction souhaitée et fixer en serrant
un contre-écrou.. Si besoin, utiliser des clés ou des pinces pour le serrage
final de l’écrou.
5) Ajuster l’angle de la lumière accentuation en desserrant la vis à tête
Phillips.
6) Régler l’angle du capot en desserrant la vis à tête moletée.
Date Issued: 3/30/12
IS-16202-CB
OUTDOOR USE ONLY
DOM ETRE INSTALLE A L’EXTERIEUR
INSTRUCTIONS
For Assembling and Installing Fixtures in Canada
Pour L’assemblage et L’installation Au Canada
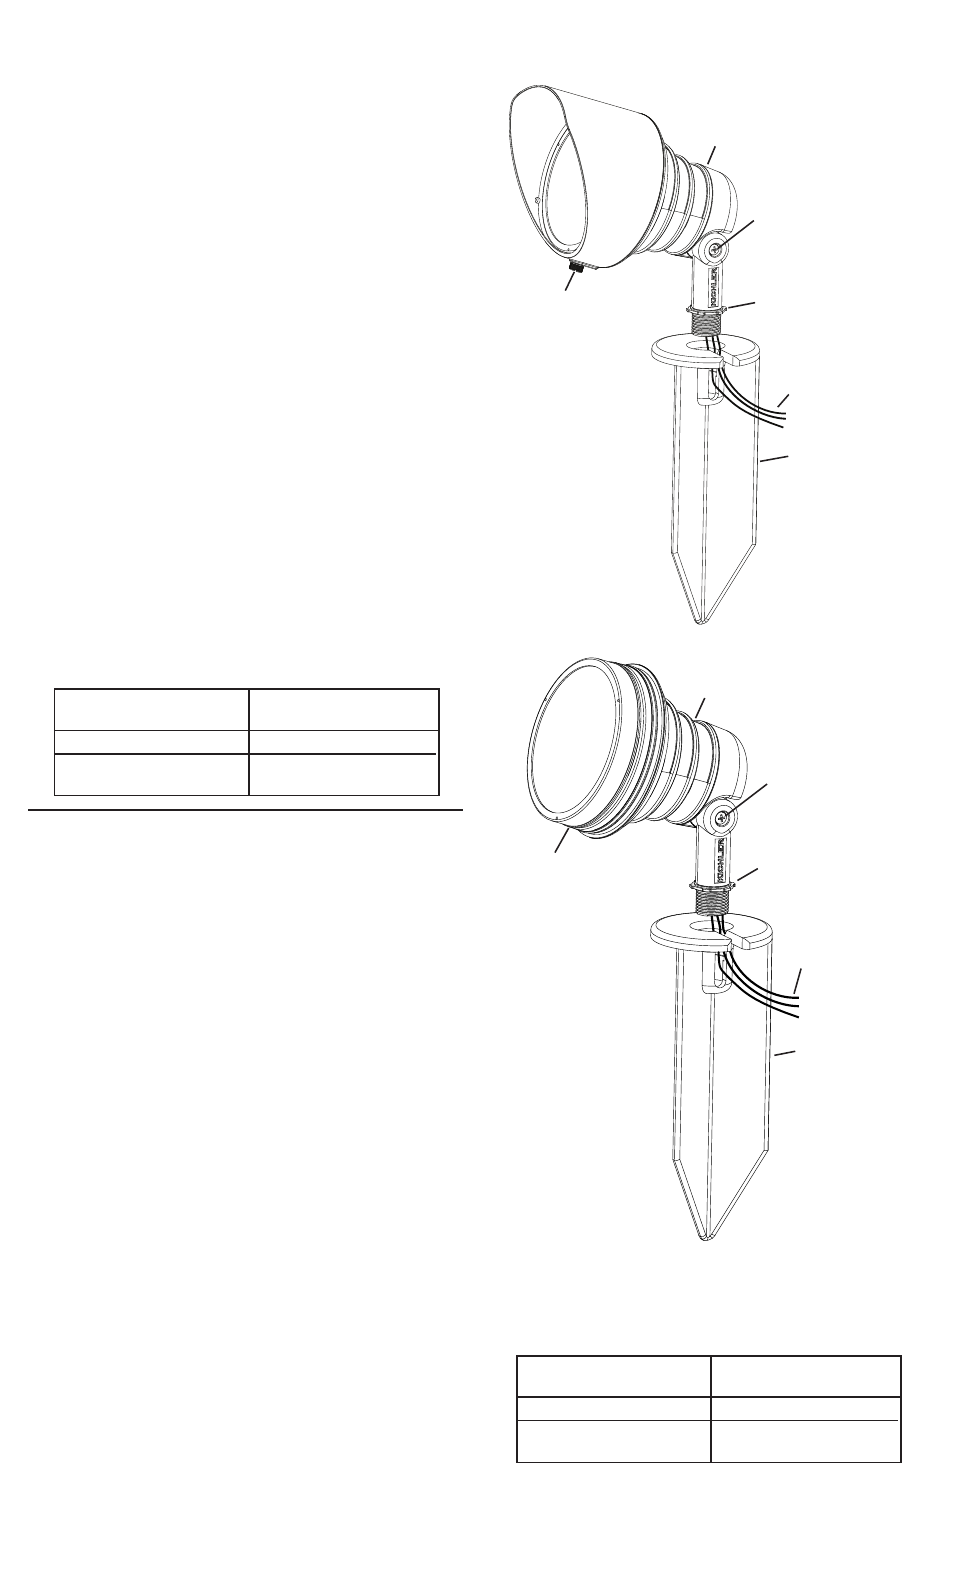
FIXTURE
LUMINAIRE
LOCKNUT
CONTRE-ÉCROU
STAKE
POTEAU
For warranty information please visit: http://www.landscapelighting.com/portal/warranty_page
Pour de plus amples informations sur la garantie, cliquez sur le lien ci-dessous : http://www.landscapelighting.com/portal/warranty_page
FIXTURE
LUMINAIRE
LOCKNUT
CONTRE-ÉCROU
STAKE
POTEAU
PHILLIPS HEAD SCREW TO
ADJUST ANGLE OF FIXTURE
VIS À TÊTE PHILLIPS POUR
AJUSTER L’ANGLE
DU LUMINAIRE
PHILLIPS HEAD SCREW TO
ADJUST ANGLE OF FIXTURE
SERRER LA VIS POUR
AJUSTER L’ANGLE
DU LUMINAIRE
THUMB SCREW TO ADJUST
ANGLE OF COWL OR TO
LOOSEN AND REMOVE COWL
VIS À OREILLES POUR
RÉGLER L’ANGLE DU
CAPOT OU POUR
DESSERRER ET ENLEVER
SHOWN WITH OPTIONAL
COWL REMOVED
ILLUSTRATION SANS
LE CAPOT
WIRE LEAD
CONDUCTEUR DE FIL
WIRE LEAD
CONDUCTEUR DE FIL
Connect Black or
Red Supply Wire to:
Connect
White Supply Wire to:
Black
White
Insulated wire (other than green)
with copper conductor
Insulated wire (other than green)
with silver conductor
Connecter le fil noir ou
rouge de la boite
Connecter le fil blanc de la boîte
A Noir
A Blanc
Fil isolé (sauf fil vert) avec
conducteur en cuivre
Fil isolé (sauf fil vert) avec
conducteur en argent
7) COUPER LE COURANT D’ALIMENTATION.
8) Connecter d’abord le fil de terre vert du luminaire au fil de terre
d’alimentation de 120 V.
9) Effectuer le raccordement des fils restants (connecteurs non fournis). Se
reporter au tableau pour les connexions appropriées et acheminer les fils
selon les instructions.