Kichler 10325 Manuel d'utilisation
Luminaires Kichler
GND
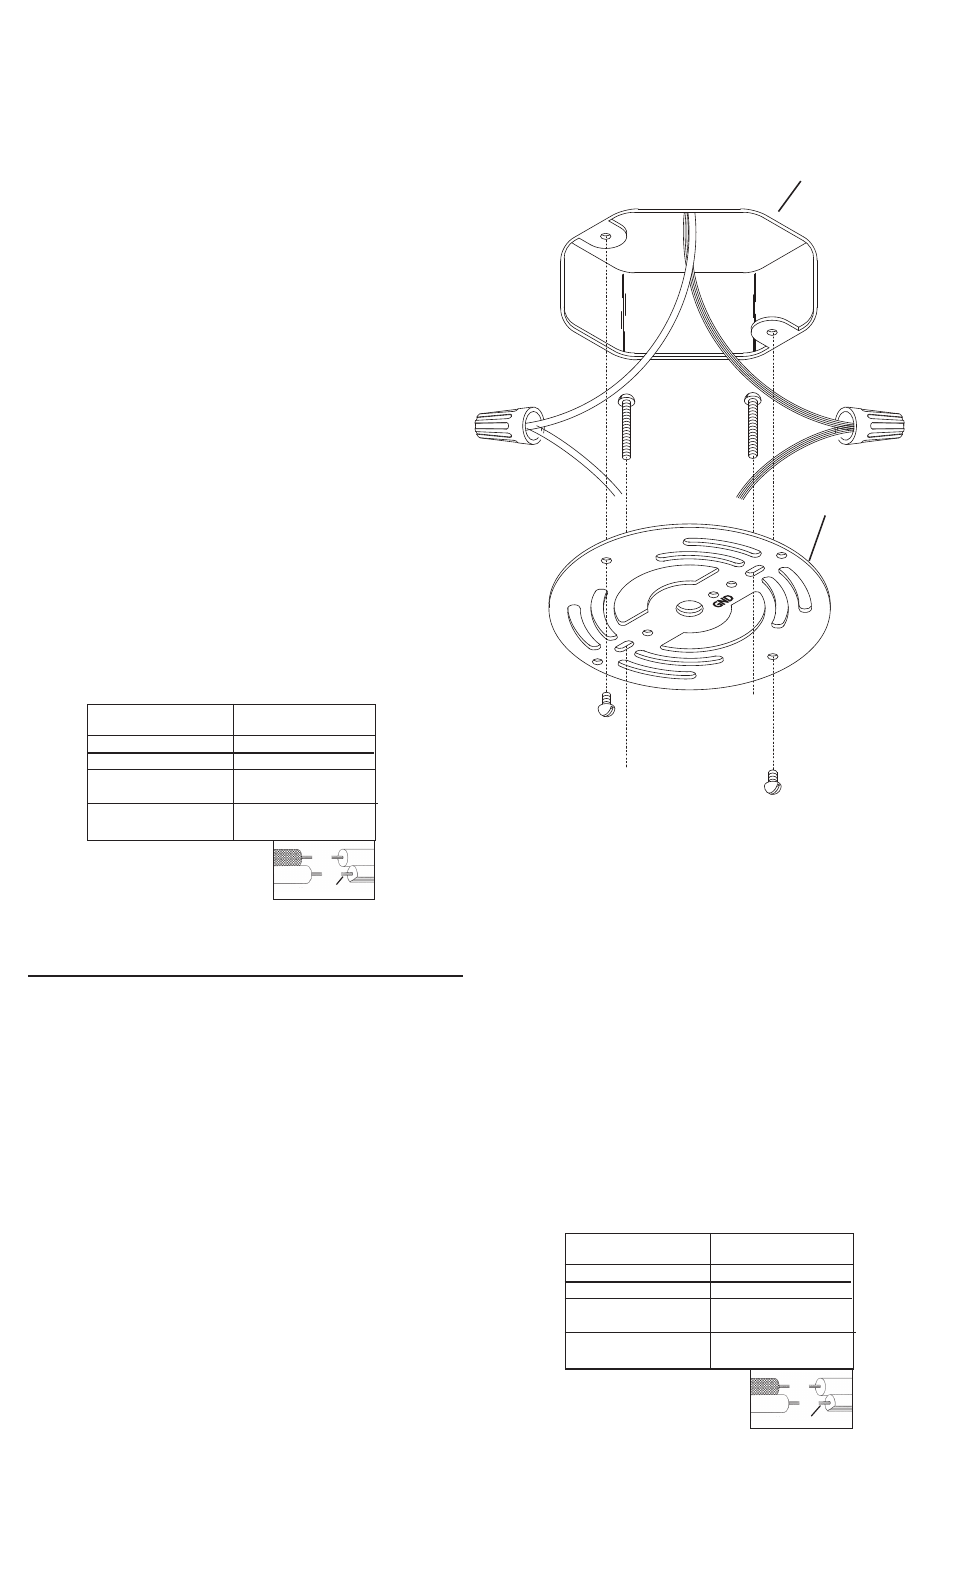
OUTLET BOX
BOîTE à prisEs
1) read and understand all instructions and illustrations completely before
proceeding with assembly and installation of this fixture.
2) if you have any doubts about how to install this lighting fixture, or if the
fixture fails to operate completely, please contact a qualified licensed electrical
contractor.
3) All parts must be used as indicated in these instructions. Do not substitute
any parts, leave parts out, or use any parts that are worn out or broken.
Failure to obey this instruction could invalidate the UL listing, C.s.A. certification,
and/or ETL listing of this fixture.
4)
IMPORTANT: Before you start, NEVEr attempt any work without shutting
off the electricity until the work is done.
a)
Go to the main fuse, or circuit breaker, box in your home. place the
main power switch in the “OFF” position.
b)
Unscrew the fuse(s), or switch “OFF” the circuit breaker switch(s),
that control the power to the fixture or room that you are working on.
c)
place the wall switch in the “OFF” position. if the fixture to be re
placed has a switch or pull chain, place those in the “OFF” position.
5) Find the appropriate threaded holes on mounting strap. Assemble mounting
screws into threaded holes.
6) Attach mounting strap to outlet box. (screws not provided) Mounting strap
can be adjusted to suit position of fixture.
7) Make wire connections (connectors not provided.) reference chart below
for correct connections and wire accordingly.
8) push fixture to ceiling, carefully passing mounting screws through holes.
9) secure fixture to ceiling with threaded balls.
CAUTION: BAllAsT MUsT Be RePlACed By A QUAlIfIed eleCTRI-
CIAN.
1) Lire et comprendre toutes les instructions et illustrations avant de procéder
au montage et à l’installation du luminaire.
2) En cas de doute sur l’installation de ce luminaire, ou si le luminaire ne
fonctionne pas correctement, prière de contacter un électricien agréé.
Connect Black or
Red Supply Wire to:
Connect
White Supply Wire to:
Black
White
*Parallel cord (round & smooth)
*Parallel cord (square & ridged)
Clear, Brown, Gold or Black
without tracer
Clear, Brown, Gold or Black
with tracer
Insulated wire (other than green)
with copper conductor
Insulated wire (other than green)
with silver conductor
*Note: When parallel wires (SPT I & SPT II)
are used. The neutral wire is square shaped
or ridged and the other wire will be round in
shape or smooth (see illus.)
Neutral Wire
Date issued: 6/11/10
is-10325-CB
INSTRUCTIONS
For Assembling and Installing Fixtures in Canada
Pour L’assemblage et L’installation Au Canada
3) Utiliser toutes les pièces selon les instructions. Ne pas substituer de
pièces, exclure certaines pièces du montage ou se servir de pièces
usées ou endommagées. Le non respect de ces instructions risque
d’annuler l’homologation UL, le certificat C.s.A. ainsi que l’homologation
ETL de ce luminaire.
4)
IMPORTANT: TOUJOUrs couper l’électricité avant de commencer le
travail.
a)
Localiser le coffret à fusibles ou le disjoncteur du domicile. Mettre
l’interrupteur principal en position d’Arrêt.
b)
Dévisser le ou les fusibles (ou mettre le disjoncteur sur Arrêt) qui
contrôlent l’alimentation vers le luminaire ou la pièce dans laquelle
le travail est effectué.
c)
Mettre l’interrupteur mural en position d’Arrêt. si le luminaire à
remplacer est doté d’un interrupteur ou d’une chaîne connectée à
l‘interrupteur, placer ces éléments en position d’Arrêt.
5) Trouver les trous filetés appropriés sur le support de montage. Visser les
vis de montage dans les trous taraudés.
6) Fixer le support de montage sur la boîte à prises. (Vis non fournies).
Le support de montage peut être réglé afin de positionner correctement
le luminaire.
7) Connecter les fils (connecteurs non fournis). se porter au tableau ci-
dessous pour faire les connexions.
8) pousser le luminaire vers le plafond en passant soigneusement les vis
de montage par les trous.
9) Fixer le luminaire au plafond à l’aide des boules filetées.
ATTeNTION : le BAllAsT dOIT êTRe ReMPlACé PAR UN éleC-
TRICIeN CeRTIfIé.
Connecter le fil noir ou
rouge de la boite
Connecter le fil blanc de la boîte
A Noir
A Blanc
*Au cordon parallèle (rond et lisse)
*Au cordon parallele (à angles droits el strié)
Au bransparent, doré, marron, ou
noir sans fil distinctif
Au transparent, doré, marron, ou
noir avec un til distinctif
Fil isolé (sauf fil vert) avec
conducteur en cuivre
Fil isolé (sauf fil vert) avec
conducteur en argent
*Remarque: Avec emploi d’un fil paralléle
(SPT I et SPT II). Le fil neutre est á angles
droits ou strié et l’autre fil doit étre rond ou
lisse (Voir le schéma).
Fil Neutre
MOUNTiNG sTrAp
sUppOrT DE MONTAGE
WARNING:
• This fixture is intended for installation in accordance with the National Electric
Code (NEC) and all local code specifications.
• Oils from skin may damage the optic surface. Gloves should be worn when
handling the optic. if gloves are not worn, the optic should only be handled
by the outer rim and never the surface.
• This lighting fixture is for indoor use only.
• Do not touch hot LED, or metal head.
• Use ONLY the supplied LED driver to power fixture.
• Driver cable is not intended for use through or concealed behind walls,
floors, or ceilings.
• Do NOT operate fixture if any light heads are not operating or operating
improperly or fixture could be further
damaged. replace circuit board(s) as required before operating fixture.
• The LED light output is strong enough to injure human eyes. Precautions
must be taken to prevent looking directly at the LED’s with unaided eyes for
more than a few seconds
dIMMING: The LED driver is compatible with standard incandescent dimmers.
For optimal performance, a low-voltage electronic dimmer should be used.
CleANING: Always be certain that electric current is turned off before cleaning.
• Optic Lens: Do not clean optic unless required. Only a soft damp cloth
should be used, other cleaning products may damage the optic.
AVeRTIsseMeNT :
• Ce luminaire doit être installé conformément aux codes d’électricité
nationaux (NEC) et satisfaire toutes les spécifications des codes locaux.
• Les huiles de la peau peuvent endommager la surface optique. Porter des
gants pour manipuler les composants optiques. sans gants, manuipuler les
composants optiques sont manipulés uniquement par la bordure externe et
jamais par la surface.
• Ce luminaire doit être utilisé à l’intérieur uniquement.
• Ne pas toucher les LED chaudes ni la tête métallique.
• Utiliser UNIQUEMENT la commande LED fournie pour le luminaire.
• Le câble de la commande ne doit pas être utilisé par ou derrière des parois,
sols ou plafonds..
• NE PAS utiliser le luminaire si des têtes de lumière ne fonctionnent pas ou
fonctionnent incorrectement sous risque d’endommager le luminaire.
remplacer le ou les cartes de circuits selon les besoins avant d’utiliser le
luminaire.
• L’intensité de la lumière des LED peut endommager les yeux. Prendre
toutes les précautions nécessaires pour ne pas regarder directement dans
les LED sans protection pendant plusieurs secondes.
GRAdATeUR: La commande LED est compatible aux gradateurs incandes-
cents standard. pour une performance optimale, utiliser des gradateurs
électriques à basse tension.
NeTTOyAGe : Toujours veiller à ce que le courant électrique soit coupé avant
de nettoyer.
• Lentille optique: ne pas nettoyer la lentille optique à moins que cela soit
requis. Utiliser uniquement un chiffon doux trempé. Tout autre produit de
nettoyage pourra endommager les composants optiques.